Pages

Showing posts with label Bella Toile. Show all posts

Tuesday, 19 July 2011

Shabby chic Bella Toile

At the Make My Monday challenge site this week they're looking for shabby chic cards involving tearing and crumpling. Hmm. Sounds like a normal day in my crafting square metre! Well, I had a little think and came up with this:


I made a background with the fabulous Bella Toile background stamp using Pear Pizzazz ink then masked the edges and sponged Blushing Bride ink over it. I've only recently discovered Blushing Bride, which is one of this year's in-colours, and I love it - it's a pale coral really, not sugar pink at all.


A Blushing Bride paper was used to make my torn and crumpled flowers. The paper is from a big designer paper stack which is just one of the options you can choose as a free gift with an order of £150 or more - and you get to choose other freebies too!


The flowers are really easy to make: you just tear rough circles out of the paper, crumple them up and open them out again, layer them up and secure them with a brad. I used these gorgeous circle ice jewel brads - they come in a mixture of sizes and colours - turquoise, pale blue, lilac and green. I love the way the flowers look with the leaves from the Little Leaves die.


I used my favourite Confetti Cream card stock again and the Bella Toile background stamped beautifully onto it. This sentiment from Sincere Salutations seemed ideal to layer over the top.


Supplies needed for this card:
Stamps: Bella Toile, Sincere Salutation
Ink: Pear Pizzazz, Blushing Bride, Always Artichoke
Card stock: Confetti Cream, Pear Pizzazz, Always Artichoke
Other: In colour designer paper stack (hostess gift), Circle Ice rhinestone brads, Little Leaves die, Eyelet border punch
You can buy any of these supplies from me and I can have them delivered to your address in the UK. Just send me an email or give me a call on 01280 820593.

Friday night was a hectic night for me. All the children were doing different activities and I'd scheduled meals and car journeys with military precision. After a lot of to-ing and fro-ing, my final task of the night was to collect my daughter and some of her friends from the cinema in a nearby town where they'd been watching the final Harry Potter film. It was nearly midnight when we got home and I was tired. But my spirits lifted when I opened the door and found this note on the rug from my youngest son.


Aaaaah! I really am blessed.

I feel very lucky to have you visiting me and leaving comments for me too, so thank you, and a very big welcome to my new followers. I'll be back here tomorrow with a handy way of making bees and other flying creatures. Do come back and see what I've been up to!

Tuesday, 15 March 2011

Cards using Notably Ornate

Have you seen the Notably Ornate stamp set on page 65 of the Idea Book and Catalogue? It contains four stamps all of which are extremely useful: the 'take note' stamp can be cut out with the large oval punch; and the 'just because' stamp is an ornate box that can hold other sentiments using a marker and a stamp-a-majig. But my favourites are the beautiful frame image and the bird in flight.

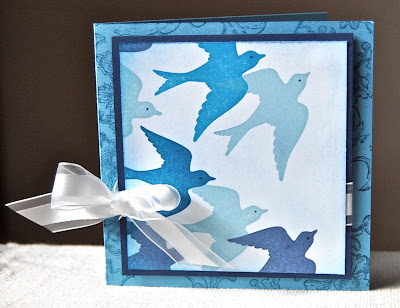
Today I have a few projects to show you using the bird stamp. Let's start with this feminine little number:

The focal panel is simply stamped in four different blues to look as if a flock of swallows has just flown in. I mounted it onto a darker, stamped card base to emphasise its lightness and added an airy Organza ribbon. I didn't add a sentiment because it would have interfered with the birds, but it could always be added inside the card.

Here's how to make this card:
  • Cut an 8.5cm square of Whisper White card stock. Stamp a design of birds using Baja Breeze, Pacific Point, Not Quite Navy and Night of Navy inks. Sponge the card stock lightly with Bashful Blue ink.
  • Add eyes to the birds with a Night of Navy marker.
  • Tie a piece of Organza ribbon round a 9cm square of Night of Navy card stock and finish in a bow. Glue the stamped panel onto this.
  • Cut a 21cm x 10.5cm piece of Marina Mist card stock. Score and fold in half to make a card base. Stamp the front with the Bella Toile background stamp. Attach the stamped panel to the card front using dimensionals.

Supplies
Stamps: Notably Ornate, Bella Toile
Ink: Baja Breeze, Pacific Point, Not Quite Navy, Night of Navy, Bashful Blue
Card stock: Marina Mist, Night of Navy, Whisper White
Other: Organza ribbon, Night of Navy marker

Here's another card made with a similar design - a one-layer card this time. 


This time I did add a sentiment. Do you recognise it? Yes it's from a free sale-a-bration set! Sadly, this promotion has now finished but you can still grab a bargain in the March Frenzy sale - where selected products have up to 30% off! Click here for details.


I wrapped a little present in copier paper, stamped to match the card, and tied it up with Real Red 1/4" grosgrain ribbon. The tag is simply a bird stamped onto Whisper White card stock, cut out with sharp paper snips and tied onto the gift with linen thread.

What a versatile image that bird stamp is! You've certainly not seen the last of Notably Ornate on my blog - I love it! As always, if you'd like to see other cards I've made with this - or with any set I use, just check out the index on my side bar. And if you have any questions or would like to make an order with me, do drop me an email or give me a ring on 01280 820593.

Thank you for visiting my blog today and I hope you have a lovely day!

Thursday, 10 March 2011

Three Minute Thursday - note cards using Bella Toile

Hello - welcome to Three Minute Thursday! If you are short of time and want to make beautiful cards in just a few minutes, you've come to the right place!

When today's project came into my head, I couldn't concentrate on anything else until I'd seen what it looked like! It's a set of note cards using the amazing background stamp Bella Toile - and each card takes literally one minute to make!


Some background stamps are strong enough to take centre stage and Bella Toile is one of them. I love the effect you get with it using tone-on-tone stamping.


Here's a close-up of one of the cards. The card base is a piece of A5 Crumb Cake card stock, scored and folded in half. I used Early Espresso ink and stamped the image leaving a 2cm strip of clear card stock at the bottom - the perfect place to stamp my sentiment! TIP: When inking up a large background stamp, let it lie on its back, rubber side up, and tap the ink pad down onto it. When stamping, make sure you put pressure on the centre of the stamp to get an even impression.


The colours I chose are: Certainly Celery with Old Olive ink; So Saffron with More Mustard ink; Marina Mist with Night of Navy ink; Crumb Cake with Early Espresso ink; and Riding Hood Red with Cherry Cobbler ink. Each card is stamped with a different sentiment.

Although it would obviously take longer than three minutes to make the full set of five, it is incredibly fast. So I thought you might like to see a quick way of presenting them as a gift set too.


I've just held them together with a simple belly band. Here's how to make it:

  • Cut a 23cm x 8cm piece of Very Vanilla card stock and score at 10.5cm, 11cm, 21.5cm and 22cm.
  • Scallop both long sides with the scallop border punch, then make a crisp fold at each score line with a bone folder.
  • Use Sticky Strip on the 1cm tab at the end of the card stock and form the belly band.
  • Cut a 23cm x 5.5cm piece of Very Vanilla Patterns designer paper and, with the cards inside the belly band to keep it firm, fold the paper round the belly band. Stick it down with Snail adhesive. TIP: I find it's easiest to start at one end, sticking each section down before moving on to the next.
  • Tie a piece of Very Vanilla taffeta ribbon round the belly band and finish with a 'handcrafted' tag tied on with linen thread.

Supplies
Stamps: Tiny Tags
Ink: Early Espresso
Card stock: Very Vanilla
Other: Patterns designer paper, scallop border and jewellery tag punches, Very Vanilla taffeta ribbon, linen thread


When making gifts like this it's a lovely idea to add a tag to show that it's hand-crafted. The tiny tags stamp set and coordinating punch are brilliant for doing this.

Thank you for joining me today. I'm going to dash off now because a UPS delivery man has just handed me a parcel containing something SO exciting I think I might burst! It's something that will appear in the new mini catalogue, coming out on the first of April, but I'm not allowed to say what it is! All will be revealed at my Open House on Thursday 31st March... watch this space for details!

That might seem a long time away but don't worry! I have something special to share with you tomorrow too! Hope you can join me then,