Pages

Showing posts with label Mixed Medley. Show all posts

Thursday, 10 January 2013

Three minute Mixed Medley valentine

It's nearly the end of the road for the winter seasonal catalogue so if there are items you really want, please don't leave it too late to order! There really are some amazing goodies in there and one of my favourites is the hostess set Mixed Medley. It's one of those sets that's a bit of an all-rounder - I've made halloween and Christmas cards with it and it's brilliant for little tags like this one or this.

Today I used it to make a valentine for my regular Three Minute Thursday slot - come and see:


I stamped the leaf from Summer Silhouettes and added the word 'Valentine' using my stamp-a-majig to get it exactly where I wanted it.  I love the way the 'v' fits into the space between the leaf and the stem and had to dance round the room hooting for a bit! Then I added the stylised flower:


This beautiful heart frame from Mixed Medley fits the small scallop circle punch perfectly so it was really quick to stamp and punch out. The 'Be mine' stamp from the same set fits neatly in the centre and cuts out efficiently with the 3/4" circle punch. I layered it on using a dimensional for a bit of interest.

And talking about valentines, don't forget that Stampin' Up have commissioned an exclusive valentine set as part of its 25th anniversary. It costs just £9.95 and you get a Sealed with Love kit for free when you buy it. I think it would make a lovely valentine's gift for a girl and would make a change from chocolate or sweets. Get all the details here!

Here's what you'll need to make today's card
Stamps: Summer Silhouettes, Mixed Medley, Delightful Dozen (sentiment)
Ink: Lucky Limeade, Primrose Petals, Raspberry Ripple
Card stock: Very Vanilla
Other: Small scallop circle and 3/4" circle punches, markers, stamp-a-majig
I'd be delighted to order any of these items for you and have them delivered straight to your address in the UK. I'm committed to providing excellent customer service and am always happy to offer help and advice. To place your order, just send me an email or give me a call on 01280 820593.
• I still have a few places available for my Stampers 6 club in February and you'd be welcome to join in. With the Sale-a-bration promotion coming up and a new mini catalogue coming out soon, it's a great way to buy your wish list gradually and get lots of freebies too! Email me here to reserve your place.

So there we are - three minutes to say 'be mine Valentine'! You could make a whole batch of these and send them to your local rugby team! Er, on second thoughts better not...!

See you tomorrow for more crafting fun!

Thursday, 20 December 2012

Three Minute snowflake cards

If you're anything like me, you'll be congratulating yourself on being wonderfully organised about Christmas and then suddenly realise you've run out of Christmas cards for the neighbours! Luckily, it's quick and easy to run up a batch of my three minute cards today. Come and have a look:


It's the cutting that takes most time on these cards (although if you have Stampin' Up's table top cutter, you can get everything cut in no time at all as it enables you to make accurate cuts through four or five sheets of card stock at once!)


The panel is stamped with a Cherry Cobbler sentiment and surrounded by three snowflakes from Mixed Medley stamped in Real Red ink. I mounted this onto a Cherry Cobbler mat before attaching to the Crumb Cake card base - the different reds give a bit of depth to this simple card.


To finish the card I added a tiny circle of red glimmer paper cut out with my hand held hole punch - it fits the snowflake centre perfectly.

Here's what you'll need to make this card
Stamps: Mixed Medley, Petite Pairs
Ink: Cherry Cobbler, Real Red
Card stock: Whisper White, Cherry Cobbler
Other: Red glimmer paper, hand held punch, stamp-a-majig
I'd be delighted to order any of these items for you and have them delivered straight to your address in the UK. I'm committed to providing excellent customer service and am always happy to offer help and advice. To place your order, just send me an email or give me a call on +44 (0) 1280 820593.

I don't think the British Isles are going to see any snow over the Christmas holiday this year - from the forecast it looks as if it's going to be wet instead. But even if we did see a snowflake or two, I'd be extremely surprised if they were red!

Now, it's time for me to roll my sleeves up and get cooking as we're expecting company this evening! See you tomorrow for a final post before we pull the shutters down for Christmas.
Hugs,

Wednesday, 12 December 2012

Petal Card punch box tutorial

Did you see the little box I posted here yesterday? It's so quick and easy to make and is perfect gift wrapping, not only for the glimmer mist I showed you, but also for items such as make up, perfume, crafting or stationery items, a torch, sweets, a rolled up promises voucher... well the list is endless! For those that hate the bangs of Christmas crackers, the boxes make great alternative, with plenty of room for a paper hat, a couple of jokes and a small gift.

I promised to show you how to make the box so here's my tutorial:


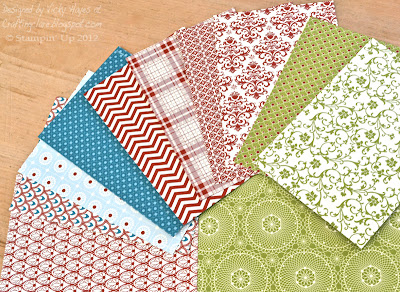
Choose a sheet of designer paper from the Festival of Prints stack - there's no need to cut it as it's exactly the right size! I love the papers in this pack - I've shown a selection of them in the photo above but there are 12 double-sided designs and you get four of each for only £6.25!


Score the paper at 2.5cm, 5cm, 7.5cm and 10cm (1", 2", 3" and 4"). Yes, I'm still using my old trimmer but my new, improved one is on its way - yippee!


Make crisp folds using a bone folder - can you see how much use mine has had?! It still works brilliantly though.


Fix the folded paper into a square tube shape using Sticky Strip - your box will never come apart if you use this!


Cut two end pieces for your box using the Petal Card double punch. This fabulous punch cuts AND scores for you! I normally recommend using Stampin' Up punches upside down so you can see where you're punching, but this one works best if you press down hard on a solid surface.


Fold the scores with a bone folder and attach one of the pieces to the bottom of the box with more Sticky Strip. For the top of the box, you need to attach one side only for a hinge effect (see photo above and below).


This is so that the recipient doesn't have to tear into the box to get to the gift! I add glue dots to the other three sides so that the box closes neatly.


Stamp a label for your box - I've used a gorgeous little tag from the fabulous little Mixed Medley hostess set which I've been finding so useful! Click here to see what else I've been making with this set.


Cut the tag out with a 3/4" punch. This is what I mean by using punches upside down - you can see exactly where you're punching if you do this.


Punch a 1" circle from Cherry Cobbler card stock and mount your stamped label onto it with a dimensional to make a tag. Pierce a hole in the tag so you'll be able to tie it onto the box.


Tie white bakers twine round the length of the box, cross it over at the base of the box and bring it back up to the top. Tie in a single knot and thread with through the tag. Finish with a bow.


Run round the house squawking with excitement, trying out different things to put in the box and squealing each time you find something new... well this last step is optional but it's quite fun and your family will all edge anxiously away from you, leaving you free to wrap up their presents without them bursting in to see what you're up to!

Here's what you'll need to make today's box
Stamps: Mixed Medley
Ink: Cherry Cobbler
Card stock: Cherry Cobbler
Punches: Petal Card double punch, 1" and 3/4" circle punches
Other: Festival of Prints designer paper stack  (p.20 of the autumn/winter mini catalogue, £6.25), white bakers twine, piercing tool and mat
I'd be delighted to order any of these items for you and have them delivered straight to your address in the UK. I'm committed to providing excellent customer service and am always happy to offer help and advice. To place your order, just send me an email or give me a call on +44 (0) 1280 820593. Check out current special offers here.

Of course this box is suitable for all the year round, not just for Christmas and I'll have one in a different style to show you on Friday. Before then though, Three Minute Thursday is coming up tomorrow and I'll have a quick punched card to show you, so do join me for that.
Hugs,


Tuesday, 11 December 2012

Stampin' Up Glimmer Mist gift idea

One thing that gives me great pleasure is working out little gifts to make and pop into the parcels of my Stampers 6 club members. Last month I sent them all an early Christmas present which I thought would come in handy for some of their festive projects - come and have a look:


This is what they found when they opened their parcels! I love this little box which I designed to hold...


... some glimmer mist! I made this by filling a Stampin' Up spritzer bottle (p.179 of the main catalogue) with 70% rubbing alcohol (available from selected chemists) and adding a couple of drops of Champagne Mist shimmer paint. This gives the most amazing shimmery effect when shaken up and sprayed on card stock, ribbon, gift wrap, the cat - actually I'm only joking about the cat, but it was touch and go as she was very curious about what was going on!


Don't the boxes look festive?! They're so easy to make - I shall be posting a tutorial tomorrow if you'd like to have a go yourself - and there'll be a list of all the things I used then.

If you love Stampin' Up products and would like to build up your collection gradually, my Stampers 6 club would be a great idea for you. Members commit to spending at least £25 a month for six months and in return they get at least £25 of free goodies of their choice, free catalogues, handmade gifts and cards and friendly and helpful one-to one service. My next club starts in January and I'm also taking names for a February start. Just email me to book your place.
PS. The club is also available as a Christmas gift!

Yesterday I kept my daughter company while she did her Christmas shopping. She had a list and calmly and efficiently bought everything on it except one thing which was unavailable. When we discovered she couldn't get it, we put our heads together, came up with another idea and bought that instead. When we'd finished shopping, we had a good old chat over a bite to eat. It was a thoroughly enjoyable experience. When I suggested making a shopping list to the boys they looked at me blankly and said they'd probably go shopping with their dad... oh well, that'll be another Christmas Eve job then! Is this a gender thing?!

Have a happy Tuesday and do pop back tomorrow for the box tutorial.


Saturday, 8 December 2012

Mixed Medley snowflakes all in a row

It's another one of those bright, frosty winter days here in Buckingham and just for a bonus I'm feeling much better today! I really do appreciate the get well messages you've been leaving for me - thank you.

I've made a fair few Christmas cards this year but another one will always come in handy, so my card for Less is More's one layer All in a Row challenge this week features a line of festive snowflakes. Come and have a look:


This is such a simple card but I love a layout with similar items in a row and it allows the colours to take centre stage. I inked up some of the snowflakes without cleaning the stamp first and that's given some subtle colour variations. (And for anyone that was considering being rude - yes I did do it on purpose!)


The only embellishment I used is a rhinestone, coloured green with a permanent marker, which I placed on the green snowflake nearest the sentiment to draw attention to it. The sentiment is a lovely bold font from the For My Family stamp set that's ideal for personalising your cards, and that beautiful snowflake is from a wonderful hostess set called Mixed Medley which contains all sorts of lovely labels and tags.

If you'd like to get your hands on any of the hostess sets but would prefer not to host a workshop, it's worth knowing that members of my Stampers 6 club are able to order these exclusive sets as well as enjoying all the other benefits of my club. Click here for more information.

Here's what you'll need to make today's card
Stamps: Mixed Medley, For My Family
Ink: Gumball Green, Tempting Turquoise,  Pacific Point
Card stock: Whisper White
Other: Basic Rhinestones, stamp-a-majig
I'd be delighted to order any of these items for you and have them delivered straight to your address in the UK. I'm committed to providing excellent customer service and am always happy to offer help and advice. To place your order, just send me an email or give me a call on +44 (0) 1280 820593. Check out current special offers here.

I'll leave you with another photo of Tuppence whose mission in life seems to be lying around looking so cute it melts my heart - well that's when she's not loudly demanding roast chicken and personal grooming, or doing the feline equivalent of yelling at the neighbours!


Have a lovely weekend and I'll be back on Monday.

Tuesday, 30 October 2012

Wrap around box tutorial

Last week I showed you this box and card made from a wonderful dotty designer paper from the Patio Party range. Well I didn't stop there! Here's another version, using a lovely wintery-looking paper from the Patterns designer paper stack (neutrals) this time:


Would you like to know how it's made? Come and have a look:


I'm going to start with a piece of Sahara Sand card stock, 4" x 4" and a piece of designer paper, 8"x 8 1/8" - don't miss out that extra 1/8" on one sided because it's important!


First I'm making a simple box by scoring 1" in from the edges all the way round the card stock.


The score lines are flattened with a bone folder and I use my lovely paper snips to cut flaps as shown above.


Rounding the corners gives a nice neat finish inside the box.


I always use Sticky strip on boxes and bags - it's so strong that I know nothing will come apart! (It's also useful for keeping bra straps in place under strappy dresses!)


Here we are - the basic box! Now for the wrap around bit!


I'm basically going to score at 2", then 3" in from the edge on three sides but on the fourth side (which should be one of the long sides, the piece that's 8 and the extra 1/8") I'm going to score at 2 1/8" and 3 1/8". This makes a nice, neat finishing flap.


All those score lines need folding crisply, so out comes the bone folder again!


I'm going to cut away quite a lot of the designer paper at this point - basically leaving just a cross shape like this:


Notice that the longest flap has had its corners rounded - that's going to be the one that shows.


Now the bottom of the box can be glued to the middle of the cross shape leaving  flaps that fit round it. The box I've shown you today is the perfect size for a brooch or other piece of jewellery - or indeed a lovely stamp from the Mixed Medley hostess set (I know lots of lovely people who would squeal if they found this under the tree!)


The box is ready for embellishing now. I used Cherry Cobbler seam binding to tie it up and the merry Christmas sentiment from Mixed Medley, which cuts out perfectly with a 3/4" circle punch, mounted onto a glittery snowflake from my Snowflake Season Simply Scrappin' kit.

Are you shocked at all the designer paper I've wasted? But of course it's not wasted - it's perfect for making a coordinating card! Come and see:


I've cut four pieces out of the designer paper waste using a square punch and arranged them in a grid. All it needs now is a gorgeous, glittery layered snowflake and some of that luscious Cherry Cobbler seam binding! I wonder if this counts as a snippets card? If it does, I think I get to frolic about in Di's Snippets playground with all the big girls! Whooopee!

Do you need any Stampin' Up goodies?
I'd be delighted to order any Stampin' Up items for you and have them delivered straight to your address in the UK, France, Deutschland, Nederland or Osterreich. I'm committed to providing excellent customer service and am always happy to offer help and advice. To place your order, just send me an email or give me a call on +44 (0) 1280 820593.

Well this has been a long post so I think it's high time I stopped rambling on and did something useful instead! I'll be back for Three Minute Thursday tomorrow when I'll have a fast Christmas card to show you. Enjoy halloween if you're celebrating it!


Friday, 26 October 2012

Polka Dot designer paper gift set

Joining Stampin' Up is even better value than usual at the moment! Until the end of November, you can add a free pack of designer paper worth £9.95/13.25€ to your starter kit AND you can get another free pack every month for the following five months! What a deal! The starter kit costs only £99/129€ and, even if you're not interested in a business venture, you may be surprised at how low the minimums are - it could be worth joining just to get discount on your own purchases. Do email me if you'd like to know more - I'm happy to give you all the information you need so you can see if it might suit you. If you already know you'd like to join, click here to join my team.

What would you do with your free designer paper? Here's a little project I made with a gorgeous bold dotty paper from the fabulous Patio Party pack:


I wanted the paper to take centre stage...


... so I just added ribbon for a bit of texture and a die-cut leaf behind the sentiment label. You can hardly see from the photo but I stamped the sentiment again and cut out the word happy to pop up for a bit of extra interest.

You can see it better in this photo - and the ruffle of the seam binding edge. I adore the combination of Always Artichoke with the gorgeous new Summer Starfruit in-colour! I made a little box to go with the card:


I like the way that on the other side of the dotty paper you catch a glimpse of cakes!


And this is how it looks when it's all done up. This wrap-around-style box is my favourite at the moment and I'll be showing you how it's made next week.

Here's what you'll need to make today's project
Stamps: Perfect Punches, Mixed Medley (for the box label)
Ink: Always Artichoke, Summer Starfruit
Card stock: Whisper White, Always Artichoke
Punches: Large oval punch, 3/4" circle punch, corner rounder
Other: Patio Party designer paper, Always Artichoke seam binding, white stitched grosgrain ribbon, bakers twine, Little Leaves sizzlits die, Big Shot
I'd be delighted to order any of these items for you and have them delivered straight to your address in the UK, France, Deutschland, Nederland or Osterreich. I'm committed to providing excellent customer service and am always happy to offer help and advice. To place your order, just send me an email or give me a call on +44 (0) 1280 820593.

When my daughter saw the project on her way in from school she told me she liked it. "It reminds me of you," she added, sailing past my desk. "In what way?" I called after her. "It's dotty!" she said and disappeared up the stairs cackling.

Have a great weekend and I'll see you very soon,

Thursday, 18 October 2012

Three minute Papaya Collage background

It's Three Minute Thursday here today, so let's talk about fast card-making! Stamping and punching has to be one of the fastest ways to make a card and I love how Stampin' Up have punches that coordinate with stamp sets. There are butterflies, birds and flowers to choose from, but the circle and square punches are also in constant use in the Crafting Square Metre. Today's card uses the 3/4" circle punch with two stamps from different sets - come and see:


When I first got my stamp-a-majig, I forced myself to use it for everything with the result that it has become a very natural part of my stamping and is now a very quick and efficient way of getting stamped images where I want them.  This background, using the lovely ornate frame image from Papaya Collage, took seconds to stamp.


The sentiment was stamped and cut out with the punch before attaching to the inside of the frame with a dimensional. Of course, I could have gone the other way and cut an aperture in the frame image... perhaps another time! I filled the other frames with the pretty snowflake/flower from Make a Mitten which I thought went rather well with the frame; I deliberately didn't decorate the centres because I wanted the sentiment to take centre stage.

Here's what you'll need to make this card
Stamps: Papaya Collage, Make a Mitten, Mixed Medley (hostess)
Ink: Elegant Eggplant
Card stock: Naturals Ivory
Other: 3/4" circle punch, stamp-a-majig
I'd be delighted to order any of these items for you and have them delivered straight to your address in the UK, France, Deutschland, Nederland or Osterreich. I'm committed to providing excellent customer service and am always happy to offer help and advice. To place your order, just send me an email or give me a call on +44 (0) 1280 820593.

My daughter and I have lots in common. One thing is that we both like zumba fitness classes (where we fondly imagine we're just dancing!) and the other is that we love mucking about with words. Here's an example of both: Yesterday, on the way to zumba, neither of us was feeling entirely up for it - she had a headache and my tummy hurt. "We're just a pair of old crocks," I said, and she immediately made snapping motions with her arms to indicate a crocodile. She always makes me laugh.

Good gracious, it's happened again - the week has galloped past! I shall be here tomorrow with more stamping fun. See you then,