I promised to show you how to make the box so here's my tutorial:
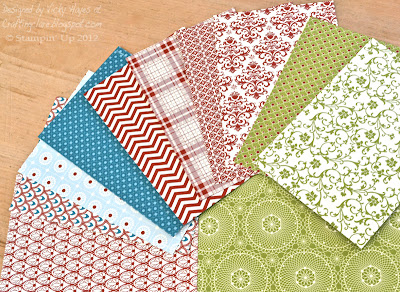
Choose a sheet of designer paper from the Festival of Prints stack - there's no need to cut it as it's exactly the right size! I love the papers in this pack - I've shown a selection of them in the photo above but there are 12 double-sided designs and you get four of each for only £6.25!
Score the paper at 2.5cm, 5cm, 7.5cm and 10cm (1", 2", 3" and 4"). Yes, I'm still using my old trimmer but my new, improved one is on its way - yippee!
Make crisp folds using a bone folder - can you see how much use mine has had?! It still works brilliantly though.
Fix the folded paper into a square tube shape using Sticky Strip - your box will never come apart if you use this!
Cut two end pieces for your box using the Petal Card double punch. This fabulous punch cuts AND scores for you! I normally recommend using Stampin' Up punches upside down so you can see where you're punching, but this one works best if you press down hard on a solid surface.
Fold the scores with a bone folder and attach one of the pieces to the bottom of the box with more Sticky Strip. For the top of the box, you need to attach one side only for a hinge effect (see photo above and below).
This is so that the recipient doesn't have to tear into the box to get to the gift! I add glue dots to the other three sides so that the box closes neatly.
Cut the tag out with a 3/4" punch. This is what I mean by using punches upside down - you can see exactly where you're punching if you do this.
Punch a 1" circle from Cherry Cobbler card stock and mount your stamped label onto it with a dimensional to make a tag. Pierce a hole in the tag so you'll be able to tie it onto the box.
Tie white bakers twine round the length of the box, cross it over at the base of the box and bring it back up to the top. Tie in a single knot and thread with through the tag. Finish with a bow.
Run round the house squawking with excitement, trying out different things to put in the box and squealing each time you find something new... well this last step is optional but it's quite fun and your family will all edge anxiously away from you, leaving you free to wrap up their presents without them bursting in to see what you're up to!
Here's what you'll need to make today's box
Stamps: Mixed Medley
Ink: Cherry Cobbler
Card stock: Cherry Cobbler
Punches: Petal Card double punch, 1" and 3/4" circle punches
Other: Festival of Prints designer paper stack (p.20 of the autumn/winter mini catalogue, £6.25), white bakers twine, piercing tool and mat
I'd be delighted to order any of these items for you and have them delivered straight to your address in the UK. I'm committed to providing excellent customer service and am always happy to offer help and advice. To place your order, just send me an email or give me a call on +44 (0) 1280 820593. Check out current special offers here.
Of course this box is suitable for all the year round, not just for Christmas and I'll have one in a different style to show you on Friday. Before then though, Three Minute Thursday is coming up tomorrow and I'll have a quick punched card to show you, so do join me for that.
Hugs,


Wonderful! Thanks for the step by step tutorial, Vicky x
ReplyDeleteThank you , thank you , for the tutorial Vicky. I am going to make these to have on the Christmas table this year. Can't wait to start! xx
ReplyDeleteI couldn't wait, so off I went and made one! lol. Here is my link, thanks for your great tutorial! http://addictedtostamps-kylie.blogspot.com.au/2012/12/inspired-by-vicky.html
ReplyDeleteYou're amazing and this is PINNED! :) HUGS!!! M xx
ReplyDeleteBrilliant tutorial Vicky, love the petal punched ends!
ReplyDeleteVal x
I have figured out that the cadbury rolls of chocolate fit perfectly!!!
ReplyDeleteGreat idea Vicky and a really easy step-by-step tutorial to follow. May have to make some of these. x x
ReplyDeleteGreat tutorial Vicky , that punch is definitely a godsend. Love the papers too so pretty and festive.
ReplyDeleteMarie
Hi vicky
ReplyDeleteThanks for the tutorial Fabby idea.....
Hugs Sylvie xxx
WOW WOW and more WOWs, love this and so clever, thanks for the tutorial.
ReplyDelete