
Hello and welcome to the official Stampin' Up weekly Artisan Design Team blog hop! Are you looking for ideas for making masculine projects? Well you've come to the right place because this week each member of the team will be inspiring you with Guy Greetings!
A WALLET FOR EVERY KIND OF GUY!
Guy Greetings has lots of lovely classic male images and lots of fun, punning greetings too. I decided to make some cards with a contemporary twist and I love the way they turned out! Come and see:

I like to make male cards that are simple but with an unusual spin - like the wallet style of these. What do you think? Would you like me to show you how to make them?! Come on then!
WALLET STYLE GUY GREETINGS CARD TUTORIAL
Start by cutting a piece of Whisper White card stock 10.5cm x 20cm (4 1/8 x 7 7/8")

Score at 5cm and 14cm (2" and 5 1/2") so it looks like the photo above. You can see I've rounded the corners of the shortest flap which will fold down at the top of the wallet. Turn the card over!
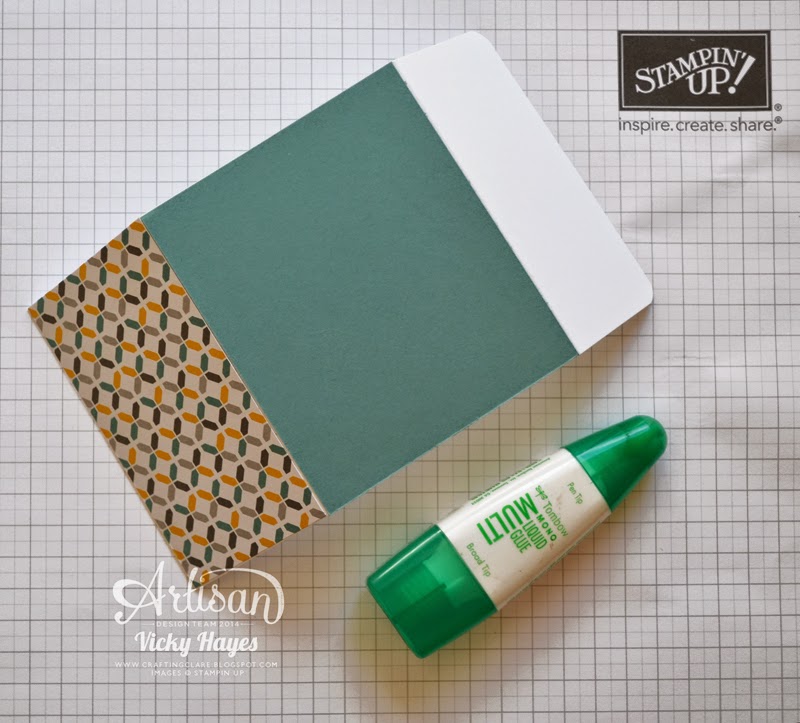
Okay, this is the back view. Cut a 6 x 10.5cm (2 3/8 x 4 1/8") piece of designer paper to fit the bottom flap and glue it on. (I've used the fab Moonlight designer paper stack which you'll find it in the Retirement Sale at just £3.13!)
Add a 9 x 10.5cm (3 1/2 x 4 1/8") piece of coordinating card stock in the middle section. TIP: Tombow wet glue is brilliant for this because it doesn't dry immediately so you have a bit of wiggle room!

Stamp one of the Guy Greetings motifs on a piece of Whisper White card stock, cut it out with a 1 3/4" circle punch and mount it on a 1 3/8" circle of contrasting card stock using dimensionals. I've fallen in love with these swish shoes and could just see Fred Astaire dancing away in them :)

When the card is folded, the designer paper bit appears on the front. Attach the circle motif to the designer paper part of the wallet, again using dimensionals, so that the top flap can tuck behind it to close it. Finish off by stamping a greeting on the top flap.
But hang on, this card won't stand up! What if you want your card to be displayed?
DISPLAY STAND FOR THE WALLET STYLE CARD
You can make a simple stand for it! Here's how:

Take a piece of card stock 10.5 x 15cm (4 1/8 x 5 7/8") and score at 1, 2, 3, 5, 7 and 11cm (3/4, 1 1/2, 2 1/4, 3 and 4"). Fold as shown above...

... making sure your fold lines are really crisp with a bone folder. Run a line of Fast Fuse where shown above and stick firmly where shown in red...

... until it looks like this!

And here are a couple of the wallet sitting neatly in their stands!
These wallet-style cards fit pretty neatly in the envelopes from Stampin' Up's pre-cut and scored note cards and if you're including a stand, I found that it's best to fold it flat and pop it inside the card to minimise bulk.

I hope you're inspired to make some of these wallet cards but there are plenty more Guy Greetings ideas from the rest of the team on this blog hop! Click the button below to visit Allison Okamitsu who has always got an amazing idea or two up her sleeve!

BUY THE SUPPLIES TO MAKE MY WALLET CARD NOW!A WALLET FOR EVERY KIND OF GUY!
Guy Greetings has lots of lovely classic male images and lots of fun, punning greetings too. I decided to make some cards with a contemporary twist and I love the way they turned out! Come and see:
I like to make male cards that are simple but with an unusual spin - like the wallet style of these. What do you think? Would you like me to show you how to make them?! Come on then!
WALLET STYLE GUY GREETINGS CARD TUTORIAL
Start by cutting a piece of Whisper White card stock 10.5cm x 20cm (4 1/8 x 7 7/8")
Score at 5cm and 14cm (2" and 5 1/2") so it looks like the photo above. You can see I've rounded the corners of the shortest flap which will fold down at the top of the wallet. Turn the card over!
Okay, this is the back view. Cut a 6 x 10.5cm (2 3/8 x 4 1/8") piece of designer paper to fit the bottom flap and glue it on. (I've used the fab Moonlight designer paper stack which you'll find it in the Retirement Sale at just £3.13!)
Add a 9 x 10.5cm (3 1/2 x 4 1/8") piece of coordinating card stock in the middle section. TIP: Tombow wet glue is brilliant for this because it doesn't dry immediately so you have a bit of wiggle room!
Stamp one of the Guy Greetings motifs on a piece of Whisper White card stock, cut it out with a 1 3/4" circle punch and mount it on a 1 3/8" circle of contrasting card stock using dimensionals. I've fallen in love with these swish shoes and could just see Fred Astaire dancing away in them :)
When the card is folded, the designer paper bit appears on the front. Attach the circle motif to the designer paper part of the wallet, again using dimensionals, so that the top flap can tuck behind it to close it. Finish off by stamping a greeting on the top flap.
But hang on, this card won't stand up! What if you want your card to be displayed?
DISPLAY STAND FOR THE WALLET STYLE CARD
You can make a simple stand for it! Here's how:
Take a piece of card stock 10.5 x 15cm (4 1/8 x 5 7/8") and score at 1, 2, 3, 5, 7 and 11cm (3/4, 1 1/2, 2 1/4, 3 and 4"). Fold as shown above...
... making sure your fold lines are really crisp with a bone folder. Run a line of Fast Fuse where shown above and stick firmly where shown in red...
... until it looks like this!
And here are a couple of the wallet sitting neatly in their stands!
These wallet-style cards fit pretty neatly in the envelopes from Stampin' Up's pre-cut and scored note cards and if you're including a stand, I found that it's best to fold it flat and pop it inside the card to minimise bulk.
Click on any item to be transported to my online shop!


If you have any queries, or prefer to speak to me, I'm happy to help.
I'll be back tomorrow with more crafting fun - see you then!

What a great idea for a card - love the custom made stand too - I'm going to have a go at making one of these! - J xx
ReplyDeleteI'm still visiting and enjoying your blog and love the wallet card.I have made it right away it is easy to make and I love it!! Going to make a few more.
ReplyDeleteSending all the best to you, love from Holland
Mimi
So good to hear from you again Mimi! Glad you've enjoyed making the wallet card - you can always rely on me for quick and easy ;)
DeleteVicky x
This is awesome and I can't wait to make it!
ReplyDeleteVicky, this is a great gift idea for those troublesome guys in our lives. I'm ok, mine can't hear me typing LOL. So glad you had a great time with Nina xxx
ReplyDeleteThese are perfect designs for presenting gift cards to the males of the family! It's hard to come up with suitable ones, and I thank you for the idea.
ReplyDeleteYou're welcome Kathy!
DeleteVicky-what a clever idea and what perfect designs for masculine cards!
ReplyDeleteNessa xxxx
These are just so perfect for guys and love the little wallet holders too...genius idea :)
ReplyDeleteJenny x