Pages

Showing posts with label tutorial. Show all posts

Wednesday, 22 July 2015

The arty fox! Acrylic block image colouring tutorial

I've been stamping with Stampin' Up's The Wilderness Awaits stamp set and have come up with a really fun arty technique for you to try. Come and see:


This fox is a real cutie isn't he?! Do you like the way I've coloured him in this abstract, watercolour style?

It's so easy to do this!

ACRYLIC BLOCK IMAGE COLOURING TUTORIAL

Here's what you'll need:

The Wilderness Awaits stamp set
Markers (I used Marina Mist, Wild Wasabi and Cajun Craze)
Stazon ink pad
Stamp-a-majig
Stampin' Up's fab new extra thick white card stock
An acrylic block (I used E)
Water in a spritzer (I used an empty Stampin' Mist bottle)

Here's what to do:


Stamp the fox onto your Stamp-a-majig imaging sheet using Stazon ink.


Turn the imaging sheet over so Foxy is facing the other way.


Place the acrylic block over the back-to-front image, so that it shows through, and roughly colour the block with markers using the image as a guide.


Spritz the block with water. I gave mine two spritzes from about 15cm (6") away - you don't want to make it too wet.


Stamp firmly onto the card stock using a surface with some 'give' - the Stampin' Pierce Mat is perfect for this. Admire the arty way the ink pools! Each time you do this you'll come up with something unique :)


Give the inky background a few minutes to dry, then ink Mr Fox up with Stazon ink and, using the stamp-a-majig, position the stamp so that the colours of the background correspond with the image. Don't worry if the colours overlap - it's all part of the arty look!


Add detail with the markers if you like, then add a greeting. See how different the images can look depending on how much water you spritz? The one on the left has more water, the one on the right has less (you can get a closer look if you click on the photo.)


So what do you think? Do you fancy having a go? Let me know how you get on won't you!


BUY THE SUPPLIES TO MAKE THIS CARD NOW!
Click on any item to be transported to my online shop!

If you have any queries, or prefer to speak to me, I'm happy to help.
You can contact me by email or phone on 01280 820593.

While I was typing up this post, my youngest son came up behind me to talk about something he needed for school. When we'd dealt with that he looked at the screen and smiled. "And now," he said in a David Attenborough voice. "Foxes!"

It's Artisan Design Team blog hop day tomorrow and you'll definitely want to come and have a look because it's all about Packaging! See you tomorrow,

Monday, 29 June 2015

Cute and trendy lace trimmed socks gift

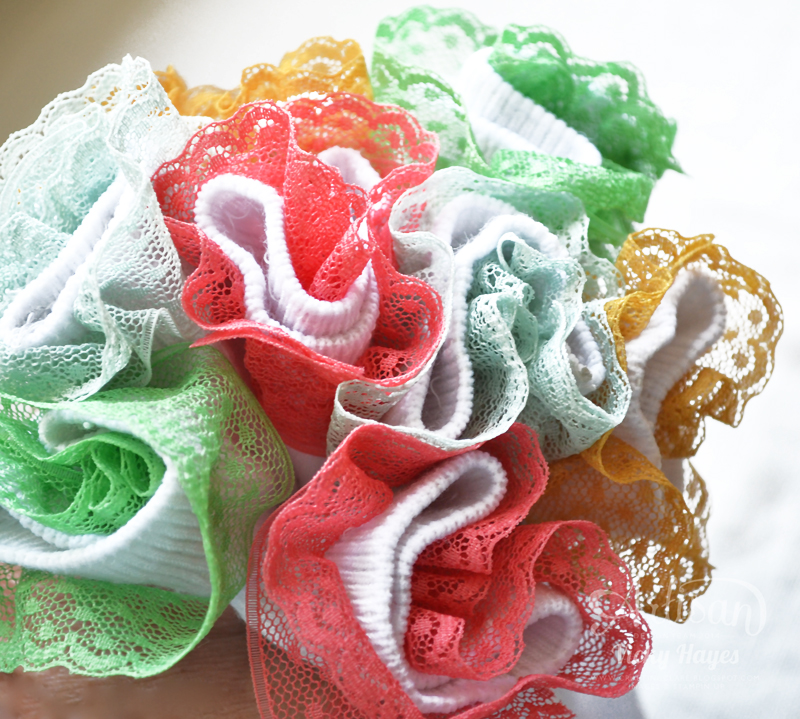
When I saw Stampin' Up's new Dotted Lace Trim in the trendy new in-colours, I immediately thought how fabulous it would look on clothing. On a scale of 1-10 my sewing skills are about -5 but these cute trimmed socks are as easy as pie and really quick to make too! Come and see:


Aren't they the cutest thing ever?! Let's take a look at them in action!


These are the socks in cool Mint Macaron but I also made them in…


Delightful Dijon,


Watermelon Wonder


and Cucumber Crush. Phew! All that leaping about and I just don’t know which is my favourite!

Would you like to know how I made these? 

LACE TRIMMED SOCKS TUTORIAL
Here’s what you’ll need:

Stampin’ Up Dotted Lace Trim
Plain white socks
Needle and white thread
An empty 1 or 1.5 litre bottle

Here’s what to do:


First fit the sock over the bottle to stretch out the top.


Wrap Dotted Lace trim round the top of the sock, overlapping by 1cm (1/2”) and pin into place.


Simply hand sew into place along the centre of the ribbon, and along the join, using a tiny stitch at the top and a longer running stitch at the back of the sock. 


Pull the sock off the bottle and finish with a few stitches at the back. Repeat the steps above for the other sock.

TIP: Make sure the join is on the inner ankle of each sock for a neat finish.


What a bouquet of socklets!


BUY THE LACE TRIM TO MAKE THESE SOCKS NOW!
Click on any item to be transported to my online shop!

If you have any queries, or prefer to speak to me, I'm happy to help.
You can contact me by email or phone on 01280 820593.

Life is a funny old business isn't it? I made these socks for my daughter, who would have been outraged if I'd suggested she wore something so girlie when she was an adorable little tot. Fast forward to 2015, and, as a student living in trendy Manchester, she was delighted with her gift!

See you tomorrow,

Thursday, 7 May 2015

Sheltering Tree faux pointillism tutorial - Stampin' Up artisan blog hop

It's Thursday, and time for another fabulous blog hop organised by Stampin' Up's crack team of artisans! You're in for a treat this week as some of the artisan designers have sneak peeks of some new and exciting products to show you!

GOING A BIT DOTTY!
I've had to contain my own excitement sadly, as my box has been delayed, but hey! it gives me the perfect opportunity to talk you through a card I made with a faux pointillism background using Sheltering Tree. Come and see:


What do you think? Would you like to know how I made it?


Okay! So, I mounted the blossom image from Sheltering Tree, inked it up with So Saffron ink and stamped my panel. TIP: Stamp off once before adding colour to the panel at first, then add more intense colour where you need it, at the bottom and round the edges.


This stylised plant from Mum's Love is gorgeous isn't it?! I used Mossy Meadow ink to stamp it over the bottom half of my panel.


This leafy in-fill stamp is perfect for adding a bit of foliage. I used a lighter green, Wild Wasabi, so that it receded into the background a little.


I coloured my plant heads in with a Tangelo Twist marker. This fabulous colour is great for adding a lovely pop of colour! When I stamped the plants, some of the stalks ended up 'floating' so I used the Mossy Meadow marker to extend them.


Sponging ink around the edges of the panel really draws the eye into the centre! I always chop my Stampin' Sponges into quarters and staple a piece of coloured card to them so that they act as handles and so that I can see at a glance what colour ink it's for.


All it needs is a sentiment... There! (I'm in love with the gorgeous ribbon fonts in the Butterfly Basics stamp set!)


I hope you've enjoyed my faux pointillism tutorial and that I've encouraged you to get artistic with Sheltering Tree.

And if you've stayed with me, bless you, because I know you're dying for some sneak peeks! Off you go and check out the excitement with Allison Okamitsu!


SHOP FOR THE SUPPLIES TO MAKE MY CARD NOW!
Click on any item to be transported to my online shop!

If you have any queries, or prefer to speak to me, I'm happy to help.
You can contact me by email or phone on 01280 820593.

Spring seems to have been interrupted by a load of wind and rain here in the heart of England! Eva is not remotely concerned by this - walkies is walkies whatever the weather! She always comes back with pretty little crimped ears when we've been walking in the rain. I come back looking as if someones stuck some colourless candy floss on my head!

See you tomorrow,

Thursday, 30 April 2015

Guy Greetings wallet cards - Stampin' Up Artisan blog hop

Hello and welcome to the official Stampin' Up weekly Artisan Design Team blog hop! Are you looking for ideas for making masculine projects? Well you've come to the right place because this week each member of the team will be inspiring you with Guy Greetings!

A WALLET FOR EVERY KIND OF GUY!
Guy Greetings has lots of lovely classic male images and lots of fun, punning greetings too. I decided to make some cards with a contemporary twist and I love the way they turned out! Come and see:


I like to make male cards that are simple but with an unusual spin - like the wallet style of these. What do you think? Would you like me to show you how to make them?! Come on then!

WALLET STYLE GUY GREETINGS CARD TUTORIAL
Start by cutting a piece of Whisper White card stock 10.5cm x 20cm (4 1/8 x 7 7/8")


Score at 5cm and 14cm (2" and 5 1/2") so it looks like the photo above. You can see I've rounded the corners of the shortest flap which will fold down at the top of the wallet. Turn the card over!


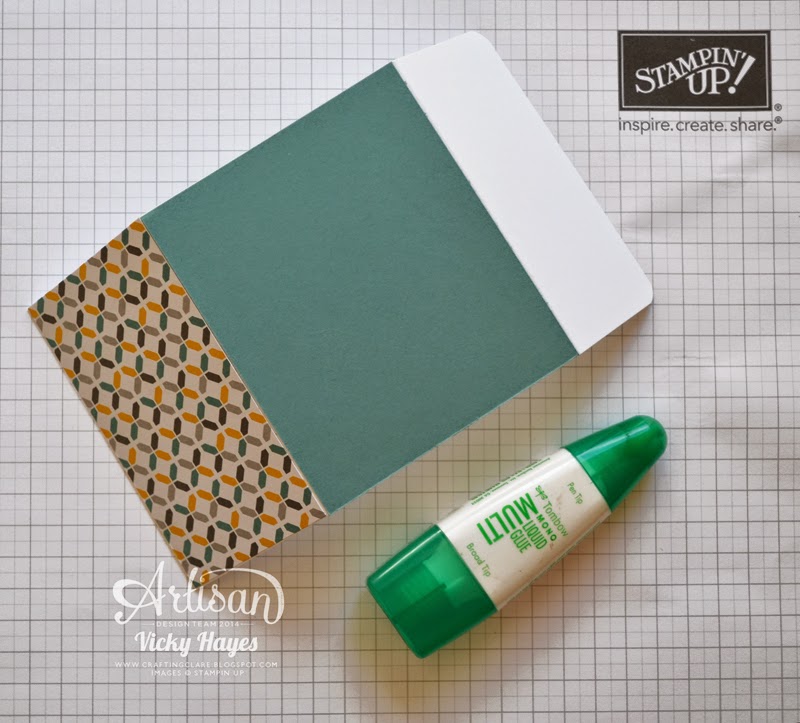
Okay, this is the back view. Cut a 6 x 10.5cm (2 3/8 x 4 1/8") piece of designer paper to fit the bottom flap and glue it on. (I've used the fab Moonlight designer paper stack which you'll find it in the Retirement Sale at just £3.13!)

Add a 9 x 10.5cm (3 1/2 x 4 1/8") piece of coordinating card stock in the middle section. TIP: Tombow wet glue is brilliant for this because it doesn't dry immediately so you have a bit of wiggle room!


Stamp one of the Guy Greetings motifs on a piece of Whisper White card stock, cut it out with a 1 3/4" circle punch and mount it on a 1 3/8" circle of contrasting card stock using dimensionals. I've fallen in love with these swish shoes and could just see Fred Astaire dancing away in them :)


When the card is folded, the designer paper bit appears on the front. Attach the circle motif to the designer paper part of the wallet, again using dimensionals, so that the top flap can tuck behind it to close it. Finish off by stamping a greeting on the top flap.

But hang on, this card won't stand up! What if you want your card to be displayed?

DISPLAY STAND FOR THE WALLET STYLE CARD
You can make a simple stand for it! Here's how:


Take a piece of card stock 10.5 x 15cm (4 1/8 x 5 7/8") and score at 1, 2, 3, 5, 7 and 11cm (3/4, 1 1/2, 2 1/4, 3 and 4"). Fold as shown above...


... making sure your fold lines are really crisp with a bone folder. Run a line of Fast Fuse where shown above and stick firmly where shown in red...


... until it looks like this!


And here are a couple of the wallet sitting neatly in their stands!

These wallet-style cards fit pretty neatly in the envelopes from Stampin' Up's pre-cut and scored note cards and if you're including a stand, I found that it's best to fold it flat and pop it inside the card to minimise bulk.


I hope you're inspired to make some of these wallet cards but there are plenty more Guy Greetings ideas from the rest of the team on this blog hop! Click the button below to visit Allison Okamitsu who has always got an amazing idea or two up her sleeve!


BUY THE SUPPLIES TO MAKE MY WALLET CARD NOW!
Click on any item to be transported to my online shop!

If you have any queries, or prefer to speak to me, I'm happy to help.
You can contact me by email or phone on 01280 820593.

While I was visiting my daughter at the weekend I noticed that the shoes she was wearing had definitely seen better days (and quite a long time ago too by the looks of things!) Impoverished student she may be but I'm her mum and I couldn't just let her go round in broken down shoes, so I took her shopping for some new ones. She was so excited about her lovely new loafers (loaves as she called them!) that she wore them straight away and put the old ones in her bag, planning to bin them when she got home. At the end of the day, she discovered that one of the shoes had fallen out somewhere and we became quite hysterical with laughter (it had been a long day!) wondering where that nasty, broken shoe had gone!

I'll be back tomorrow with more crafting fun - see you then!