Pages

Showing posts with label Envelope board. Show all posts

Friday, 9 January 2015

Irresistibly Yours for a wedding day

Are you busy browsing the new Stampin' Up spring/summer catalogue and making your wish list? Don't forget that you can choose a free item from the Sale-a-bration brochure for EVERY £45 you spend! (And you can earn even more if you have a big wish list - click here for details!)

It's worth mentioning that you don't have to shop from the new catalogue to earn your freebies and you can get even more for your money by shopping from the Weekly Deals or the Clearance Rack! I spotted the fabulous envelope board in the Weekly Deals this week for just £13.46! That's less than the price of a punch for goodness sake! Come and see how I used it today:


I made a pretty wedding card with Your Perfect Day, a beautiful stamp set from the spring summer catalogue.


Everything was stamped and heat embossed with gold embossing powder and I added a hint of colour with an aquapainter.


The background panel and matching envelope were made with the Irresistibly Yours designer papers that you can get free as part of the Sale-a-bration promotion. I LOVE these papers!


It comes in subtle white with various clear embossed patterns, and you can use it as it is or you can colour it in a variety of ways to give it a new look! I sponged a gradient on mine using Soft Sky ink and tied the envelope up with matching seam binding ribbon.

BUY THE SUPPLIES TO MAKE THIS CARD NOW!
(Click on any item to be transported to my online shop!) 


My shop is open 24/7 so you can buy Stampin' Up products from me any time, day or night.
If you have any queries, or prefer to speak to me, I'm happy to help.
You can contact me by email or phone on 01280 820593.

I loved using the new wedding set today and felt very virtuous that I was stamping a cake rather than eating one. My daughter said she'd seen an exercise online that was a cross between a lunge and a crunch. "It's called lunch," she said pertly.

Have a great weekend and don't forget to join me again on Monday for more crafting fun.

Wednesday, 31 December 2014

Painted Blooms family resolutions - Stampin' Up Artisan blog hop

The Stampin' Up Artisan Design Team is back and we're all keen to inspire you with a whole bunch of fabulous new products from the upcoming spring/summer catalogue! Are you ready for some sneaky peeks? Okay - let's get hopping!

HAPPY NEW YEAR 2015!
It's the time of year for making resolutions, for changing things in our lives so that we can become happier, healthier or fitter. For my project this week, I thought it would be fun to create some resolution cards for the family that we can fill in and keep. Come and see:


I used the Envelope punch board to make an envelope out of a lovely leafy design from the gorgeous new Painted Blooms paper pack and labelled it with a panel printed from my computer. I added the year using the Metro Type alphabet ( yes, you do get numbers in that set too!) and a sprinkling of punched stars.


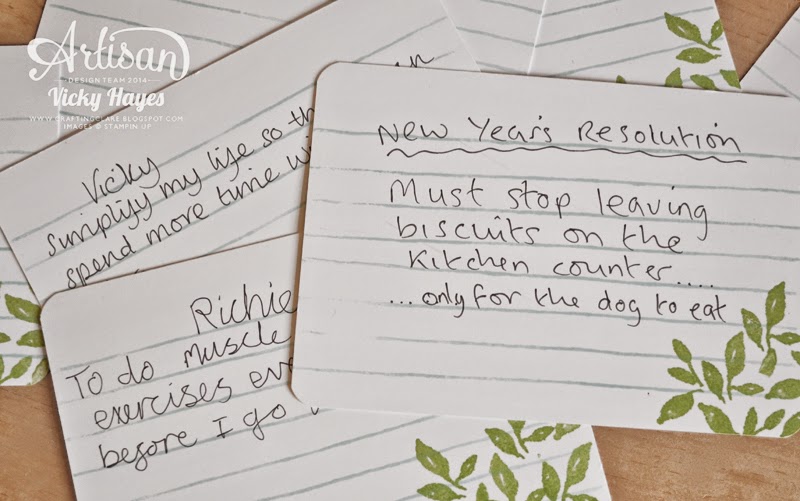
Inside the envelope, there are some cards which I backed with another of the Painted Blooms papers. Aren't these papers just stunning?! Every single one of the papers in this pack is utterly beautiful and everyone that sees them is immediately bowled over by them so I can't imagine they'll be in stock for long! There are coordinating stamps and an embossing folder too.


The cards were stamped with lines using the Draw the Line stamp set from the annual catalogue so that we all had lines to write our resolutions on, and I decorated one corner with leaves from the Painted Blooms stamp set. Let's take a look at some of those resolutions...


Look out folks, my youngest son plans to get big muscles this year! And it would certainly be a good thing if my husband could stick to his resolution!


But what's this? Hmm, Let's see if these naughty animals can behave this year shall we?!


I love the idea of family resolutions and am looking forward to getting them out on New Years Eve next year to see how we got on! Maybe you'll be inspired to incorporate this project into your family rituals too.

Now it's time to hop over to the lovely Allison Okamitsu and see what she's been making to inspire you!


Click above to place an order any time, day or night,
but if you have any queries, or prefer to speak to me, I'm always happy to help.
You can contact me by email or phone on 01280 820593.

We have all got quite good at putting food out of reach of an inquisitive puppy... except my husband! There was a particularly tense moment yesterday when he found her sitting on her rug with a packet of smoked salmon in front of her and a guilty look on her face! I suggested he rapped himself over the nose with a rolled up newspaper!

I'll be back on Monday with some more sneak peeks so I'll hope to see you back here then. Meanwhile have a lovely New Year's Day and a great weekend!

Hugs,

Wednesday, 21 May 2014

Peek a boo bug

It was the birthday of someone fabulous and small yesterday and I got to make the birthday card - yay! Come and have a look:


Are you aghast? Does it seem ridiculously plain for a little girls' card? Well that's because it's harbouring a secret thanks to the Peekaboo Frames Bigz L die! The card was for the little sister of my daughter's boyfriend and she loves pink and playing hide and seek... so what's under the flap?


It's a ladybird - and she loves those too! This ladybird comes from Stampin' Up's Bug Me stamp set and is romping about on some snippets of designer paper.


I popped the card in a bright envelope, made with my indispensable envelope board...


And added a speech bubble sticker to the front, cut out with one of the Word Bubble framelits.

I'll be linking today's card up with Make My Monday where the theme is Nature.

HERE'S WHAT YOU'LL NEED TO MAKE THIS PROJECT
(Click on each item to find it quickly in my shop) 
Stamps: Bug Me wood or cling, sentiment retired
Click above to place an order any time, day or night,
but if you have any queries, or prefer to speak to me, I'm always happy to help.

It was my daughter that introduced her boyfriend's little sister to the absorbing game of making houses for bugs in the garden. They found a container, decorated it with grass and twigs and gravel and searched for a ladybird to live in it. At the end of a long, happy afternoon, the little girl brought the little bug into the house. My daughter and her boyfriend exchanged glances. "The ladybird needs to go home now," they told her. She turned her big blue eyes on them. "But it's warm and safe here!" she said. It took patience and ingenuity but you'll be glad to know that the ladybird was eventually released into the wild.

See you tomorrow,


Thursday, 10 April 2014

Of stars and stripes

What do Benedict Cumberbatch and Twiggy have in common with Handel and Charles Dickens? They are all supporters of 275 year old children's charity Coram! Stampin' Up has asked a number of celebrities to make cards which will be auctioned between 6th May and 16th May 2014 to raise money for the charity which helps some of the UK's most vulnerable children in many different ways. Find out more here and check out Mr Cumberbatch's and Twiggy's fabulous artwork as well as cards made by a host of other celebrities.

I didn't want to be left out of all this star-studded creativity and although I can't imagine any of my cards being auctioned for any princely sums, I thought I'd make my own tribute to a charity that touches my heart. Come and see:


If you go along to the Coram website, you'll notice that its colours are bright and positive orange and red so I  used those colours and some of the design elements on the site to make my card. While you're there you can read a bit about why Thomas Coram set up the charity back in 1739 and what it's trying to achieve in the present day.


This was a very quick card, suitable for my Three Minute Thursday slot today. I cut strips of card stock and glued them to a curved square base. That was topped with a fabulous graphic label from Hello Lovely which was stamped twice in Pumpkin Pie and Real Red, then snipped and spliced together for a two-tone effect.

HERE'S WHAT YOU'LL NEED TO MAKE THIS CARD
(Click on each item to find it quickly in my shop) 
Other: Envelope board (for rounding corners), paper snips
Click above to place an order any time, day or night,
but if you have any queries, or prefer to speak to me, I'm always happy to help.
You can contact me by email or phone on 01280 820593.

My daughter's boyfriend brought his three year old sister round to play yesterday and I was transported down memory lane. All our favourite stories were read aloud; a little house was built under the kitchen table and 'porridge' made in a saucepan and dished out onto our picnic plates; our cat was (much to her horror!) petted by eager but clumsy fingers; bubbles were blown and chased after in the garden; my boys' old wooden garage and road system was put together and played with; there was a special lunch out followed by a trip to the playground. I was thinking about all this as I typed up today's post - this is childhood as experienced by the lucky ones.

See you tomorrow,


Wednesday, 12 March 2014

Geometrical goes soft

Last week a lovely friend of mine had a 'do' to celebrate her 50th birthday so naturally a special gift was called for. In my quest for the perfect piece of jewellery, I found a beautiful bracelet I thought she'd love - and it inspired me with the packaging too. Come and see:


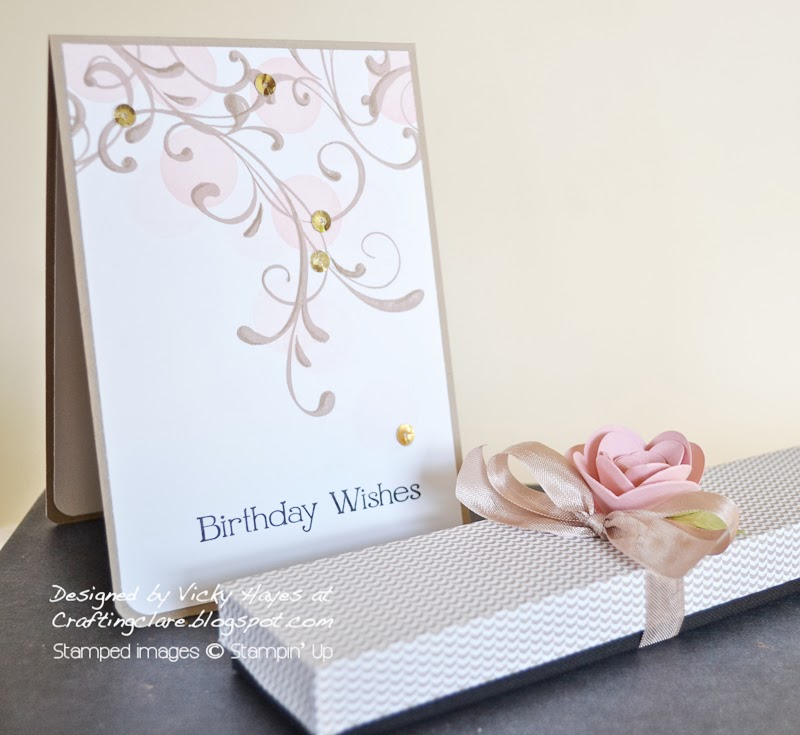
Here's the card and wrapped gift, made using a soft Blushing Bride and Crumb Cake colour palette with touches of gold.


The card was stamped with the swirl from Stampin' Up's Everything Eleanor set (an invaluable addition to anyone's stash) and circles from Geometrical which reminded me of delicate rose petals.


I 'stamped off' some of the circles for a bit of depth and you can see that better in this close up. For that celebratary feel, I sprinkled the card with gold sequins - such a lovely embellishment and very on-trend!


The swirl leads the eye nicely down to the Birthday Wishes, one of the fabulous statement sentiments from Four You.


The bracelet came in a box with a hideously garish lid so I made a different one out of this subtle tone on tone design from the Designer Paper Stack. The box was tied up with soft Crumb Cake seam binding ribbon and I added a pretty rolled rose, made using the new Spiral Flower die from the spring/summer catalogue.


I knew you'd like a peek at that bracelet - isn't it beautiful? And you can see where the swirl idea came from!


I didn't want the gift to get damaged on the way to the party, so I popped it in a plain white bag, tied up with some of the gorgeous chevron ribbon and decorated with a coordinating tag. My goodness my Tag Topper punches are seeing some action - have you got yours yet?!

HERE'S WHAT YOU'LL NEED TO MAKE THIS CARD
(Click on each item to find it quickly in my shop) 
Click above to place an order any time, day or night,
but if you have any queries, or prefer to speak to me, I'm always happy to help.
You can contact me by email or phone on 01280 820593.

CHOOSE A FREE SALE-A-BRATION GIFT WITH EVERY £45 YOU SPEND (excl. p&p)

It was quite a treat to go out to eat at The Muddy Duck, a beautiful old pub with very fine food in a village not far from Buckingham (highly recommended if you're ever in the area.)


Arriving by horseback is optional of course!

Now, normally I'd suggest dropping in tomorrow for my usual Three Minute Thursday quick card, but this week, there'll be an exciting alternative instead! See you tomorrow when all will be revealed!


Saturday, 1 March 2014

Petite Petals for a happy mother's day

When I woke up this morning I wondered if I'd been transported to another country in the night (what do you mean?! It COULD happen!) It's been so dark and wet and gloomy in the heart of England but today it's blue skies and sunshine all the way - and what a perfect spring colour challenge at Less is More to go with it - green and yellow. Come and see what I've come up with:


I wanted to play with flowers today and I've gone for a combination of Stampin' Up's Peaceful Petals, for the leaves, and Petite Petals for the flowers. There's a punch to cut those pretty flowers out so it was quick and easy (and if you buy the stamp set and punch together you get a nice 15% discount!)


The background was made by inking up one of my acrylic blocks and stamping it onto the card base. I coloured the leaves in with a blender pen and some Gumball Green ink - my goodness, I will miss this colour when it retires at the end of June!


I decided this design would be nice for mothers day - coming up on the 30th of this month in case you were wondering! The sentiment was made by combining the 'happy' from Happy Watercolour and the 'mothers day' from Teeny Tiny Wishes. It's so easy to do this with a stamp-a-majig!

• I've made a short video tutorial to show you how to combine stamps using the stamp-a-majig. Click here to watch it.

I used this gorgeous sketch from CAS(e) this Sketch today.


And my card can also be my second entry into the CAS Addicted to Stamps and More challenge!

HERE'S WHAT YOU'LL NEED TO MAKE THIS CARD
(Click on each item to find it quickly in my shop) 
Stamps: Peaceful Petals wood or cling, Petite Petals wood or cling,
For the sentiment: Happy Watercolour wood or cling, Teeny Tiny Wishes wood or cling
Card stock: Naturals Ivory, scraps of Very Vanilla
Click above to place an order any time, day or night,
but if you have any queries, or prefer to speak to me, I'm always happy to help.
You can contact me by email or phone on 01280 820593.

CHOOSE A FREE SALE-A-BRATION GIFT WITH EVERY £45 YOU SPEND (excl. p&p)

Here's someone else enjoying the sunshine this morning.


She was sitting out there as a dark warning to small birds and unsuspecting rodents... but they all laugh at her knowing that she's an old lady with very few teeth, who expects choice viandes to be chopped up for her and would prefer to be fed by hand only she can't get the staff!

Hope you're having a lovely weekend - see you soon!


Monday, 24 February 2014

Raising a glass or three

Today is a sad Monday because my children have all gone back to school after half term - but the news that I was the winner at CAS(e) this Sketch last week with this card has cheered me up no end! I'm always inspired by the sketches there and this week there's another great one. Here's what I've made...


... and here's the sketch I was working from:


I knew I wanted to use the lovely champagne glasses from Stampin' Up's Embellished Events stamp set  and thought sequins and bubbles would form the right sort of shape.


I thought it was going to look a little too minimilist though - even for me!  - so I added interest with a split panel. I used a combination of lovely textured core'dinations card stock and Soft Sky smooth and stamped the glasses over both.


Have you noticed those curved corners on the panel? My envelope board did those - that board has to be one of the most useful items in my Craft Square Metre!

HERE'S WHAT YOU'LL NEED TO MAKE THIS CARD
(Click on each item to find it quickly in my shop) 
Stamps: Embellished Events wood or cling, Express Yourself (hostess set)
Other: Envelope board (used to round corners), sequin trimstamp-a-majig
Click above to place an order any time, day or night,
but if you have any queries, or prefer to speak to me, I'm always happy to help.
You can contact me by email or phone on 01280 820593.

CHOOSE A FREE SALE-A-BRATION GIFT WITH EVERY £45 YOU SPEND (excl. p&p)

We had a lovely half term but why is it that everything always gets crammed in at the end? It all started in the most relaxing way but now we all need a holiday after the holiday!

See you tomorrow,