Pages

Showing posts with label Good luck. Show all posts

Wednesday, 2 July 2014

Stampin' Up blendabilities and stamp set giveaway!

"Hmmm? What did you say?!" That's the sound of crafters all over Great Britain and Europe with their noses in the new Stampin' Up catalogue! Have you decided on what you're getting first? One of the first 'must haves' for me was a collection of Blendabilities, Stampin' Up's new alcohol markers, and I've been putting them to use on today's card! Come and see:


These markers are brilliant for colouring in line drawings and blend beautifully to produce a really wonderful smooth, intense colour finish. But you don't need line drawings! This lucky four-leafed clover on this card was made using the tiny heart punch from Stampin' Up's new Itty Bitty Accents punch pack. Here's a close-up:


I coloured each heart with the Old Olive assortment of Blendabilities, starting with the darkest shade on the outside, then colouring over it with the medium shade and finally, colouring the whole heart with the lightest shade. I love the effect! The centre of the clover leaf is decorated with a green gem - it's one of Stampin' Up's super-sparkly gems coloured with the darkest Blendie! (They say little things please little minds and I'm afraid I'm never going to get tired of colouring gems to match my projects - and it works with pearls and other embellishments too!)

If you'd like to win a pack of Stampin' Up's Coastal Cabana blendabilities and or one of Stampin' Up's beautiful photopolymer stamp sets, I've got one of each to give away!


All you have to do to be in with a chance of winning is to leave a comment on yesterday's catalogue launch post (click here to get there.) I'll use a random selector to find the winner and will reveal all at 10 pm (BST) on Friday. Good luck!!!

HERE'S WHAT YOU'LL NEED TO MAKE TODAY'S CARD
(Click on each item to find it quickly in my shop) 
Stamps: Metro Type Alphabet photopolymer 
Ink: Hello Honey, Pear Pizzazz marker from the subtles pack,
 Old Olive assortment blendabilities
Card stock: Whisper White, Mossy Meadow
Other: Basic rhinestones, Essentials piercing template, mat and tool.
Click above to place an order any time, day or night,
but if you have any queries, or prefer to speak to me, I'm always happy to help.
You can contact me by email or phone on 01280 820593.

While the end of year tests were going on at school I asked my youngest son (imagining a small plastic animal or lucky pebble) whether he had a lucky object. "Yes," he said at once. "My lucky cross!" It turns out that this is a celtic cross he bought in Northern Ireland with money given to him by one of my kind aunts.


It's small but it weighs a ton and would definitely not be allowed into an exam in case my son clocked the invigilator over the head with it!

See you tomorrow.


Sunday, 21 April 2013

Lucky Day on a lovely day

Wow! What an absolute stunner of a day today - which explains why I'm slipping this one in so late! Less is More threw in an unexpected CASE challenge today and what gorgeous cards they've inspired us with! I decided to take elements from both samples and came up with this:

Card made with Lucky Day from Stampin' Up

This technique where you stamp an image on two pieces of card, die cut letters from one and superimpose them over the other has been on my list of things to try for a while so I was delighted to give it a shot with Stampin' Up's Lucky Day stamp.  I loved Jen's pierced-edge frame popped up over a coloured mat too so I added one of those for extra interest.

Here are Jen and Chrissie's cards for our CASEing enjoyment:


Here's what you'll need to make this card
Stamps: Lucky Day, Hopeful thoughts 
Ink: Gumball Green, Always Artichoke
Card stock: Whisper White, Always Artichoke
Other: Essentials paper-piercing pack and tool, Big Shot, Timeless Type sizzlits alphabet (retired), stamp-a-majig
I CAN ORDER STAMPIN' UP ITEMS FOR YOU AND HAVE THEM DELIVERED STRAIGHT TO YOUR ADDRESS IN THE UK. I'M COMMITTED TO PROVIDING EXCELLENT CUSTOMER SERVICE AND AM ALWAYS HAPPY TO OFFER HELP AND ADVICE. TO FIND OUT MORE OR TO PLACE YOUR ORDER, JUST SEND ME AN EMAIL OR GIVE ME A CALL ON 01280 820593.
• Get more for your money - place an order for £250 and choose £65 worth of products free! Or join SU and get £155 worth of products for just £99! Offers end 30th May 2013

So, how did you spend the first proper day of spring? (or was that summer?!) My daughter and I were supposed to go geo-cacheing today but she sensibly decided she'd be better off spending the day revising for an exam instead and I felt it was a good moment to get things cleared up in the garden. I wasn't the only one in the garden...


 ... but some of us were more active than others!

See you on Monday for more crafting fun,

Thursday, 17 January 2013

Three minute Good Luck card

It's always handy to have a stash of good luck cards to help your loved ones feel supported before an exam, a job interview, a driving test, a performance... well, you get the picture, there are all sorts of challenges to be faced in life! I've been using Horse Frontier a lot lately and there's a gorgeous horseshoe image in the set which is perfect for a good luck card. I made this one for my Three Minute Thursday slot today - come and have a look:


I coloured the rubber of my sentiment first, using markers, and stamped it using a stamp-a-majig to get it where I wanted it. Next came the horseshoe, which I coloured with a Sahara Sand marker, and finally the beautiful fern image, stamped off once before pressing onto the card stock.


A gem gives the horseshoe that finishing touch and that's it - a small 7.5cm square notelet that you could tuck into a lunch box, pocket or gadget case, and takes just a couple of minutes to make.

Here's what you'll need to make this card
Stamps: Horse Frontier, Sincere Salutations (retired), Papaya Collage
Ink: Lucky Limeade and Basic Grey
Card stock: Very Vanilla
Other: Markers, Basic Rhinestones, stamp-a-majig
I'd be delighted to order any of these items for you and have them delivered straight to your address in the UK. I'm committed to providing excellent customer service and am always happy to offer help and advice. To place your order, just send me an email or give me a call on 01280 820593.
• All places on my Stampers 6 club have now been filled for February and March but if you'd like to put your name on my waiting list, please let me know.

We are in the grip of a cold spell here in Buckingham but look:


There's hope! These will turn into cheerful yellow daffodils in a month or two to brighten up the base of the hawthorn tree. We've hung a fat ball high up in the tree and it's proving to be quite a draw for local birds. Needless to say The Mighty Warrior (that's Tuppence, our cat) is outraged!

See you tomorrow,

Thursday, 15 March 2012

Three Minute Thursday Good Luck

I was so looking forward to using last week's ColourQ inspiration but sadly, being called away meant I didn't get time. This week there's a very intriguing palette!


Greens and greys - aren't they gorgeous?! Greens are always associated with good luck in my mind (for some reason that I can't quite pin down at the moment...!) so I made a quick good luck card. Come and have a look:


This ornate frame from the free Sale-a-bration set Elementary Elegance is perfect for a focal sentiment and seems to be at home in pretty much any colour. Not only that but the set is free with any order of £45 or more - which just adds to its loveliness!


The sentiment is from Sincere Salutations and is one of my most-used sentiment sets with its gorgeous flowing scripts. I added the little bird from Elementary Elegance - I love the way these little images look when they're used as part of a sentiment.

Here's what you need to make today's card:
STAMPS: Elementary Elegance, Sincere Salutations,
INK: Basic Grey, Garden Green, Wild Wasabi
CARD STOCK: Naturals Ivory, Certainly Celery, Garden Green
OTHER: Stamp-a-majig
I'd be delighted to order any of these items for you and can have them delivered to your address in the UK. I'm committed to providing excellent customer service and am always happy to offer help and advice.
Until the 31st March you can choose a free stamp set or pack of papers as part of the Sale-a-bration promotion - with EVERY £45 you spend. Click here to see all the Sale-a-bration freebies.

Come and see the lemon meringue pie I made on Sunday:


My son isn't a big fan of cake so he asked me to make him a lemon meringue pie for his birthday instead. The last one of these I made was before I had the children!


It was pretty tasty, although I did wonder how we were going to get the candles in...


In the end my son lit and blew out one large candle 11 times which he enjoyed enormously!

I'm still trying to catch up after being away last week and after the weekend's birthday celebrations, so if I haven't been round to your blog yet I do apologise - I'll get there in the end!

See you tomorrow,

Tuesday, 15 March 2011

Cards using Notably Ornate

Have you seen the Notably Ornate stamp set on page 65 of the Idea Book and Catalogue? It contains four stamps all of which are extremely useful: the 'take note' stamp can be cut out with the large oval punch; and the 'just because' stamp is an ornate box that can hold other sentiments using a marker and a stamp-a-majig. But my favourites are the beautiful frame image and the bird in flight.

Today I have a few projects to show you using the bird stamp. Let's start with this feminine little number:

The focal panel is simply stamped in four different blues to look as if a flock of swallows has just flown in. I mounted it onto a darker, stamped card base to emphasise its lightness and added an airy Organza ribbon. I didn't add a sentiment because it would have interfered with the birds, but it could always be added inside the card.

Here's how to make this card:
  • Cut an 8.5cm square of Whisper White card stock. Stamp a design of birds using Baja Breeze, Pacific Point, Not Quite Navy and Night of Navy inks. Sponge the card stock lightly with Bashful Blue ink.
  • Add eyes to the birds with a Night of Navy marker.
  • Tie a piece of Organza ribbon round a 9cm square of Night of Navy card stock and finish in a bow. Glue the stamped panel onto this.
  • Cut a 21cm x 10.5cm piece of Marina Mist card stock. Score and fold in half to make a card base. Stamp the front with the Bella Toile background stamp. Attach the stamped panel to the card front using dimensionals.

Supplies
Stamps: Notably Ornate, Bella Toile
Ink: Baja Breeze, Pacific Point, Not Quite Navy, Night of Navy, Bashful Blue
Card stock: Marina Mist, Night of Navy, Whisper White
Other: Organza ribbon, Night of Navy marker

Here's another card made with a similar design - a one-layer card this time. 


This time I did add a sentiment. Do you recognise it? Yes it's from a free sale-a-bration set! Sadly, this promotion has now finished but you can still grab a bargain in the March Frenzy sale - where selected products have up to 30% off! Click here for details.


I wrapped a little present in copier paper, stamped to match the card, and tied it up with Real Red 1/4" grosgrain ribbon. The tag is simply a bird stamped onto Whisper White card stock, cut out with sharp paper snips and tied onto the gift with linen thread.

What a versatile image that bird stamp is! You've certainly not seen the last of Notably Ornate on my blog - I love it! As always, if you'd like to see other cards I've made with this - or with any set I use, just check out the index on my side bar. And if you have any questions or would like to make an order with me, do drop me an email or give me a ring on 01280 820593.

Thank you for visiting my blog today and I hope you have a lovely day!

Wednesday, 26 January 2011

Good luck cards - using So Happy For You

At some stage or another, somebody we care about will put themselves up for a challenge - from exams and driving tests, to marathons and mountain climbs for charity. A good luck card is a lovely way of showing your support.

This week I'm showing you cards made with the So Happy For You stamp set, one of four fabulous sets that you get free when you place a £45 order (click here for details). This is the set:

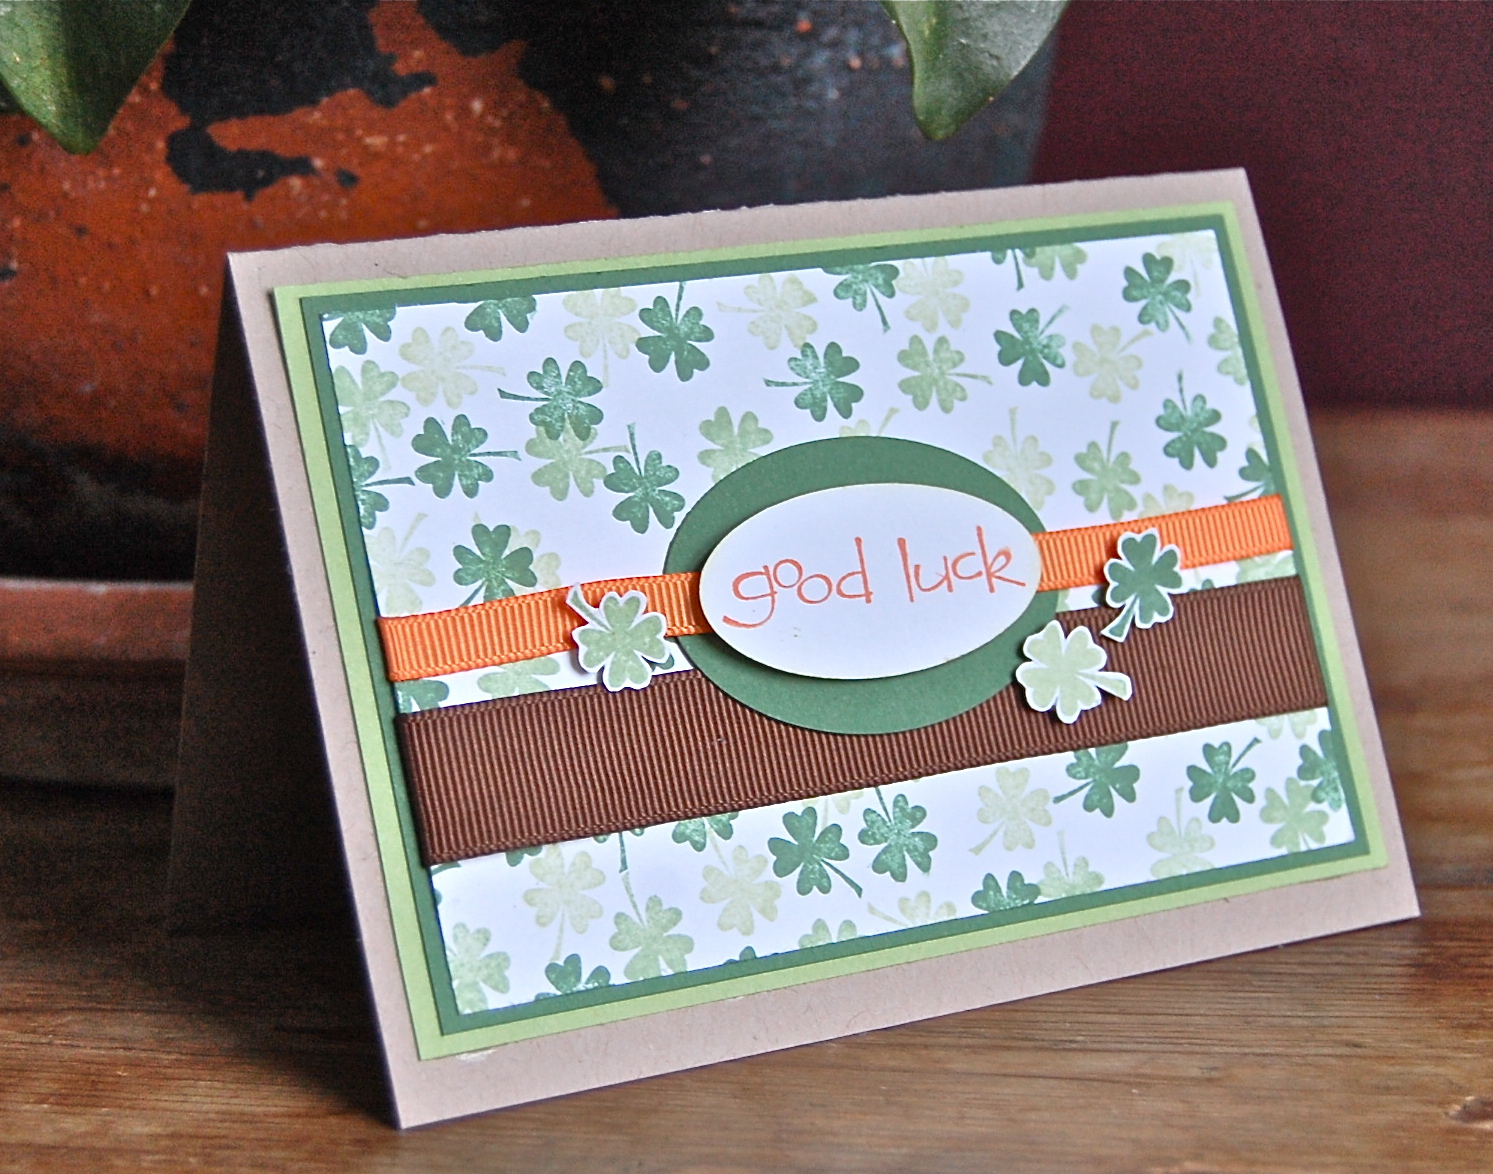
And here's the good luck card I made with it:


The little clover stamp is perfect for this repeat image background and can also be cut out to make accents as I did here.

Here's how to make this card:

  • Cut an 11.5cm x 7.5cm piece of Whisper White card stock. 
  • Stamp clovers all over it in three different green inks, starting with the palest.
  • Stick Early Espresso wide grosgrain ribbon to the clover panel with Snail adhesive, wrapping the ends behind the card stock for a neat finish. 
  • Cut an oval from Garden Green card stock using the large oval punch, and stick it onto the clover panel, slightly overlapping the Early Espresso ribbon. 
  • Wrap Pumpkin Pie narrow grosgrain ribbon round the clover panel, taking it over the middle of the green oval. Use Snail adhesive to stick it down.
  • Stamp the sentiment onto Whisper White card stock and cut out with the medium oval punch. Sponge the edges with a touch of Certainly Celery ink. Stick to the Garden Green oval, over the top of the Pumpkin Pie ribbon, using dimensionals.
  • Stamp a clover in each shade of green onto Whisper White card stock and cut them out with sharp paper snips. Fix these around the sentiment with dimensionals. TIP: I snip off edge pieces from a packet of dimensionals and use them to stick small items.
  • Mount the clover panel onto a piece of Garden Green card stock, then onto a piece of Certainly Celery card stock. Finally mount this onto an A5 Crumb Cake card base.
Supplies
Stamps: So Happy For You (Free set with Sale-a-bration)
Ink: Garden Green, Wild Wasabi, Certainly Celery, Pumpkin Pie
Card stock: Crumb Cake, Whisper White, Garden Green
Other: 1/4" grosgrain ribbon in Pumpkin Pie, 5/8" grosgrain ribbon in Early Espresso, large and medium oval punches

I love the 'good luck' sentiment that comes with this set. It's quite effective as the focus of a card too, as on this one:


It was easy to line the words up with my stamp-a-majig and I added some layered scallops made with the scallop border punch. The colours here are Old Olive, Not Quite Navy and Daffodil Delight.

These cards could be accompanied by a little good luck charm. When I was at school, I remember lucky gonks were all the rage - remember these? (No? Well it was sometime in the middle ages after all!)

Thanks for popping in today -  I really do appreciate your visits and comments. It's Three Minute Thursday here tomorrow and I'll be here with the quickest card ever! Hope you can join me,