Pages

Showing posts with label Sale-a-bration 2013. Show all posts

Thursday, 4 April 2013

News from Stampin' Up!

I'm having a bit of time off this week, but when I saw that Stampin' Up had announced some VERY exciting news I couldn't wait to share it with you! So what's the big news? Well, actually there are several pieces of news:

New colours, coming soon...
There's going to be a bit of a COLOUR REFRESH! No - don't panic! It's not a major renovation or anything, it's just a few tweaks to the existing colour families to bring them bang up to date. Come and have a look:

Stampin' Up colour refresh

Some of the colours are going to be discontinued and their places taken by more current shades, some of which were previous in-colours - I'm so pleased that I'm not losing my beloved Pool Party, Island Indigo, Wisteria Wonder and Calypso Coral and thrilled to bits to see the return of last year's in-colours Pear Pizzazz and Blushing Bride. There will also be three colours that will be new to us here in the UK - Crushed Curry, Bermuda Bay and Smoky Slate and since I'm always excited by new colours, I can't wait to start playing with them - not just in ink, markers and card stock but in embellishments and patterned papers too!

Of course, I'm going to have to wait because these colours won't be available immediately. My customers will be able to get hold of them on the 1st July - but if you can't wait until then, you could plan to join my team, as new demonstrators will be able to order them as part of their starter kit from 31st May!

As always, to make room for the new and exciting, something has to go. Check the box above for the colours that are being discontinued and email me if you'd like to stock up on your favourites.

Now available to buy...
Curly Label punches from Stampin' UpThe gorgeous Petite Curly Label punch proved a real winner during the Sale-a-bration promotion this year and I'm delighted that Stampin' Up have decided to make it available for purchase for £11.50. The punch works brilliantly with it's big sister, the Curly Label punch (see my card below) and coordinates with the fabulous Ciao Baby stamp set from the spring/summer mini catalogue as well as the Pretty Petites Sale-a-bration set. Stampin' Up have confirmed that the punch will feature in the upcoming annual catalogue too, so I'm hoping there'll be more images to go with it!

Card made with Curly Label punches from Stampin' Up

Only available while stocks last...
My regular readers will know how much of a fan I am of Stampin' Up's Watercolour Wonder crayons, so I'm sad to see that these are being discontinued in all four colour families, as well as the Watercolour pencils. These items will only be available while stocks last so please email me as soon as possible if you'd like to order them before they're gone.

So, you're all up to date on the news from Stampin' Up and I'm all behind on the children's tea... Actually, they'd be perfectly happy with toasted sandwiches! My youngest son, who has been coveting the toastie maker I gave my eldest son for Christmas, told me the other day: "When I'm older, I'm going to buy a toasted sandwich maker." He gave a sigh. "And then my life will be complete," he added.

Thank you for bearing with me while I take a rest! I'll be back on Monday and will have some new cards to show you.

Hugs,

Wednesday, 27 March 2013

Easter Basket tutorial

I know Easter is nearly upon us but my tutorial on Easter baskets is so quick and easy that those who have left it to the last minute (er, who me?!) can run up several of these in a flash!


Here's how to make my Easter basket


Start by cutting a 4"x 5" piece of card stock for the body of the basket and a 1/2"x 4" piece for the handle.


Score along the long edges of the handle for a neat finish and pierce holes in the ends.


Turn the larger piece of card stock 'baskety' by running it through the Big Shot with the Square Lattice embossing folder (Sandwich from bottom: Multipurpose platform open at Tab 1, cutting plate, card stock inside embossing folder, the other cutting plate). I like to make my embossing more subtle by running it through again, this time without the embossing folder (Sandwich from bottom: Multipurpose platform closed at Tab 2, cutting plate, card stock with NO embossing folder, the other cutting plate).


Now it's ready for scoring: Along the long side, score at 1", 2", 3" and 4". Turn the card stock and score at 1 1/2", and 2 1/2".


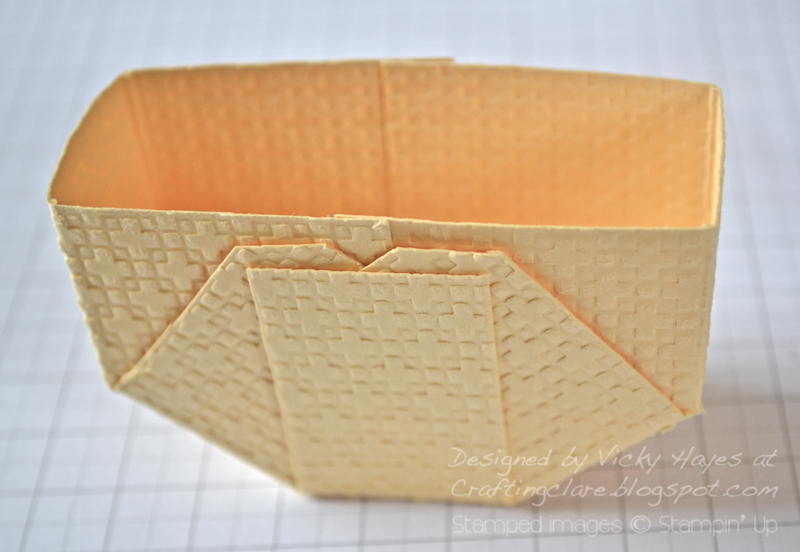
Flatten all your score lines with a bone folder so your card stock lies neatly and don't worry about flattening your embossing further - it really does look better when it's subtle! Now snip the basket so that it looks like the picture above.


Okay - it's time to assemble the basket! The outside two flaps on each side need to be brought to the centre so that you get a rectangle shape when you look down on your basket from above and so that you start the curve at the base of your basket. Secure the flaps with snail adhesive.


Now take the inner two flaps and pull them in to carry on the curve of the base of your basket. You'll find that two little points stick up over the edge of the basket - snip these off with paper snips.


Finally, pull the central flaps over the others on each side and secure it with Snail. Hmm, it doesn't look very tidy does it? And surely it's not very strong? You're quite right, but it's okay because we're going to disguise the untidiness and hold everything together tightly with brads!


Take the small off-cut of card stock, score it down the centre and cut two circles out of it with a  1 3/8" circle punch. Fold them crisply with a bone folder...


... and position over the flaps on your basket. Pierce or punch a hole through all the layers on each side, add the handle to the inside of the basket and secure everything with a brad.


I think the baskets look lovely lined with tissue, filled with eggs and decorated with a little tag tied to the handle with bakers twine. For younger children, wouldn't it be sweet to pop in a little knitted or sewn rabbit or chick?!


Here's a close up of my little tag.  I started with one of the Lots of Tags dies, folding it and glueing it  closed.  The edges were sponged with Marina Mist ink and I stamped the sentiment from Teeny Tiny Wishes as well as the sweet flower from the Patterned Occasions sale-a-bration set. The flower was centred with a tiny pearl and I doodled some grass with a marker and added a tiny embossed butterfly too. It's fun working in miniature!

Here's what you'll need to make this project
Stamps (for the tag): Teeny Tiny Wishes, Patterned Occasions (Sale-a-bration set, retired)
Ink: Marina Mist plus markers
Card stock: So Saffron plus scraps of Daffodil Delight and Very Vanilla for the tag
Other: Big Shot, Square Lattice embossing folder, Simply Scored, 1 3/8" circle punch, metallic brads, Lucky Limeade bakers twine, Basic pearls, Beautiful Wings embosslits die, Lots of Tags sizzix die, stamp-a-majig
I'D BE DELIGHTED TO ORDER STAMPIN' UP ITEMS FOR YOU AND HAVE THEM DELIVERED STRAIGHT TO YOUR ADDRESS IN THE UK. I'M COMMITTED TO PROVIDING EXCELLENT CUSTOMER SERVICE AND AM ALWAYS HAPPY TO OFFER HELP AND ADVICE. TO PLACE YOUR ORDER, JUST SEND ME AN EMAIL OR GIVE ME A CALL ON 01280 820593.


When my daughter was a baby, I used to sing Kitty in a Basket to her. I'd come across Diana Decker singing the song on a weird CD for infants which included quite a lot of ancient and hilarious songs. They always made me giggle and, when she reached giggling age, they made my daughter giggle too. When the boys came along they loved the songs in their turn and I often think that this CD might have been partially responsible for my children's bizarre senses of humour! Here's the song (being sung by a strange puppet!) in case you're curious.


There won't be a Three Minute Thursday this week, although I do have some little Easter bonnets to show you so do pop back to see those!

Hugs

Tuesday, 26 March 2013

A proper baskety Easter basket

Hmm, there's no such word as baskety is there? But you know what I mean don't you? When you want an Easter basket that's made out of card stock but looks like it really is a basket! Well that's what I've made for today - come and see:


Now the shape of this basket is not my idea; I saw it on the internet somewhere but since I can't find any trace of its existence, I had to work out how to make it myself! I'll put a tutorial on my blog tomorrow so that you can make them too if you like - they're ever so quick and easy (like everything I do!) The basketiness is my idea though - I ran the card stock through the Big Shot in my Square Lattice embossing folder before putting it together. You can embellish it with punched flowers and anything else you like but mine is for a male person, so it's remaining staunchly manly!


Naturally it needed a coordinating card so out came Stampin' Up's lovely Take Care stamp set. The details of how to make this are similar to yesterday's post but I used coloured card stock and the sentiment from Everybunny to give it a different feel.


The nest looks quite dimensional as you can see from this arty shot. I stamped it in Early Espresso on Crumb Cake card stock, cut it out and smudged ink into the centre with a sponge dauber to make it look recessed and the eggs are mounted on dimensionals to add to the illusion. I cut the whole branch out this time with my sharp paper snips so that it could overlap my card base.


And here they are together, card and basket, making rather a lovely couple!

Here's what you'll need to make the card and basket
Stamps: Take care, Everybunny (sentiment), Pretty Petites (Sale-a-bration set, retired)
Ink: Soft Suede, Early Espresso, Baja Breeze, Real Red, plus markers
Card stock: Soft Suede, Baja Breeze, Naturals Ivory, Crumb Cake
Other: Big Shot, Square Lattice embossing folder, Simply Scored, 1 3/8" circle punch, metallic brads, Lucky Limeade bakers twine, stamp-a-majig
I'D BE DELIGHTED TO ORDER STAMPIN' UP ITEMS FOR YOU AND HAVE THEM DELIVERED STRAIGHT TO YOUR ADDRESS IN THE UK. I'M COMMITTED TO PROVIDING EXCELLENT CUSTOMER SERVICE AND AM ALWAYS HAPPY TO OFFER HELP AND ADVICE. TO PLACE YOUR ORDER, JUST SEND ME AN EMAIL OR GIVE ME A CALL ON 01280 820593.
                              
The children break up for the Easter holidays this week and I can see that my oldest son particularly needs to rest his poor brain: He was playing on his xbox at the weekend when suddenly he cried: "Oh no! Oh no - that's terrible!" I looked up. "What's the matter?" I asked. "Oh no!" he said again. "My xbox live account is about to run out in approximately... er... soon!" My son - the mathematical genius!

I shall be back tomorrow with my baskety basket tutorial and I'll hope to see you then.

Friday, 22 March 2013

A Bloomin' Marvellous final hurrah!

Yes it's true, Sale-a-bration ends today but if you're kicking yourself for not taking advantage, don't worry, I'll be taking orders today until 6pm - choose your free gift from this selection. If you want to join Stampin' Up you'll need to sign up by 22.30pm to benefit from choosing the extra 25% of products in your starter kit.  It's quick and easy to do this online - just follow this link.

I've really enjoyed Sale-a-bration this year and I hope you have too. Stampin' Up always lays on the most gorgeous stamp sets and this year the company offered other items from the catalogue as free gifts too. My card today uses my favourite free set and I've been inspired by Make My Monday where they're looking for monochrome CAS cards, Less is More, where the theme is Frame it, and CASology, where the cue word is Song. Come and have a look:


I used a fair few techniques on this card so bear with me while I explain. I used the 2 1/2" circle punch to make the circular panel, sponged it lightly with Bashful Blue ink and pierced a frame round it with my Essentials paper-piercing pack.


My Bloomin' Marvellous bird was facing the wrong way so I stamped him onto my brayer and then rolled him out onto a piece of Whisper White card stock. Once I'd cut him out with my paper snips and placed him on my card he was facing the right way like a good little bird! This stamp set has some fabulous sentiments and I used this one for the gospel song of the same name (check out the powerful rendition by Aretha Franklin and Mavis Staples at the bottom of this post.)


The leaves were stamped on the edge of the circle and then my flowers were stamped over the top and clear-embossed. I did it this way round because I wanted the flowers to seem translucent and the leaves to be slightly visible through them. I added a bit of shadowing with a Baja Breeze Watercolour Wonder crayon and added dots to the flower centres with a marker (TIP: leave these to dry for a while or they'll smudge!). Finally, I sprayed the panel with my Color Spritzer Tool and sponged the flowery edge of the panel with Not Quite Navy ink for a bit of dimension.

By the way, you get a great light effect you get when you pierce through the card front...


Here's what you'll need to make this card
Stamps: Bloomin' Marvellous (Sale-a-bration freebie)
Ink: Bashful Blue, Baja Breeze, Marina Mist, Pacific Point, Not Quite Navy, and markers
Card stock: Whisper White
Other: Essentials paper-piercing pack, brayer, paper snips, 2 1/2" circle punch, Subtles Watercolour Wonder crayons, Color Spritzer tool, versamark, clear embossing powder, heat tool, stamp-a-majig
I'D BE DELIGHTED TO ORDER STAMPIN' UP ITEMS FOR YOU AND HAVE THEM DELIVERED STRAIGHT TO YOUR ADDRESS IN THE UK. I'M COMMITTED TO PROVIDING EXCELLENT CUSTOMER SERVICE AND AM ALWAYS HAPPY TO OFFER HELP AND ADVICE. TO PLACE YOUR ORDER, JUST SEND ME AN EMAIL OR GIVE ME A CALL ON 01280 820593.
• Add a free Sale-a-bration item from this list for every £45 you spend! Offer ends today 6pm.

Thank you so much for all your get well wishes for my youngest son. He was completely fed up by the end of yesterday and much better so I (reluctantly) let him go back to school - he's always such good company, even when he's poorly! He was obviously pleased with the reaction he got when he pointed out the nut allergy warning (see Wednesday's post) and has been reading food labels avidly ever since. Yesterday he pointed out the information on a pineapple label which stated: Cholesterol: 0 mg. "Look!" he said to me. "Cholesterol - OMG!"

Have a happy day and a great weekend, and I'll see you very soon.

Hugs,

Thursday, 21 March 2013

A Three Minute Happy Hello

Today I'm using the Happy Hello Simply Sent kit which is free as part of Stampin' Up's Sale-a-bration promotion, but in fact it's more like a sad goodbye as Sale-a-bration ends tomorrow. If you have your eye on any of the Sale-a-bration free gifts, please do email me your order as soon as possible!

It's easy and fun to make cards with kits like this one and the Simply Scrappin' kits (on 167 and 168 of the annual catalogue). Come and see what I've been up to:


The Sale-a-bration Happy Hello kit contains 8 die-cut cards, printed with a trendy chevron design, and these wonderful contrasting envelopes. You also get Basic Grey bakers twine, stickers in a gorgeous combination of Basic Grey and Daffodil Yellow, and sparkly rhinestones to embellish with. The set would make a lovely gift for someone who doesn't craft because you can keep it very simple, as I have in the card above...


... or you can go off piste and do your own thing as we crafters love to do! I made this quick card using one envelope, one die-cut card, a sheet of Whisper White card stock and few of the embellishments as well as the following two cards. In this one, I trimmed the shaped card stock and envelope for my background and added the stickers and a sentiment in a jiffy!


Here's a card for someone who has achieved a goal or passed an exam or driving test. I found that it was easy to cut stars out of the larger flower stickers using my Merry Minis star punch, and gave them a  celebratory look with rhinestones.


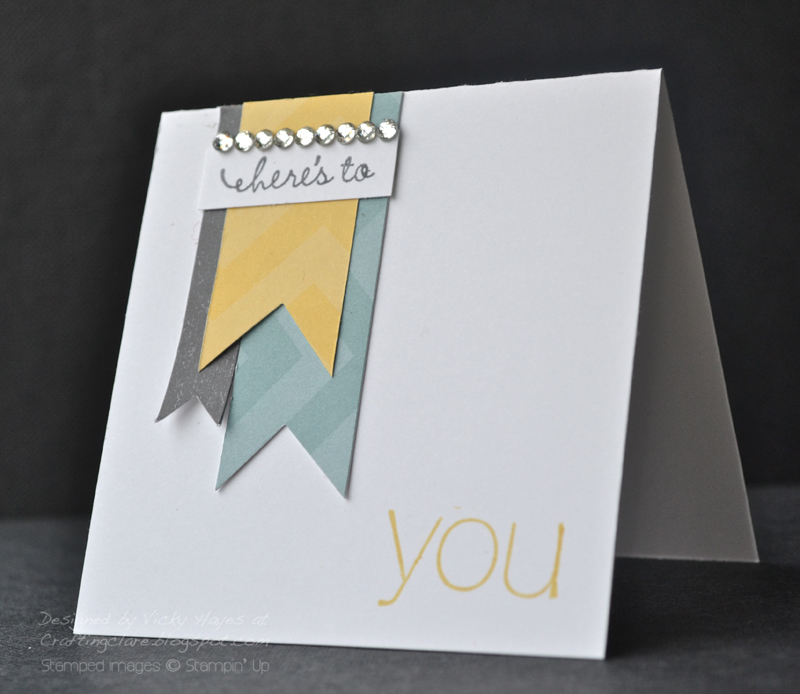
Here's another card to celebrate an achievement. This time I've used the offcuts of the grey sticker and the patterned card stock to create banners which I've ribbon-tailed with a square punch. I used markers to isolate the words on the sentiment, making a 'here's to' ticket to place on the banners and stamping the 'you' directly onto the card base. I embellished with a row of rhinestones - Stampin' Up's rhinestones come with two chains of these to make lines easy.

There's heaps of the kit left and I've got plans to make it into a mini scrap book to house this year's Easter photos - those colours will be perfect!

Here's what you'll need to make these cards
Stamps: Friendly Phrases 
Ink: Daffodil Delight, Basic Grey and Baja Breeze markers
Card stock: Whisper White
Other: Happy Hello Simply Sent kit (Sale-a-bration freebie), Basic Rhinestones (for the small ones), Square punch, Merry Mini punch set, stamp-a-majig
I'D BE DELIGHTED TO ORDER STAMPIN' UP ITEMS FOR YOU AND HAVE THEM DELIVERED STRAIGHT TO YOUR ADDRESS IN THE UK. I'M COMMITTED TO PROVIDING EXCELLENT CUSTOMER SERVICE AND AM ALWAYS HAPPY TO OFFER HELP AND ADVICE. TO PLACE YOUR ORDER, JUST SEND ME AN EMAIL OR GIVE ME A CALL ON 01280 820593.
• Add a free Sale-a-bration item from this list for every £45 you spend! Offer ends tomorrow so don't miss out!

My son is getting better now and so boredom has set in. Yesterday, feeling that I could do with some help with my blog, he suggested a featured post for each day of the week: Two Minute Tuesday for example (I told him that might be stretching the concept of fast just a tad!) Six Minute Saturday, Seven Minute Sunday... He also came up with Faffing About Friday (no change there then!) and Make What You Want Monday (Hmm!) before I decided he could do with a more constructive activity!

See you tomorrow for a bit of the usual Friday faffing!

Wednesday, 20 March 2013

Stampin' Up - you'll never walk alone!

Yesterday I had an email from someone who'd read my post about joining Stampin' Up saying that she would never dare to set up a business on her own. The truth is though that we're not alone at all. When you join my team, you'll get as much help as you choose from me - I'm always available on the phone or online, and my goal is to help you to get what you want out of being a demonstrator whether that's to pursue your hobby, or build a business, or anything in between. As well as me, you'll have the whole extended team behind you as well as the dedicated official Stampin' Up support team. You'll be amazed at what you could achieve while doing something you love! Click here for more info - and think about  it... this could be the start of something very exciting!

Stampin' Up rewards demonstrators for their achievements and when members of my team get promoted I like to send them a little something too. Here's a little gift I sent to one of my team members recently:

card using Easy Events by Stampin' Up

This was made at the same time as yesterday's card and uses a similar design but a different colour scheme. Check out that scored border which, I've realised, was partly scored by my friend Jenny from Crafting in the Country who was round here and playing with the score plate! I think you'll agree it adds a whole extra je ne sais quoi to the project! The flowers are coloured with a So Saffron marker but because they were stamped on Naturals Ivory card stock which is more porous than the smooth Very Vanilla, the colour comes out darker. I love it and the way it contrasts with the Pool Party.

Are you wondering what's inside that little pouch?

Inkredibles team promotion gift

It's my exclusive INKredibles team bracelet, complete with a handmade charm! A new charm is sent for each promotion so the bracelets can end up looking very pretty indeed!


I wrapped the bracelet in tissue and secured it with a coordinating label...

scallop envelope bigz die by Stampin' Up

... before popping it into a pouch made with the Scallop Envelope bigz die. I folded the die cut as a pocket rather than an envelope - just another way to use this fabulous die!

Here's what you'll need to make the card and pouch
Stamps: Easy Events, Delightful Dozen, Tiny Tags
Ink: Black stazon, subtles markers
Card stock: Naturals Ivory, Pool Party
Punches: Decorative Label, 7/8" scallop and 3/4" circle punches
Other: Simply Scored, Borders scoring plate, Big Shot, Beautiful Wings embosslits, Pool Party bakers twine,  Neutrals Watercolour Wonder crayons, stamp-a-majig
I'D BE DELIGHTED TO ORDER STAMPIN' UP ITEMS FOR YOU AND HAVE THEM DELIVERED STRAIGHT TO YOUR ADDRESS IN THE UK. I'M COMMITTED TO PROVIDING EXCELLENT CUSTOMER SERVICE AND AM ALWAYS HAPPY TO OFFER HELP AND ADVICE. TO PLACE YOUR ORDER, JUST SEND ME AN EMAIL OR GIVE ME A CALL ON 01280 820593.
• Add a free Sale-a-bration item from this list for every £45 you spend!

My poor son is still poorly but hasn't lost his sense of humour. I was snacking from a bag of almonds yesterday when he suddenly creased up laughing and pointed at the side of the packet. There was an allergy warning printed there which said: "Warning - may contain nuts!" I looked at him rolling around on the sofa. "Hmm," I said. "It's a bit like this house isn't it!"

It's Three Minute Thursday here tomorrow - hope you'll join me then for a fast card!

Tuesday, 19 March 2013

Join Stampin' Up and work from home

Yesterday morning I got a phone call telling me my youngest son had been sick in class. A vision of him upset and mortified flashed through my mind and I told the school secretary that I would be there as soon as possible. When I arrived less than five minutes later, she seemed quite surprised although I was only aware of the sheer relief in my poor son's face. I realised afterwards that she hadn't been expecting me quite that soon and, not for the first time, I felt deeply thankful that I run my own business from home.

In fact, I feel thankful every day, not just because I get to enjoy my work and also be available when my family needs me, but also that I get to be creative, that I work with lovely people who share my passion, that my hobby is all paid for, and that I get a huge sense of achievement from what I do.

Lots of my downline have told me the same thing: they're having loads of fun as Stampin' Up demonstrators and only wish they'd joined earlier!

How about you? Have you been thinking joining Stampin' Up might be a good idea? Well, why not go for it - there really is nothing to lose: If you join my team this week you'll get an additional 25% worth of products in your Starter kit as part of Sale-a-bration. The Starter Kit costs just £99 and you choose £162.50 in products. If you decide it's not for you, there are no penalties and you will get to keep your Starter Kit. You can join online here or do give me a call on 01280 820593 if you'd like to find out more.

Now, how about a card? Here's one I sent one of my downline ladies who was holding an Open House event over the weekend:


I am head over heels with my Borders scoring plate and the pretty scored border on this card is just one of hundreds of different variations you can add anywhere you like on your projects. I masked it off before adding these pretty flowers from Stampin' Up's Easy Events stamp set.


The flowers were coloured with markers and I added a shadow with my Sahara Sand Watercolour Wonder crayon - I love the 3D effect this gives. The Beautiful Wings embosslits butterflies are such gorgeous little embellishments. I like to make up a bunch of them with scraps of card stock so that they're always to hand when I want them.


The sentiment is from Teeny Tiny Wishes which contains 24 sentiments that pair perfectly with the Word Window punch. I attached it to my card with a couple of brads in Certainly Celery to match the butterfly.

Here's what you'll need to make this card
Stamps: Easy Events, Teeny Tiny Wishes
Ink: Black stazon, subtles markers
Card stock: Very Vanilla, Naturals Ivory, Pink Pirouette
Other: Simply Scored, Borders scoring plate, Big Shot, Beautiful Wings embosslits, Subtles brads, Word Window punch, Neutrals Watercolour Wonder crayons, stamp-a-majig
I'D BE DELIGHTED TO ORDER STAMPIN' UP ITEMS FOR YOU AND HAVE THEM DELIVERED STRAIGHT TO YOUR ADDRESS IN THE UK. I'M COMMITTED TO PROVIDING EXCELLENT CUSTOMER SERVICE AND AM ALWAYS HAPPY TO OFFER HELP AND ADVICE. TO PLACE YOUR ORDER, JUST SEND ME AN EMAIL OR GIVE ME A CALL ON 01280 820593.
• Add a free Sale-a-bration item from this list for every £45 you spend!

It seems that my son has picked up a bug which, I have no doubt, found him an easy target after his sleepover at the weekend (or shall we call it a no sleepover?) Every cloud has a silver lining though and at least I get to be on snuggling-up-on-the-sofa duty!

See you tomorrow,

Monday, 18 March 2013

Everybunny chick - you've been framed!

Sorry to have gone missing in action this weekend; it was a sleepover weekend here - need I say more?! - and I'm just catching up now. At Less is More this week, the theme is Frame it - perfect for show-casing the Easter chick I had lined up for Addicted to CAS's current Wings cue word! I've used up lots of scraps in my card today so I think I'll pop over for a romp in Di's Snippet Playground too! Come and see my card:


My favourite frame at the moment is made using the oval Designer Frames embossing folder and then cutting it out with one of the Labels framelits. I mounted the Crumb Cake frame on same-coloured card stock and accented with a little flower and leaf embellishment made with an Itty Bitty punch and the 2-step bird punch.


This adorable chick is from Stampin' Up's Everybunny set - which contains some gorgeous Easter images which can also be used all year round. I coloured my chick with markers and paper-pieced the shell using Naturals White card stock - I love the shell-like texture this has.


I wanted the sentiment to really pop so I stamped it in versamark and embossed it with white embossing powder. TIP: If you find you get specks of embossing where you don't want it, try wiping your card stock with the embossing buddy before stamping and embossing - it really does make a huge difference.

Here's what you'll need to make this card
Stamps: Everybunny, Delightful Dozen
Ink: Pool Party, Early Espresso, More Mustard + markers
Card stock: Crumb Cake, scraps of Whisper White, Rose Red, Certainly Celery, Naturals White
Punches: Itty Bitty punch pack, 2-step bird punch
Other: Labels framelits, Designer Frames embossing folder, Big Shot, Basic Pearls, versamark, white embossing powder, heat tool.
I'D BE DELIGHTED TO ORDER STAMPIN' UP ITEMS FOR YOU AND HAVE THEM DELIVERED STRAIGHT TO YOUR ADDRESS IN THE UK. I'M COMMITTED TO PROVIDING EXCELLENT CUSTOMER SERVICE AND AM ALWAYS HAPPY TO OFFER HELP AND ADVICE. TO PLACE YOUR ORDER, JUST SEND ME AN EMAIL OR GIVE ME A CALL ON 01280 820593.
• Add a free Sale-a-bration item from this list for every £45 you spend!

When my oldest son heard that the house was going to be invaded by my youngest son's friends, he promptly organised sleeping over at one of his friends that night. It is extraordinary how someone who finds organising general day-to-day tidying and homework a bit of a challenge can be ragingly efficient when it comes to something he wants to do! I protested about his sleepover, asking how on earth he was going to get things done while feeling sleep-deprived. He looked at me with those huge blue eyes and gave me a hug. "Don't worry," he said. "When I get back I'll be your little napkin!" I melted and before I could remember to be a tough mum, he'd disappeared out of the door!

Thank you for popping in today. See you tomorrow!

Friday, 15 March 2013

High fashion Fabulous Florets!

I know what you're thinking... those gorgeous flowers in Stampin' Up's Fabulous Florets set are charming but hardly the stuff of the catwalk...


... Well today they are because when I saw this week's Runway Inspired challenge, the black dot on the models t-shirt reminded me of the big flower in the set and today's card happened! Come and see:


I was really attracted to the blocky look of the outfit in the inspiration photo so I cut card stock and striped designer paper and arranged them as a background, rounding one corner to echo the model's shoulder.


The large flower from the Fabulous Florets set was stamped in black stazon ink and centred with a black brad before I attached it to the background. I needed a bold pink accent, so I cut a Melon Mambo tab using the free Sale-a-bration punch and tucked it under the Summer Starfruit layer.


The sentiment is from A Word For You - I liked the fine lines as a contrast to the bold shapes in the image. I really enjoyed making this card but it's not getting me sorted with Easter!

Here's what you'll need to make this card
Stamps: Fabulous Florets 
Ink: Black stazon, Melon Mambo marker
Card stock: Whisper White, Summer Starfruit, scrap of Melon Mambo
Other: Petite Curly Label punch (Sale-a-bration freebie), Neutrals Patterns designer paper stack, black brad, corner rounder, stamp-a-majig
I'D BE DELIGHTED TO ORDER STAMPIN' UP ITEMS FOR YOU AND HAVE THEM DELIVERED STRAIGHT TO YOUR ADDRESS IN THE UK. I'M COMMITTED TO PROVIDING EXCELLENT CUSTOMER SERVICE AND AM ALWAYS HAPPY TO OFFER HELP AND ADVICE. TO PLACE YOUR ORDER, JUST SEND ME AN EMAIL OR GIVE ME A CALL ON 01280 820593.
• Add a free Sale-a-bration item from this list for every £45 you spend!

Yesterday my oldest son accidentally dropped a large cube of melon on the floor while bringing it to the table and our cat Tuppence, aka Slayer of the Fiendish Fish Finger, pounced on it immediately. There followed a complete comedy where she tried to eat the slippery melon (I know - aren't cats supposed to be carnivorous?!) and only succeeded in pushing it around the kitchen floor with her tongue. Eventually she did manage to get a few bites out of it and, presumably finding it lacking in the meaty chunks department, abandoned it for the skivvy to clean up - hmmm, that'll be me then!

Have a lovely weekend and I'll see you very soon,