Pages

Showing posts with label Snowflake Soirée (The Greetery). Show all posts

Friday, 4 October 2024

Christmas in Bloom

Hello, crafting friends!
 
It's a brand new month and a brand new challenge at The Flower Challenge! This time we are concentrating on stenciling.
 

If you are a regular here you will know that I am a massive fan of stencils and particularly like using them to create designs different to the way they were intended! Today I used The Greetery's Always in Bloom layering stencils to create a Christmas card.
 

First, I made a swatch-style background using Funky Fossil's Postage Frame stencil. This required some measuring up a grid, masking with low tack tape and then sponging with pale blue ink. On these little swatches, I stenciled lots of different flowers and berries and leaves, using distress oxide inks and drying with my heat tool between each inking.
 

I did smudge a little of the blue ink but covered it up with the sentiment banner! I made that with the banner from WPlus9's Be Merry and used my stamp positioner to curve a sentiment from The Greetery to fit it. The finishing touches were made with my white Posca acrylic paint pen - LOVE how this stays white on the distress inks!

Okay, now it's your turn! Do hop over to The Flower Challenge blog to check out the gorgeous samples made by the rest of the design team. When you're ready to make your own card, don't forget to make flowers the focus of your creation and include stenciling. You can share with us using the blue Linky button at the bottom of the challenge post.
 
CHALLENGES
I'm linking this card up at the Stencil Fun Challenge where there's an optional halloween theme but I didn't go for it! I'm also joining in at Allorts Challenge where the team are celebrating their 800th challenge - wow! They have an Anything Goes challenge this time.
 
AND IN OTHER NEWS
Poor Eva is fed up with having her paw prodded about and we are no further on in discovering what the problem is. Clipping her claw right back so there is no pressure there has made her much more comfortable and she is able to go careering about over the countryside with her fluffy sister again.
 

We have had some grim weather and the mud is back with a vengeance, so I am doing a lot of bathing dogs and am paying particular attention to that paw. I am going to leave it at that for the time being and monitor the situation; her paw is a bit lumpy and bumpy but we love her and in our eyes she's perfect!

Sending hugs,

Monday, 28 August 2023

Natural merriness

Hello, crafting friends!
 
In the first half of this year, I was so busy that I didn't have much time to craft. And even when I did find a minute, it was a stamp and go type of crafting. What I really love is starting a card, changing my mind, having a lightbulb moment, dragging half my stash out to find the right thing... only to have another idea and swerve off on another tack! Do you know what I mean? That's how this card was made!
 

I had a vague idea of making a Christmas card and I knew I wanted to use some left over botanical die cuts on it, perhaps as a wreath, but the card base started as white until I came over all rustic and brought out the brown card stock, which made me think I might stencil a brick wall using brown ink for a tone on tone look but then suddenly remembered white ink... well, you get the picture!
 

I liked the frosty look of the white ink on the brown card and added extra 'snow' with a white paint pen. Then, inspired by the natural vibe of the card, I rooted about in my DSP drawer for a precious snippet of wood effect paper to make a beam to hang my snippety wreath on with a twine bow. The wreath die from SU had been cut out of green card which I swiped with white ink, and the botanical die cuts from Mama Elephant were white so I coloured those with ink and a sponge dauber, and then glued everything together.


The sentiments are from The Greetery's Snowflake Soirée, the 'be merry' part stamped on the card base and the 'may all your days' part stamped on kraft card, snipped out and popped up on dimensional pads. 

CHALLENGES
I used lots of left over botanical die cuts on this card, a snippet of wood effect paper, an offcut of brown card for the card base and a white offcut to line it with, plus a tiny piece of kraft for the sentiment and some left over twine. All that is to say that I'm playing at the Snippets Playground with this card; I'm also joining in at Jingle Belles where Lauren and Stef want to see cards with a vintage vibe (and I'm hoping my card will pass the Vintage Test!); I'm joining in at Color My Heart Color Dare #563, choosing the left hand diagonal Candy Apple/Toffee/Green Apple; I'm also just in time to join in with Rudolph Days where we make a card to celebrate the 25th of each month, then share by the end of the month.

AND IN OTHER NEWS
Autumn seems to be drawing in a bit early this year. It's still lovely and warm but not boiling hot, and it's quite unsettled. It's actually much nicer for the dogs...
 

... and they get to intersperse their swimming activities with rabbit hunting which is much too hot for Eva with her thick coat in the full sun!
 
PS I must once again state that no rabbit is ever in the smallest danger of being caught by either of these two goofballs!!


Sending hugs,

Friday, 5 August 2022

Merry snowflakes

Hello, crafting friends!
 
I've been wanting to join in with the Christmas theme at The Snippets Playground for over a week now. A rummage through my snippets box brought no lightbulb moment but I finally got out the folders containing my offcuts of card instead!


I made a background on the flip side of a ruined card base, using the Snow Flurry stencil from Funky Fossil and some dark purple ink. Then I set to work cutting snowflakes with my favourite Dies by Chloe snowflake dies. These are great because you really can use tiny little snippets! I cut some stars out of the fragments too using the retired Twinkle punch from Stampin' Up.
 

The panel was cut out using one of The Greetery's Nordic Frame dies. I cut a smaller panel out of the panel with the smallest Nordic Frame die then inlaid it again for a bulk free look. Once the panel was attached to a card base, I topped the inlay with a bold sentiment from The Greetery's Snowflake Soirée, stamped in versamark, heat embossed in silver and fussy cut. And then it was just a matter of arranging the die snowflakes and stars over the stenciled background and adding a few silver accents with silver liquid pearls.

CHALLENGES
So I'm finally turning up at the Snippets Playground with my homework (Sorry I'm late Miss Sarn!); The challenge chosen by Lynda at ABC Christmas is N is for New, O is for Old. I've gone for old stash - the newest thing on my card is the Nordic Frame dies which were released 2 or 3 years ago now; At Sparkles Christmas, Helen is challenging us to use the Sentiment as the main Focus so I'm linking up there too.
 

AND IN OTHER NEWS
It hasn't rained for ages here, so instead of lush green grass we have hay, and there's certainly not a snowflake to be seen...
 

 ... unless you count my very own Special Snowflake of course!

Sending hugs,

Friday, 17 December 2021

Contemporary poinsettias

Hello, crafting friends!
 
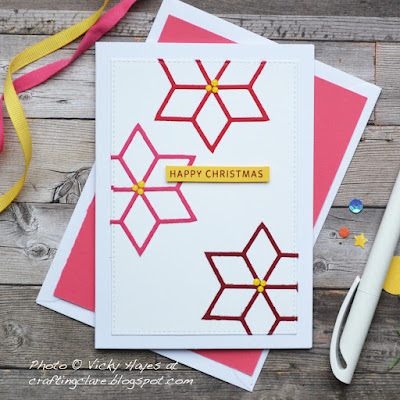
I've finally had time for some snippetty fun today! Last year, I was fortunate enough to win Spellbinders' Optical Illusion Geo dies at Di's Snippets Playground. I was delighted as I have a friend who makes amazing patchwork quilts so I was able to make a personal card for her using the dies. I've found plenty of other uses for them too and the last time I used them, I had a Christmas idea...


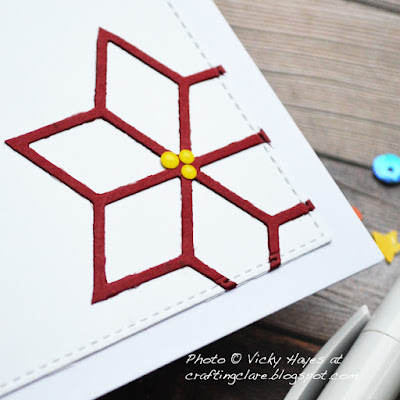
The 'waste' of the large die could be used as a stylised poinsettia!
 

I brought out my red/pink snippets folder, cut three of them and arranged them on a card panel. The panel was trimmed to size with my favourite stitched rectangle die, with the outlines attached so it looked as though the poinsettias were stitched into the edge. I stamped a sentiment from The Greetery in red on a tiny snippet of yellow card, which I popped up on dimensional pads.


I'd decided to inlay the shapes into my poinsettias but in the end I preferred them left as outlines. The left overs can be used on ANOTHER snippets card!! After attaching the panel to a card base, the centres of the flowers (or bracts to be more precise!) were decorated with some tiny enamel dots.

CHALLENGES
This is my entry at The Snippets Playground. Di, who runs the playground, is being a Christmas Angel with help from her canine Elf Dudley! She has laid on a spectacular Grand Prize Draw spanning four weeks over the festive period. You'll need to make a Christmas/New Year-themed snippets card to enter - full details can be found here, but do read the instructions carefully to be sure of a chance to win a prize!


AND IN OTHER NEWS
Eva likes to have a job to do whether it is meeting and greeting what she fondly imagines to be Her Public, or keeping the other dogs in order when they come out with us for walks (they do love her but they really don't see her as a leader at all!) One of her jobs is picking up the mail and at this time of year, her Post Mistress duties are stepped up!
 

Cards and small parcels coming through the letterbox are a great excitement to her and she picks them up one at a time in her soft little mouth and brings them to me with great waggings of her tail! When she has collected them all, I reward her with dried sprats or pieces of cheese and she goes to rest, contented in the knowledge of a job well done!

Sending hugs,

Thursday, 2 December 2021

Merry snowflakes

Hello, crafting friends!
 
Welcome to another fabulous challenge at Tic Tac Toe where we aim to inspire you eight different ways with our boards! Betty has come up with a beauty for this week:
 

I chose the middle column for my simple festive card:
 

I stamped the fun sentiment from The Greetery's Snowflake Soirée in bright red ink on a nice thick card base. The edges were masked off with sticky notes and blue ink blended inwards from the edges, creating a 'glow' effect in the centre around the sentiment. The sticky notes were removed to reveal a border.


Next came the die cutting! The Greetery's Halvsies Diamond die was used to cut a gorgeous deep blue/green plaid paper which was layered over the top of the ink blend to frame the bottom of the sentiment. I also die cut some snowflakes from coordinating card stock, embellished them with clear gems and used them to finish the card.
 
Okayy, now it's over to you! Which column or row will you choose? And don't forget you have the diagonal options too! Do hop over to the Tic Tac Toe blog to admire the gorgeous samples my teamies have made to inspire you. You'll find the Linky Tool at the bottom of the post so that you can link up your own creations with us. We are looking forward to seeing what you make!

CHALLENGES
I'm linking up at Watercooler Wednesday where Heidi is hosting the All About Occasions challenge; I'm also joining in with the fun at Festive Friday where they're celebrating Christmas Jumper Day! I've chosen Red Green and Plaid from the list.


AND IN OTHER NEWS
Never mind card stock snowflakes, we had a taste of the real stuff earlier in the week! Not so much that we couldn't get out but just enough to get us in a festive mood. This was a very good thing for me as I've been so busy with the dogs that my Christmas preparations are very much behind!


On the other hand, Someone had other ideas about how I should be spending my time!!

Sending hugs,

Thursday, 18 November 2021

A happy Christmas ornament

Hello, crafting friends!

Welcome to another Thursday challenge from The Tic Tac Toe Challenge. This week it's my turn to come up with  a board to inspire you and here's what I've come up with:


I'm still happily making Christmas cards and have chosen the top row Plaid/Stencil/Tree to create this festive little number:


I started b creating an ornament, die cutting a circle from a scrap of textured blue card stock and stencilling an ornament top using Funky Fossil's Ornamental stencil. I cut another circle from an off-cut of plaid paper from Stampin' Up and then lopped off half with a curved border die to make an interesting (and unlikely!) snowy hillside.


There are lots of different techniques you can use with stencils; as well as inking directly onto your card base or panel, you can ink through bits of a stencil onto scraps of card and fussy cut - as I've done here using just one of the trees on Funky Fossil's Skinny Trees stencil. Once everything was assembled and glued together, I finished with a sentiment from The Greetery's  Snowflake Soirée and some orange enamel dots.

Okay, now it's your turn! You can choose any row or column or either of the diagonals but first, do hop over to the Tic Tac Toe Challenge site and admire the beautiful samples from my clever teamies! You'll find the Linky Tool there as always and will be able to link up your own creation. Have fun!

CHALLENGES
I'm linking this card up at Happy Little Stampers Stencil Challenge where Anything Goes; I'm also joining in at The Snippets Playground as all items used on this card were snippets - AND The Christmas Kickstart Challenge where Di has put her Elf hat on and is helping Jo celebrate Christmas snippets; I'm also sharing this card at Darnell's NBUS Challenge as the schtencil is Never Before Used Schtuff!


AND IN OTHER NEWS
I'm looking forward to meeting my daughter tomorrow afternoon. We're going for a walk in the grounds of a local manor house and visiting an outdoor Christmas fair - and if that doesn't get me in the mood for preparing for Christmas, nothing will!!

Sending hugs,

Wednesday, 17 November 2021

It's a wrap!

Hello, crafting friends!

Oh the joy of seeing a couple of challenges and snatching some time to join in!


This card looks simple but I had a bit of problem solving to do before it came together. I wanted the stamped 'ribbon' to look as if it was wrapped around the panel, but the stamp I had from Uniko's Background Builders Classics wasn't long enough for a standard card so I trimmed the  card base and panel down a bit. Luckily I had a kraft envelope the right size!


I stamped on the kraft card stock with Stampin' Up's Poppy Parade ink. The kraft darkens it down a bit so Real Red card stock was a good match when I die cut the bows using MFT's Birthday Cocktail die set. The holly sprig is from Budding Beauties Winter by the Greetery.


I had planned a circular tag style sentiment but I couldn't get my elements to work well together. In the end, I found this sentiment from Thye Greetery's Snowflake Soirée which fit the space exactly and that excited me so much I forgot about circles!

CHALLENGES
I loved the brown-paper-parcels-tied-up-with-string in the snow and the sketch at Inspired By this week; Sparkles Christmas Challenge's theme for November is Presents and I thought it would be fun to create a card that looked like a present!


AND IN OTHER NEWS
It was my darling dayughter's birthday yesterday and her floofy sister naturally wished to send birthday greetings. Normally she greets the family with cute little 'hen noises' or raises her nose and 'arooos' gently but since we were celebrating at a distance this year, we sent this:


It is not natural for a retriever to hold a thin rose stem in her mouth I can tell you! I removed all the thorns first and used kitchen paper to create a padded area for Eva to hold on to. She was rewarded with dried sprats!! Isn't she adorable?

Sending hugs,