Pages

Showing posts with label Less is More challenge. Show all posts

Saturday, 6 October 2012

A touch of silver

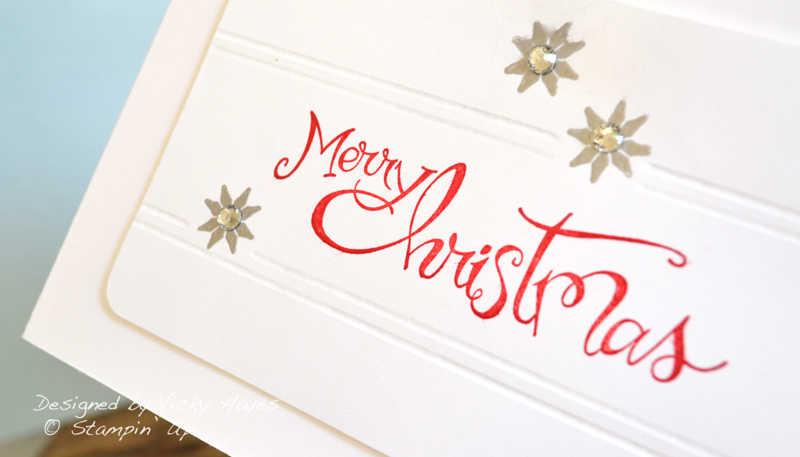
It seems it's world card making day today which amuses me because every day's a card-making day for me! In fact, today is less of a card making day than usual because I have a very long list of chores to do... So it's a very quick card from me, made for the Less is More challenge where Chrissie and Mandi want to see some Silver, and also for the St Lukes Charity Card Challenge where CAS Christmas cards are the order of the day. Come and have a look:


I adore this wonderful ribbon-like new sentiment from Sassy Salutations and felt it deserved to take centre stage on a Christmas card. I versamarked some snowflakes from my Make a Mitten set around it and heat embossed them in silver...


... before decorating the centres with the largest Basic rhinestones. I've tried to photograph them looking  all shiny but failed miserably! You'll have to take it from me - they are lovely and glittery! The scoring was done afterwards so that I could skip the bits where the snowflakes are.

Here's what you'll need to make this card
Stamps: Sassy Salutations, Make a Mitten
Ink: Real Red
Card stock: Whisper White
Other: Versamark, silver embossing powder, heat tool, Simply Scored, Basic Rhinestones, corner rounder, stamp-a-majig
I'd be delighted to order any of these items for you and have them delivered straight to your address in the UK. I'm committed to providing excellent customer service and am always happy to offer help and advice. To place your order, just send me an email or give me a call on 01280 820593.

My daughter is writing an essay about marriage so we were discussing it. I explained that it doesn't cost much to get married in a church but that you do have to pay extra to have a choir, bell ringers, organist etc - 'bells and whistles' as I termed it. "Whistles?" she said in surprise and I suddenly had a vision of a wedding service being punctuated by a slide whistle!

Hope you're having a lovely weekend.
Hugs,

Saturday, 14 July 2012

Three bits of CAS sunshine!

Aargh! What a day! My husband is away today so I gleefully spread my crafting supplies around the house and got down to catching up with my favourite challenges. I was thrilled to see that the challenge at Less is More today is 'Three of Anything' which, I thought in my innocence, would fit in nicely with the new CASology challenge of 'Sun' and I could even use this week's gorgeous ColourQ palette... Here's the card I came up with (see if you can spot the problem):


Three sunflowers! I used my large square punch to make them into faux chipboard tiles by glueing together a stack of Chocolate Chip squares (am I making you hungry?) and topping with the flower image.


Before stamping the flowers, I coloured the rubber directly with Daffodil Delight and More Mustard markers. Once they were stamped, I blended the colours with the Daffodil one. The centres were stamped in Chocolate Chip ink on More Mustard card stock, cut out with my 1/2" circle punch and popped up with dimensionals. Using an image from French Foliage, I added Pear Pizzazz leaves after masking the flower and sponged round the edges of the tiles.


The tiles are mounted on textured card stock and then attached to a Naturals Ivory card base which had been scored to make a home for them. The sentiment is from the wonderful Pocket Silhouettes set and was added with my stamp-a-majig to make sure it was straight.

Of course you all know what's wrong don't you: while this card fits well with the Sun theme at CASology and the colours at ColourQ, it's one layer week at Less is More and I don't think Chrissie and Mandi will let me get away with this one! Grrr... of course I had to go off and make another card then!


This one uses the group of three tea cups from Tea Shoppe - very handy! I stamped them onto a Naturals Ivory card base and added definition with a blue watercolour pencil. Then I masked them and made a swirly tablecloth pattern with a couple of the Everything Eleanor stamps.


I was rather proud of my 'steam' - can you see it? To make it I squashed the lid of my Baja Breeze ink pad so that when I opened it there was a pool of ink in the lid, and used my aquapainter to paint a wavy line from each cup which fades as it goes up.


The cups needed 'grounding' so I scribbled shadows with a So Saffron marker and added a hint of blue. Finally, I stamped the sentiment, using my stamp-a-majig.

Well this is a mammoth post so I do beg your pardon if you've all gone to sleep and I won't list the supplies I've used as I would normally (just email me if you want more info). Instead, I'll leave you with a giggle: I was planning to take my youngest son to a party in Towcester earlier. "I wonder how long it'll take to get to Towcester?" I wondered aloud. "Oh, it's only a few seconds to get to the kitchen," said my daughter waggishly. Yes, this is the kind of smart talking I have to contend with!

Edited to add: Towcester, by the way, is pronounced 'toaster'.

Thanks for looking here today and putting up with my waffling. See you soon,

Wednesday, 23 November 2011

Another Welcome Christmas silhouette

Welcome Christmas has to be one of my favourite Christmas stamp sets! On Saturday, I used it to make this card for the Less is More silhouette challenge and enjoyed it so much that I've made another one using the other silhouette in the set! Come and have a look:


I'm absolutely fascinated by the variety of cream card stocks I have and the way they look together. Here, I've used the gorgeous suede-feel Naturals Ivory for the card base and teamed it with Very Vanilla smooth card stock which contrasts beautifully with the watercolour paper I've used for the focal panel. Actually this isn't a very good photo but you can see it better in the close up:


That's better! Look at the textures - I get very excited about this kind of thing! I made a background by washing three coloured inks over my watercolour paper with my aquapainter and when it was dry (which only takes a few minutes) the silhouette was stamped over the top using Basic Black ink. Watercolour paper is specially designed to take watery inks so it doesn't buckle and the inks blend perfectly. The sentiment is also from the same set and is stamped on a strip of Naturals Ivory card stock, which anchors the panel to the card base.

Supplies needed for this card:
Stamps: Welcome Christmas
Ink: Real Red, Pumpkin Pie, Daffodil Delight, Basic Black
Card stock: Naturals Ivory, Very Vanilla, watercolour paper
Other: Aquapainter, Basic Black marker, dimensionals, stamp-a-majig
I'd be delighted to order any of these supplies for you and can have them delivered to your address in the UK. I am committed to providing excellent customer service and am always happy to help and advise. Just send me an email or give me a call on 01280 820593. 

Yesterday I had some chores to do in Buckingham so I stopped off in the town after collecting my youngest son from school. While we were there it got quite dark and felt so festive with all the bright shop windows showing off their Christmas wares that I thought it would be a good moment to help my son start his Christmas shopping. We spent an enjoyable half hour wandering about looking at things, and even managed to buy one present before my son suggested we have a bit of a rest in our local gelateria... Mmmmmm! I chose a delicious strawberry cheesecake ice while my son opted for a lemon and lime sorbet! It's time to start some gentle Christmas shopping folks and my top tip is to take a ten-year old boy with you!

It's Three Minute Thursday here tomorrow and I shall have some more fast inspiration for you so do pop back if you have a minute.

Hugs,


Monday, 12 September 2011

Masculine Monday - Autumn Days reflection card

Good morning! I'm back to my routine of starting the week with a masculine card and what could be better to inspire me than the Less is More challenge! Mandi and Chrissie are asking for one-layer cards with a 'seeing double' theme this week, and that got me thinking about reflections. Come and have a look:


There's a distinctly autumnal feeling in the air here and that's got me reaching for my lovely Autumn Days stamp set - perfect for those country living men in our lives! I thought it would work well using the reflection technique - yet another great reason for owning a stamp-a-majig! You just stamp the image you want reflected on the imaging sheet and then press the sheet onto the card stock wherever you want it. Let's have a closer look:


The image comes out indistinctly - which is just how it would be if it were reflected in water - and because the imaging sheet is clear, you can see exactly where you're putting your reflection.  I used a scrap piece of paper to make a line to divide my water from my land and sponged Soft Suede and Always Artichoke in for the land and Bashful Blue for the water. I love this technique!

I haven't put a sentiment on this card as I'm using it as a notecard, but it would be easy to add one. Earlier this year I made another card using this stamp set and I'm just thinking that it would be nice to make a set of these cards.

Supplies needed for today's card:
Stamps: Autumn Days
Ink: Soft Suede, Always Artichoke, Bashful Blue, More Mustard, Bravo Burgundy
Card stock: Naturals Ivory
Other: Regals markers, stamp-a-majig
You can buy any of these supplies from me and I can have them delivered to your address in the UK. Just send me an email or give me a call on 01280 820593. Click here to view the Last Chance List - full of stamps and accessories, some at up to 40% off! These items are available only while stocks last - and I have to say some things are sold out already!


I've had an exhausting weekend trying to sort out my Crafting Square Metre - the picture above shows how messy it's become. I've taken down the cupboard and shelving which were parting company with the wall; put all my stamps and other stash in boxes, filled and painted the walls and sadly that's it for the moment. I'll hate living with all that mess so I'll be trying to figure out some amazing space-efficient way of storing everything as soon as possible. If you have any bright ideas do let me know! I was rather touched by all the comments that seemed to assume I really was buying that amazing craft cupboard I showed on Friday's post but I have to tell you that it's just a little bit over my budget! (Well, okay a lot over!)

Thank you for coming to visit today. I'll be back tomorrow and I'll hope to see you then.

Saturday, 23 July 2011

Itty Bitty Buttons wedding

When I clicked on my favourite challenge site Less is More this morning I had to do a double take. Chrissie and Mandi have asked for ribbon and buttons on this week's cards and this card that I made for last week's circles theme would have fit the bill quite well! I had a bit of trouble getting past that idea but eventually came up with a card I was reasonably pleased with - although I couldn't get a decent photo of it to save my life!


I chose Very Vanilla textured card stock for my base and I love the subtle contrast between that and the smooth card stock I used to make the tag-like focal panel. I scored that to make areas for the buttons to sit in, then matted it onto one of my favourite papers from the Springtime Vintage designer paper range.

My starting point for the card was my tub of Itty Bitty Buttons. They are just gorgeous and I've been meaning to use these tiny transparent heart-shaped ones for a wedding or engagement card for a while. I cut hearts out of another Springtime Vintage paper and stuck the buttons to them and I'm really pleased with the effect.


Ribbon at the moment means seam binding to me - I am totally in love with it and this Baja Breeze colourway is one of my favourites! Seam binding ties into bows so beautifully and sits quite flat too which is good for posting.


Supplies needed for this card:
Stamps: Perfect Punches for the sentiment
Ink: Not Quite Navy marker
Card stock: Very Vanilla smooth and textured
Other: Springtime Vintage designer paper, Baja Breeze seam binding, corner rounder, Itty Bitty Buttons
You can buy any of these supplies from me and I can have them delivered to your address in the UK. Just send me an email or give me a call on 01280 820593.


Well it's the first day of the holidays and my poor youngest son is a little under the weather. He's a bit listless and tired so I've arranged him neatly on the sofa with the Diary of a Wimpy Kid series of books and from the giggles coming from his direction, I'm assuming he's enjoying them. My older son is out playing tennis and will no doubt return when his tummy tells him to, and my daughter is busy planning a whole new wardrobe! We could wish for a bit more sunshine but hey ho!

Hope you're having a great weekend. I shall be popping over to see what magic you've worked with buttons and ribbons shortly! See you soon,

Saturday, 9 July 2011

Forest Friends baby card - with legs!

The household was roused by my cackles this morning as I logged onto the Less is More challenge site. Chrissie and Mandi, I discovered, have entertainingly set us the challenge of making a card featuring something with legs! My first thought was a spider... but I don't have a spider stamp, which is lucky as I can't cope with spiders first thing in the morning (or at any time of the morning come to that!) Next I thought of furniture and wished I had the Little Additions set from p.20 of the mini catalogue...

Anyway, then Life happened, and by the time I was able to return to the LiM challenge, I'd come over all gooey! Come and have a look:


I was thinking of Bambi - do you remember when he goes off on his spindly legs with Thumper and learns new words? Well here he is meeting a butterfly! I thought this would make a cute card for a new baby.


'Bambi' is from the Forest Friends set and I think he's adorable! I stamped him in Early Espresso ink and clear-embossed him. The bushes are actually the tops of the oak tree from Lovely as a Tree and the butterflies are a really useful image from one of this year's Sale-a-bration sets So Happy For You.


I built the sentiment out of two stamps and I'm really pleased with how it turned out. Taking bits of a stamp and putting it with another is easy with markers and a stamp-a-majig, and the markers contain the same ink as the full sized ink pads so no need to worry about whether the colours match.

Supplies needed for this card:
Stamps: Forest Friends, Lovely as a Tree, So Happy For You, Hello You, Tiny Tags
Ink: Soft Suede, Pear Pizzazz, Crumb Cake 
Card stock: Whisper White
Other: Marina Mist, Wild Wasabi, Soft Suede markers, Stamp-a-majig
You can buy any of these supplies from me and I can have them delivered to your address in the UK. Just send me an email or give me a call on 01280 820593.

This morning my youngest son came up to me saying "Mummy, what's this?" He then proceeded to stretch his cheeks away from his nose with his hands, making his mouth stretch in a wide line. I looked at him in astonishment. "I don't know," I said faintly. "I don't either," he said cheerfully. "But I've just learned how to do it!"

Thank you for looking at my card today. I know all you other LiMettes out there will have been working hard on this challenge and I can't wait to see what you've come up with. Enjoy the rest of your weekend and I'll see you on Monday with a card for a boy that's WAY outside my comfort zone! Hope to see you then!