Pages

Showing posts with label Neighborhood wheel. Show all posts

Friday, 2 September 2011

Sentimental over sentiments

So, as you've probably seen at the top of my blog, the Stampin' Up Last Chance List has been published with all the stamp sets and accessories from the Idea Book and Catalogue that WON'T carry over into the new catalogue. Some of them are being sold at a discount, but hurry - they're only available while stocks last!

I have mixed feelings about this list as some of the names on it are old favourites of mine. (But of course the new catalogue will have plenty of new offerings to stimulate my creativity so I shall try not to mind too much!) I've used two favourites for today's card. Come and see:


I made this card to say thank you to my kind friend who looked after our house and garden over the weekend when my husband came to join us on holiday in Devon. Do you recognise the little house? It's from the Neighborhood jumbo wheel and has been stamped on watercolour paper, coloured with inks and an aquapainter, and cut out with my sharp paper snips.


This lovely wheel has had 40% lopped off the price and now costs only £5.10! You could unmount the wheel too as I did in this post, and split the buildings up - which would give you houses for a crazy £1 each, plus a kennel! The house is mounted on a strip of paper from the Greenhouse Gala designer range - and it's worth noting that all the paper ranges are retiring except the Patterns tone-on-tone range.


Apparently Samuel Beckett once said "words are all we have" but he had almost certainly never met a crafter! We tend to have loads of images but NEVER enough sentiments - or is that just me?!! The sentiment here has been put together with my stamp-a-majig and three stamps from a brilliant set called Basic Phrases consisting of heaps of words and phrases. They've knocked 25% off this set which is now a bargain at £25.46.

Supplies needed for today's card:
Stamps: Neighborhood jumbo wheel, Basic Phrases
Ink: Bashful Blue, Rich Regals markers
Card stock: Naturals Ivory, Very Vanilla, Watercolour paper
Other: Aquapainter, stamp-a-majig, paper snips
You can buy any of these supplies from me and I can have them delivered to your address in the UK. Just send me an email or give me a call on 01280 820593. Click here to view the Last Chance List - full of stamps and accessories, some at up to 40% off, available only while stocks last.

Writing about Basic Phrases has brought a lump to my throat because my daughter and I have had great fun with this set, vying with each other to make the most ridiculous sentiments. We love to make mad wordy things - this is the card I made her for her last birthday for example, using all sorts of sentiment sets. Anyway, that's enough of going to Mumland!

I really appreciate you popping in today and hope you manage to snap up a bargain! Have a great weekend and I'll see you very soon,


Wednesday, 20 April 2011

Royal Wedding street party invite

It's not long now until our favourite royal couple tie the knot and, all over Britain, people are organising street parties and barbecues. If you've got a bit of a royal 'do' planned, why not send out some of my patriotic invites?!


It was fun to make a Union Jack by masking and sponging. I used the Neighborhood wheel to stamp the houses, cut them out and arranged them on top of the 'flag' in a higgledy piggledy row.


The fabulous Party This Way arrow is from the stamp set of the same name. It's wonderfully graphic and made the perfect sentiment for the invitation.

Here's how to make this card:

  • Take an A5 piece of Whisper White card stock. Score and fold in half to make a card base.
  • Create the Union Jack background on the card front: Use post-it notes to mask off the central cross and sponge with Real Red ink. Now mask the triangles in each corner and sponge them in Night of Navy ink. Add the final line using a ruler and the thick end of a Real Red marker. TIP: Discard the post-its after one use as they smudge if you re-use. Ask me how I know...!
  • Ink up the Neighborhood wheel with Basic Grey ink and roll over Whisper White card stock. Cut the houses out and arrange in a lively row across the Union Jack.
  • Use Real Red and Night of Navy markers to colour the Party this Way arrow and stamp onto Whisper White card stock. Cut out with sharp paper snips and attach to the card front with dimensionals.

Supplies
Stamps: Party This Way, Neighborhood Jumbo wheel
Ink: Real Red, Night of Navy, Basic Grey
Card stock: Whisper White

I absolutely adore the Neighborhood wheel and this card is yet another reason to own it - it's brilliant for party invites! Let me know if you'd like me to order it for you - or anything else for that matter! It's easy to order from me and I can have your Stampin' Up supplies delivered directly to your door if you're not local to me. Just send me an email or give me a call on 01280 810593.

Have fun planning your royal wedding party! I'll be back tomorrow for Three Minute Thursday with a quick thank you card - so do come and join me if you can. Thank you for visiting me, and for your comments, and also for your support in following my blog - I truly appreciate it.

Friday, 18 March 2011

Coordinated gift set using the Neighborhood wheel

Today I have a lovely project to show you! Friends of ours have just moved into the most gorgeous rambling old Victorian villa and I made this card to bring along when we visit. Because it's for both of them, I didn't want anything too feminine so...


...Yes, I had to get my Neighborhood wheel out again! My favourite thing to do with this is to wheel it onto Stampin' Up's gorgeously thick water colour paper, colour the houses with an aqua painter and cut them out. To make the background strip, I just masked off the area I wanted and sponged Certainly Celery ink in it. It really does anchor those houses.


Here's a close-up of the houses. Aaaargh! I've just noticed there's a crumb on the step of the front house! How did that get there?!


I think it might have been something to do with these yummy biscuits I made to go with the card. Home-made biscuits are a great way welcome a family into their new home! I packaged them in a simple Crumb Cake box with a liner made from Certainly Celery Patterns designer paper.


The box is wrapped in cellophane and tied it up with a Certainly Celery grosgrain ribbon. I made a tag to match the card and tied it onto the ribbon with lovely linen thread - I couldn't do without this stuff!


Here's the unwrapped box with its liner. Oh those biscuits smell divine! They are a secret recipe - once tasted never forgotten!


Yum!

Now, don't forget that the Neighborhood wheel is on special offer until the end of March - only £5.95, down from £8.50. I really do think it makes a great addition to any stamp collection - it's perfect for all sorts of projects and for people of any age or gender. Get yours by emailing me or giving me a call on 01280 820593. Click here to see the other items on special offer this month!

Before I disappear for the weekend, I just want to share something that happened this week. My youngest son was leaning over my shoulder while I was writing an email to his teacher. "Why have you put an exclamation mark?" he asked. "Because I wanted her to know I'm joking," I told him. He looked at me disapprovingly. "Why don't you just write LOL JK?" he suggested. Oh dear, am I getting old?

Thank you so much for your visits to my blog. I love to know that people are looking at my work - and even reading my ramblings! It makes my day when you make a comment or email me and I am always thrilled when someone likes my blog enough to follow me. Have a wonderful weekend!

Wednesday, 9 March 2011

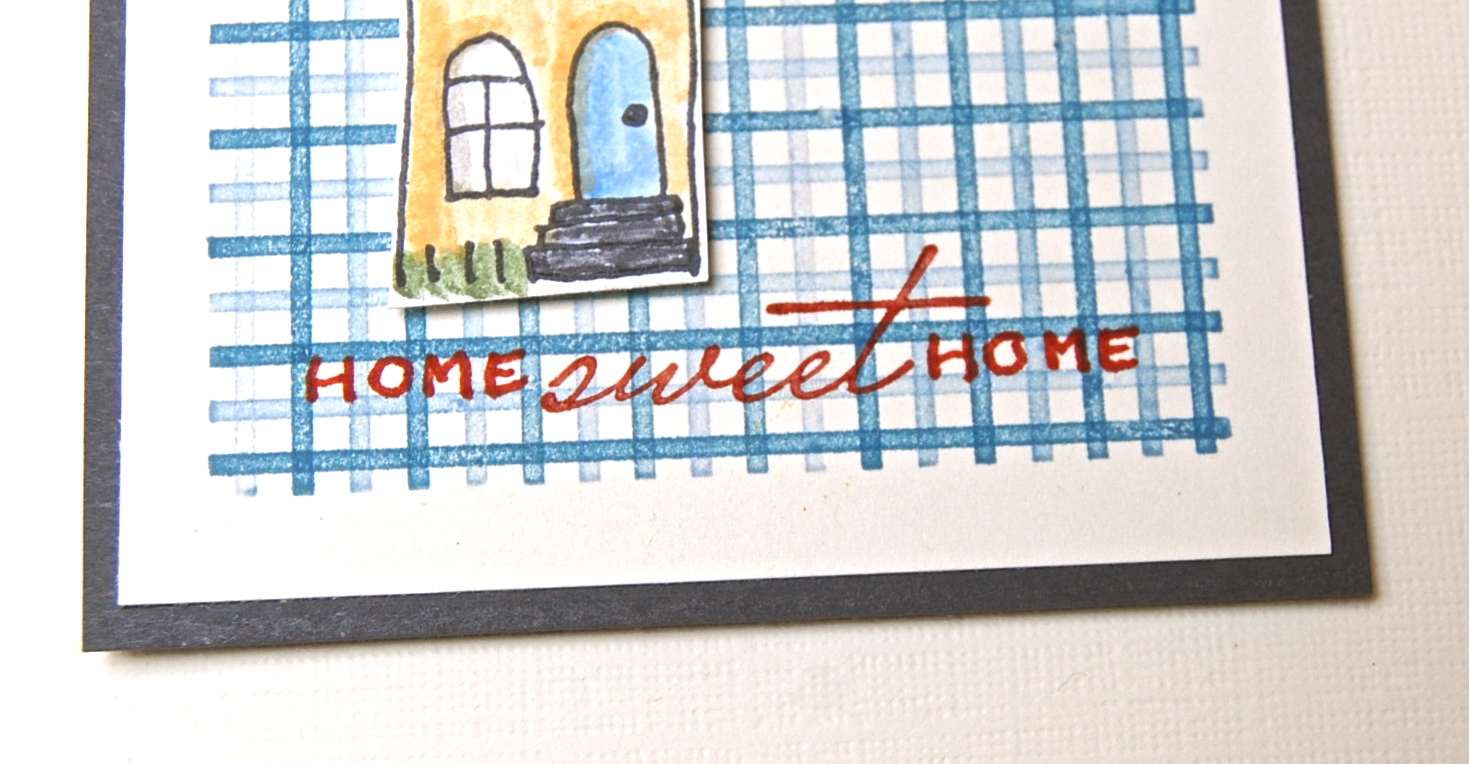
Home sweet home framed picture

You may have noticed that I've been using the Neighborhood wheel a lot lately! I spotted it on the March Frenzy special offer list at only £5.71 (down from £8.50!) and I'd forgotten how much I love it! Today I've used one of the houses on the wheel to make a little framed picture that would make a great gift for someone moving into a new house or just someone who loves their home! Look:


This was inspired by a sweet (and shockingly expensive!) embroidered picture I saw in a local gift shop.


The faux gingham was made with the Solid Stripes background stamp and is my favourite way of using it.  Notice that I've mounted the picture on a piece of textured card stock for that linen look.


The word 'sweet' is from a little-seen sentiment stamp set called Hello You. You'll find it on page 86 of the Idea Book and Catalogue - I use it quite a lot! I just wrote the word 'home' - it's quite easy to form relatively even letters using the faux gingham as a guide.


That little heart has been snipped from one of the flowers in the Boho Blossom punch. I love how tiny and perfect it is!

Here's how to make this picture:

  • Stamp a square of 'gingham' onto a 7.75cm square of Very Vanilla card stock, using Bashful Blue and Marina Mist markers and the Solid Stripes background stamp. TIP: Leave two of the stripes uncoloured to make a square shape; use a stamp-a-majig for accuracy.
  • Use the stamp-a-majig again to stamp the word 'sweet' at the bottom of the gingham. Write the word 'home' on either side using a Real Red marker.
  • Stamp a house with the Neighborhood wheel. Colour it using markers and an aqua painter and cut it out using sharp paper snips. Attach it to the gingham with dimensionals.
  • Cut a tiny heart out of one of the small flowers on the Boho Blossoms punch. Glue it to the picture.
  • Mount the panel onto an 8.25cm square of Basic Grey card stock.
  • Stick this to a piece of textured Very Vanilla card stock cut to fit a square frame.

Supplies
Stamps: Neighborhood wheel, Hello You
Ink: markers
Card stock: Very Vanilla textured and smooth, Basic Grey
Other: Boho Blossoms punch, square frame

I loved making this quick and easy project and I have an idea for another picture too, so watch this space!

Well, yesterday was Shrove Tuesday - a day for eating pancakes in our family. I have a brilliantly simple recipe (6 oz flour, 3/4 pint milk, 3 eggs - throw them into a food processor and whiz for a few minutes. Cook each pancake in hot butter and serve sprinkled with lemon juice and sugar) which is supposed to be enough to feed an army. Actually two armies! Hmmm. Put it this way, I think I'd better double the recipe next year!

It's Three Minute Thursday tomorrow and I have a speedy little set of cards to show you. In the meantime, if you'd like to buy any Stampin' Up craft goodies or a catalogue, or if you have any questions or suggestions, do send me an email and I'll get straight back to you.
Happy crafting!

Tuesday, 8 March 2011

Less is More challenge 5 - using the Neighborhood wheel

I have really enjoyed the challenges on the fresh, new Less is More site  and was eager to see what Chrissie and Mandi would set for challenge 5. It's all about colour this week - we are asked to make a card using pastel shades. So, here's what I came up with:


I couldn't put my Neighborhood wheel down now I've rediscovered it, and anyway I thought that ice-cream coloured houses would definitely fit the bill. Out came my trusty aqua painter and my beautiful water colour paper! If you haven't tried these items yet - go on! Treat yourself! They have brought me hours of pleasure. They'd make a perfect gift too...


I planned a garland of spring blossom to add the finishing touch but, as you can see, I let my imagination run away with me a bit... I mean, who ever saw blue blossom?!! Never mind, you get the idea I'm sure! The garland is made from flowers cut out of the circle image in the Just Believe stamp set and leaves cut with the 2-step bird punch. You could also use a punch to make flowers if you wanted a quicker card. The Happy Birthday sentiment is from Party This Way and I love it - it has such a happy feel!

Here's how to make this card:

  • Score and fold an A5 piece of Crumb Cake card stock in half to make a card base. Mask off the top 7cm of the card front with post-it notes and sponge the bottom of the card with Crumb Cake ink to darken it a little.
  • Stamp the Neighborhood wheel onto water colour paper using Basic Grey ink. (I don't find it necessary to use Stazon as long as I'm careful when watercolouring.)
  • Select three houses  and paint them in ice cream colours. The technique I use is to colour round the edges with markers and then draw the colour in with an aqua painter. Use colours from the Subtles family plus Basic Grey for the roofs and the steps. Leave to dry for a few minutes and then cut the houses out using sharp paper snips. Glue them to the card front, using the darker section as an anchor.
  • Stamp a sentiment in Basic Black ink, using a stamp-a-majig to make sure it's straight.
  • Stamp the floral circle image from Just Believe ten times onto Whisper White card stock, using pinks and mauves (and blues if you're feeling a bit wacky!) Cut the flowers out using paper snips, leaving a border of the colour round their edges. Define the seeds in their centres with a Basic Black marker.
  • Cut three leaves from Certainly Celery card stock, using the 2-step bird punch. Add definition to them with a Certainly Celery marker.
  • Use the flowers and leaves to make a garland under the houses, using dimensionals to pop some of the flowers up.

Supplies
Stamps: Neighborhood wheel
Ink: Basic Black, Basic Grey, Subtles inks and markers
Card stock: Crumb Cake, Whisper White, Certainly Celery, Water colour paper
Other: 2-step bird punch, Basic Black marker

Do you ever dream of a day where only amazingly brilliant things happen? Of course, days like that never, ever happen - right? Wrong! Yesterday, my youngest son had a day like that! He was just getting ready for a humdrum day when I got a text from his school saying it was having to close due to a power failure - his face was a picture when I told him! While I was suggesting we use the time to get him some new school shoes (boring!) the phone rang - it was a friend inviting him for lunch and a play in the park. I told him we'd get home in time for that but, before we could leave, another friend phoned and asked him round for the morning! The impromptu day off could have been a cold, rainy one - but no! To make it even more of a miracle the sun was shining in a cloudless blue sky, so he and his friends spent the day romping around in the sunshine. When I tucked him up in bed last night, I asked him if he'd had a good day. He gave me a huge smile. "It was perfect!" he said.

Thank you for your company today and I hope you've enjoyed your visit here. I shall be back tomorrow with a gift idea made with the Neighborhood wheel and I hope you'll come and see it. Until then I wish you a 'perfect day'!

Monday, 7 March 2011

Masculine Monday - using Neighborhood wheel

Good morning! Welcome to Masculine Monday, my weekly series to inspire you to make cards for the male people in your life!

Today, I've been using my Neighborhood wheel, which I haven't used for a little while and which is on special offer during the month of March - £5.95 instead of £8.50! I have to warn you, I have completely fallen in love with this wheel all over again and you may be seeing quite a lot of it over the next few days! Here's a card that would work as an anniversary card - or whenever you'd like your man to know you love him!


My starting point for the card was the image of the semi-detached houses on the wheel which would be 'together forever'. I don't have that sentiment in stamp form so I decided to make one on my computer, but then decided 'I'm VERY attached to you' was less of a cliché. I'm quite pleased with the way it turned out but I have to say that a stamped sentiment is a lot less trouble!


I chose to use only black, white and red for the card which makes it look very graphic and left the houses uncoloured for that sketched look. The red 'fence' behind the houses is another wheel - the railway image 'Right on Track'.

Here's how to make this card:

  • Design a sentiment using your computer. Print it out on the bottom half of an A4 piece of Whisper White card stock on either the right or the left. (You'll need to work this out for your own printer/computer/software.)
  • Cut the printed A4 sheet in half lengthwise. Score and fold in half to make a card base with the sentiment on the card front.
  • Stamp the Right on Track wheel above the sentiment using Real Red ink.
  • Stamp the Neighborhood wheel on a spare piece of Whisper White card stock using Basic Black ink. Cut out the semi-detached houses with sharp paper snips and attach it to the card front over the top of the 'fence' and above the sentiment. Add a heart cut out of textured Real Red card stock with the small heart punch.

Supplies
Stamps: Neighborhood, Right on Track wheels
Ink: Basic Black, Real Red
Card stock: Whisper White, Real Red textured
Other: Small heart punch

Well, you'll be glad to know that the temperature DID rise above 2 degrees at the weekend so I did leave the house! My husband and I went to see the brilliant and moving film 'The Kings Speech' and then had dinner at Café Rouge, where our charming young waiter offered me a large chocolate sundae on the house as the creme brulé I'd ordered wasn't available. It would have been churlish to refuse and of course I didn't want to be rude...

Don't forget to check the special offer list for the Neighborhood wheel and all the other bargains and, if you'd like to buy anything, just click here to email your order to me.

Thanks for joining me for Masculine Monday today. I'll have something much more feminine to show you tomorrow, so I do hope you'll join me then.
Happy Monday!

Thursday, 9 September 2010

Three Minute Thursday - using the Neighborhood wheel

Welcome to another Three Minute Thursday, my weekly series for crafters that like their cards to be speedy! Today I'm using my gorgeous new Neighborhood jumbo wheel - ideal for fast cards and loads of other projects too.

When I timed today's card, it actually came in at four minutes but if you prepared your card blanks in advance, you could easily shave a minute off that time. Here's what I came up with:


The houses remind me of those lovely ice-cream coloured ones you see in harbours in Devon and Cornwall.

Here's how to make this card:

  • Cut a 9cm square Whisper White card blank.
  • Ink the wheel up with Basic Grey and run it across the middle of the card blank.
  • Sponge some Bashful Blue ink at the top and some Certainly Celery at the bottom.
  • Now colour in the image using markers. Be quite slap-dash as the 'naive' colouring goes well with this style of stamp.
  • Stamp a sentiment using a stamp-a-majig for placement.
  • Punch a 1/8" hole and knot a piece of striped grosgrain ribbon through it. 

Supplies
Stamps: Basic Phrases
Ink: Basic Grey, Bashful Blue, Certainly Celery
Card stock: Whisper White
Other: Soft Subtles markers, Close to Cocoa marker, So Saffron striped grosgrain ribbon, 1/8" punch

Here's a closer view:


And (because I'm Mrs Photography today!) from the side:


Don't worry - I managed to restrain myself from taking photos of the back, underneath etc...!

You may be wondering if the Neighborhood wheel is on the Last Chance List... well no, it isn't. But there are lots of other wheels on the list - including my favourite It's Beautiful wheel - so if you want them, you'll need to get them soon because at the end of September they'll be gone for good! Click here to have a look at the Last Chance List and if you'd like to order anything, give me a call on 01280 820593 or click here to send me an email.

By the way, I do apologise to anyone that visited my blog last Thursday only to find this gift card holder that took considerably longer than three minutes! Sorry about that - I'd just returned from a camping trip in Somerset and I think I was suffering from car-lag and lack of sleep!

Hope you're having a happy Thursday.
I have a lovely bright card to show you tomorrow.
Hope to see you then!