

Would you like to know how it's made? Come and have a look:

I'm going to start with a piece of Sahara Sand card stock, 4" x 4" and a piece of designer paper, 8"x 8 1/8" - don't miss out that extra 1/8" on one sided because it's important!

First I'm making a simple box by scoring 1" in from the edges all the way round the card stock.

The score lines are flattened with a bone folder and I use my lovely paper snips to cut flaps as shown above.

Rounding the corners gives a nice neat finish inside the box.

I always use Sticky strip on boxes and bags - it's so strong that I know nothing will come apart! (It's also useful for keeping bra straps in place under strappy dresses!)
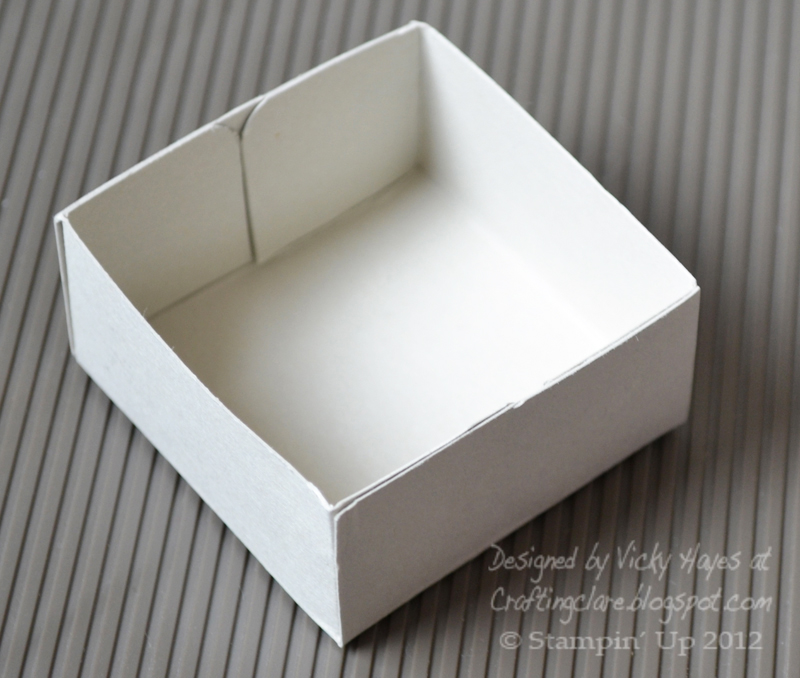
Here we are - the basic box! Now for the wrap around bit!

I'm basically going to score at 2", then 3" in from the edge on three sides but on the fourth side (which should be one of the long sides, the piece that's 8 and the extra 1/8") I'm going to score at 2 1/8" and 3 1/8". This makes a nice, neat finishing flap.

All those score lines need folding crisply, so out comes the bone folder again!

I'm going to cut away quite a lot of the designer paper at this point - basically leaving just a cross shape like this:

Notice that the longest flap has had its corners rounded - that's going to be the one that shows.

Now the bottom of the box can be glued to the middle of the cross shape leaving flaps that fit round it. The box I've shown you today is the perfect size for a brooch or other piece of jewellery - or indeed a lovely stamp from the Mixed Medley hostess set (I know lots of lovely people who would squeal if they found this under the tree!)
The box is ready for embellishing now. I used Cherry Cobbler seam binding to tie it up and the merry Christmas sentiment from Mixed Medley, which cuts out perfectly with a 3/4" circle punch, mounted onto a glittery snowflake from my Snowflake Season Simply Scrappin' kit.
Are you shocked at all the designer paper I've wasted? But of course it's not wasted - it's perfect for making a coordinating card! Come and see:

I've cut four pieces out of the designer paper waste using a square punch and arranged them in a grid. All it needs now is a gorgeous, glittery layered snowflake and some of that luscious Cherry Cobbler seam binding! I wonder if this counts as a snippets card? If it does, I think I get to frolic about in Di's Snippets playground with all the big girls! Whooopee!
Do you need any Stampin' Up goodies?
I'd be delighted to order any Stampin' Up items for you and have them delivered straight to your address in the UK, France, Deutschland, Nederland or Osterreich. I'm committed to providing excellent customer service and am always happy to offer help and advice. To place your order, just send me an email or give me a call on +44 (0) 1280 820593.
Well this has been a long post so I think it's high time I stopped rambling on and did something useful instead! I'll be back for Three Minute Thursday tomorrow when I'll have a fast Christmas card to show you. Enjoy halloween if you're celebrating it!

Super cute gift box and matching card, and very thrifty too! x x
ReplyDeleteWhat a super tutorial Vicky and a gorgeous little box and card. I am so loving those glittery snowflakes. xx
ReplyDeleteIt's just lovely V! Thanks for such a detailed and easy to follow tutorial...not to mention inspiring!
ReplyDeleteHi Vicky
ReplyDeleteWhat a brilliant post .. .. love the finished projects.
Sorry I am a stranger here. Life is super busy nowadays and blog visiting is suffering big time!!
Hope all is well with you.
Love Jules xx
Thank you for the great tutorial! Your box and card are very pretty.
ReplyDeleteThank you, Vicky! You are so generous with your time. Pinned this guy!
ReplyDeleteWhat a beautiful box & card combo! I make lots of boxes, but never thought to round the corners like you did, but that really makes them go together well! The snowflake looks stunning! TFS!
ReplyDeleteLoved your tutorial. Cute little box and matching card. x
ReplyDeleteWhat a very sweet little box Vicky, I love the papers and the beautiful card too, that snowflake is so sparkly and pretty!
ReplyDeleteHi Vicky
ReplyDeleteWelcome to the Snippets Playground :) Love the box and it's a fab tutorial too. Hope to see you playing again.
Hugs, Di xx
Wonderful! Your ideas are always great! I love this box with coordinating card!
ReplyDeletePetra from Germany
Wonderful and beautiful, thanks for the tut
ReplyDeleteHi Vicky - thank you so much for the wonderful tutorial - the box is beautiful (love that SU snowflake). Well done for using the leftovers on a matching card - Di will be very impressed!
ReplyDeleteThanks also for the lovely comment on my leaves card - it was an interesting thought that the colour of my top may have caused the blue patch on the photo, but I was wearing a dark pink top at the time, so it remains one of life's little mysteries!!!
Hugs, Sylvia xxx
Both the card and box are fabulous! Love the DP you used for the box and the shine and snowflake! This size box would be great for so many different things! Thanks for the instructions too!
ReplyDeleteLynn
Thanks for the tutorial, Vicky, I'll have to give it a go. The little package looks great finished off the the snowflake!
ReplyDeleteYoo hoo . . . THERE you are . . . I've been waiting for you. C'mon, let's go play on the swings! Wheeeeeeeee!
ReplyDeleteLOVE this gorgeous snippets make. Thanks so much for doing the show and tell.
Big Hugs
Sarn xxx