Pages

Showing posts with label Butterfly Basics (SU). Show all posts

Thursday, 1 February 2024

Paper roses

Hello, crafting friends!
 
Welcome back to the Tic Tac Toe challenge! We're back with all our usual inspiration but we're giving you two weeks to join in with each board this year :) Design Team O launched the first board two weeks ago, and now it's Team X's turn to inspire you to create! I got the privilege of making the board this time and I hope you enjoy my suggestions :)
 

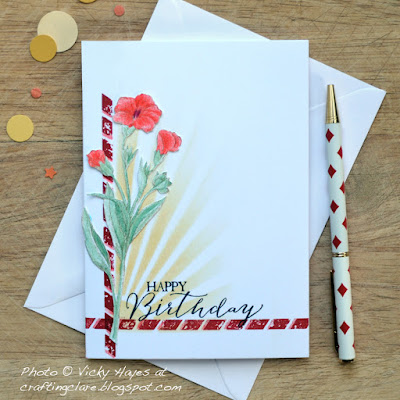
There are valentine rows and columns for those that love the Season of Lurve! But I've tried to make everything versatile enough for other occasions too - as shown by the bright and cheery birthday card I've made:
 

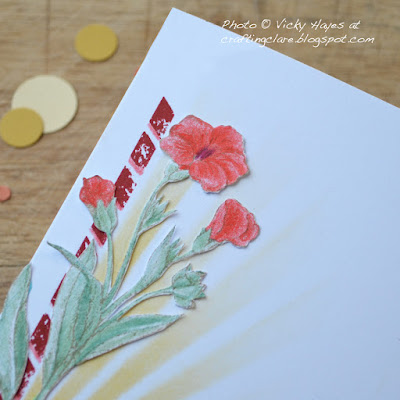
I started with my Altenew Layered Rose die set, cutting the flower and leaf layers out of left over white card. I used three shades of red for the roses, sponging them roughly to get more variation, and two shades of green for the leaves. Once they were dry, I assembled them with glue (I have double sided adhesive sheets on order!!) and set them aside.
 

The snippet of beautiful mustard-coloured paper was found deep in the designer paper drawer! I trimmed it to fit the width of a card base and cut the top diagonally. The flowers and leaves were arranged on the diagonal and glued in place. I finished with a sentiment from The Greetery's PreText Sentiments set stamped in mustard, joined with a cursive 'birthday' from a retired SU set.

Okay, it's your turn now! Here's how to play: First, hop over to the Tic Tac Toe challenge blog and admire all the amazing inspiration the design team has come up with. Second, choose a row or column from the board and create a card using the suggestions. Third, use the Linky Tool at the bottom of the post to share your card with us - we can't wait to see what you make!

CHALLENGES
I'm linking this card up at Seize the Birthday where I'm going with the Anything Goes option; also Make My Monday, where Pamela has chosen 'Use your Patterned Paper' as her challenge; The colours were chosen from Colour Dare #584 - Sundance, Jade and Candy Apple.
 
AND IN OTHER NEWS
Such a lovely bright day today! Recently, I'd promised a friend a rug we've had stored away in the garage so I asked OH to help me get it out. It took half an hour of hard labour to locate the rug and heave it out, and afterwards, perspiring gently, we uttered those terrible words: "We really must have a clear out!" We stared at each other in horror until one of us came to our senses and said hurriedly: "When it gets a bit warmer!"

Sending hugs,

Saturday, 30 December 2023

Stamping stamps!

Hello, crafting friends!
 
Back in the summer, I was so busy I had no time to craft and even less time to blog! I did, however,  find time to buy the Waffleflower Postage Stamp Collage die which made my heart beat faster on its release! Of course I only took it out of its wrapper in December (can anyone relate?!) and it has not disappointed. I had so much fun making this card and I think it might have been my favourite of the year!
 

There are stencils you can get to go with this die but I just used the die itself as a stencil, sponging blue ink into the stamp shapes, and it worked perfectly well! Then came the fun bit: I used a couple of new-to-me Greetery sets (Pretty Postmarks and Pine Blossom) to design my own postage stamps, adding script and other images for a collage effect. The Christmas Blessings sentiment came from Uniko's Peace on Earth set.
 

American frame dies are made for US A2 cards, but I usually just trim a bit of the height of my cards to make them work. On this occasion, I had a little lightbulb moment! I remembered a retired Stampin' Up set (Butterfly Basics) that had an airmail pattern stamp on it, and stamped it in red as a frame around three sides of the card base.
 
 
I was really pleased with that final touch - and isn't it amazing how many stamps and dies from different eras and different companies work perfectly together!

CHALLENGES
The die set and two of the stamp sets are Never Before Used Schtuff, so naturally I will zoom over to Darnell's NBUS challenge to share. PS. I'm very proud to have a card from last month showcased there! I'm also joining in with Stamping Sensations where we are asked to use Favourite Colours - I love all colour but this is a favourite Christmas combination; We Love Stamping has a Winter Flowers and/or Foliage theme so I'm also linking up there.

 
AND IN OTHER NEWS
I've always loved hearing the sound of the letter box before Christmas! There are always some exciting cards to open or parcels containing gifts that need to be wrapped. After a few unhappy incidents when Eva was a puppy and chewed up the post, I taught her to gather up the mail and bring it to me. She was rewarded handsomely for this and has been a keen helper ever since. But his year, we've had another pup in the house of course! Eva wasn't prepared to give up her task but Lulu watched carefully and then decided her job would be to give a wuff to alert everyone to the fact the post has arrived. Oh dear, this is NOT something I feel should be rewarded! I have a long list of training that will begin in the new year!

Sending hugs,

Monday, 17 July 2023

Feel better with forget me nots

Hello, crafting friends!
 
The other day,  I was looking up forget me nots to see whether they had 4 petals or 5. It turns out they usually have 5 but can have 6 but never mind that, while looking I started to wonder whether I could put a leaf stamp and a little flower stamp together and make forget me nots... And so this card happened:
 

The leaves are from a flower in a long-ago retired Stampin' Up set called Butterfly Basics and the tiny flower is from a freebie SU set from a few years ago called Thoughtful Blooms. I inked up the stems and leaves from the first flower with a green water-based marker and stamped it along the bottom of a card base, varying the height and angle. I was then able to add the tiny flower to these images, stamping repeatedly in pale blue ink.
 

For a bit of depth, I used coloured pencils to add yellow flower centres, to vary the intensity of the blue petals and to shade in the leaves and stems with green. 


To finish the card, I stamped a favourite sentiment in blue ink and tied some yellow bakers twine to the edge, finishing with a neat bow.

CHALLENGES
I used the colour palette from Sunday Stamps to create this card so I'm linking up there; I'm also linking up at Stamping Sensations where the theme is Summer Flowers and We Love Stamping where the theme is Fabulous Florals.
 

AND IN OTHER NEWS
Earlier on in the year, when my daughter found her wedding dress, we had conversations about the little rhyme for a bride:
 
Something old
Something new
Something borrowed 
Something blue

For 'old' and 'borrowed' I lent her these little vintage pearl earrings, very simple and just what she wanted.
 
 
'New' was easy as her dress and shoes were new. But we were stumped on the 'blue' for a while. In the end, I asked her if she would trust me to embroider something on the inside of the dress where no-one would see it and she agreed (clearly not knowing that embroidery is not my forté!)
 

And so I had a go at embroidering a tiny forget me not on the inside of one of the seams. It's not expertly done but she seemed to like it and it was a personal touch.
 
Speedwell with their 4 petal heads

It turns out it isn't a forget me not (which, as I now know, has more than 4 petals) but is more like a speedwell!

Sending hugs,

Friday, 4 February 2022

Blooming in the sun

Hello, crafting friends!
 
What a pleasure it was today to have a rummage through my older stamps and come up with a pretty floral birthday card using inspiration from some favourite challenges :)


I used a long-ago retired Stampin' Up set called Butterfly Basics that I used to have when I was a demo, and that a very good friend found and gifted to me last year (thank you so much lovely!) I started by masking off the side and bottom of a thick card base and sponged yellow ink into Clearly Besotted's Sunny Day stencil. The long stamp from the set was used to create a strong vertical and horizontal axis.


I stamped the flower on a piece of scrap card, coloured it with coloured pencils and fussy cut it. To tie the flower into the background, I used the red pencil to add a shadow to the darker red stamping too.
 

To work out the position of the sentiment, I first positioned the flower on the card front without glue.  Using a stamping platform, I stamped the sentiment several times for a nice crisp black finish and then glued the flower in place.

CHALLENGES
I used Linda's fabulous sketch from this week's Freshly Made Sketches, so I shall link up there; I'm also playing along with Allsorts where Brenda has chosen an Anything Goes theme with the option of adding a stencil; and last but not least, I'm finally managing to join in at The Paper Players where my friend Joanne has come up with a fun tic tac toe board to inspire us - I chose the centre row CAS/Flower/Birthay.


AND IN OTHER NEWS
This is the time of year I look out for flowers on my walks. There's not much blooming in the countryside (apart from bloomin' mud!) but in the parks and gardens there are bulbs beginning to come out as well as some other brave plants. Look at these wonderful snowdrops I found on a local walk that uysed to be a railway line! 


Eva is trying to eclipse them with her beaming smile and I might be biased but I think she has succeeded!!

Sending hugs,

Tuesday, 15 June 2021

A bit dotty

Hello, crafting friends!

Welcome to another glorious day here in the heart of England :) There's a colour challenge starting today at CAS Colours and Sketches and it couldn't match the weather better!


I couldn't wait to use these delicious colours that reminded me of mango sorbet, strawberry daiquiri and sun-drenched mint leaves! Having said that, I went in a different direction and brought out a beautiful flower gifted to me by a lovely friend:


I presented the flower on Uniko's Background Blocks Halftone, stamped in Mango Melody ink directly onto a card base. The flower, from Butterfly Basics by Stampin' Up, was stamped in the Olive ink over the top. I coloured it with coloured pencils which allowed the dots to show through. I liked the texture this gave the leaves and stems but preferred a cleaner look for the flowers, so...


... I stamped the flower again in pale pink ink, coloured the petals and sepals with my coloured pencils and cut them out, glueing them over the top of the originals. To finish, I stamped a retired sentiment in the space under the flower.


So now it's your turn - and who wouldn't enjoy playing with these uplifting colours? Come on over to the CAS Colours and Sketches blog where the team and this month's special guest, Deborah Wheeler, are waiting to inspire you. You'll find the Linky Tool there too so  that you can upload your own creation. I can't wait to see your take on these colours - but don't forget to keep it clean and simple!

CHALLENGES
I'm linking this card up with CAS on Friday where the theme is Flowers; and The Flower Challenge, where the challenge is clean and simple.


AND IN OTHER NEWS
Right, who's joining me for a strawberry daiquiri?!

Sending hugs,