Pages

Showing posts with label birthday cards. Show all posts

Saturday, 10 February 2024

One layer sprigs and splatters

Hello, crafting friends!
 
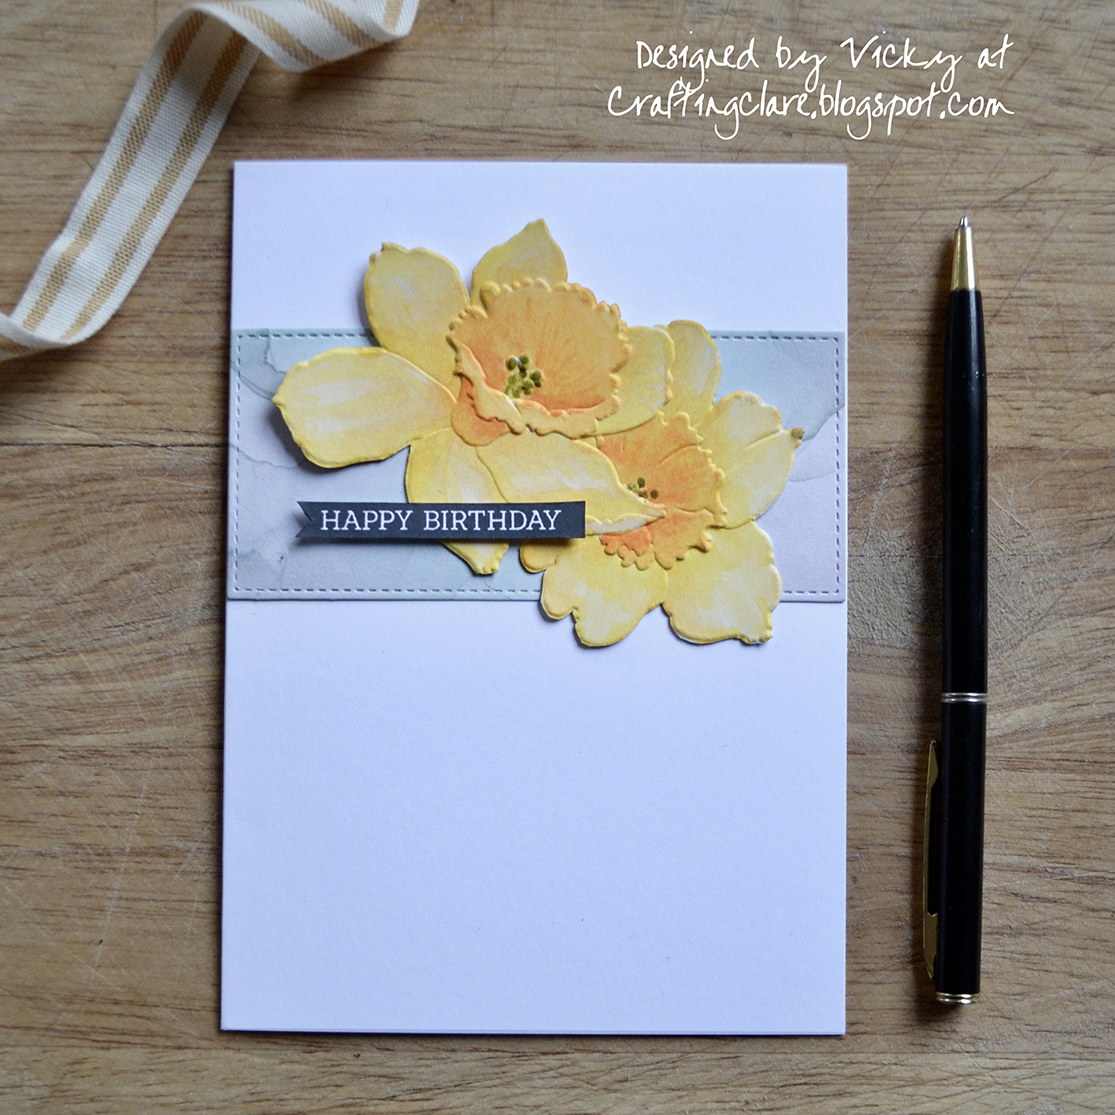
When I get Christmas or birthday money, I immediately run my inner eye over all the craft items I could treat myself to! How about you? This year, after Christmas, I splurged on a some of my favourite stamps and dies from The Greetery (Seven Hills Crafts is the exclusive Greetery retailer in the UK. You're welcome!) Fleur Impressions was one of the stamp sets:


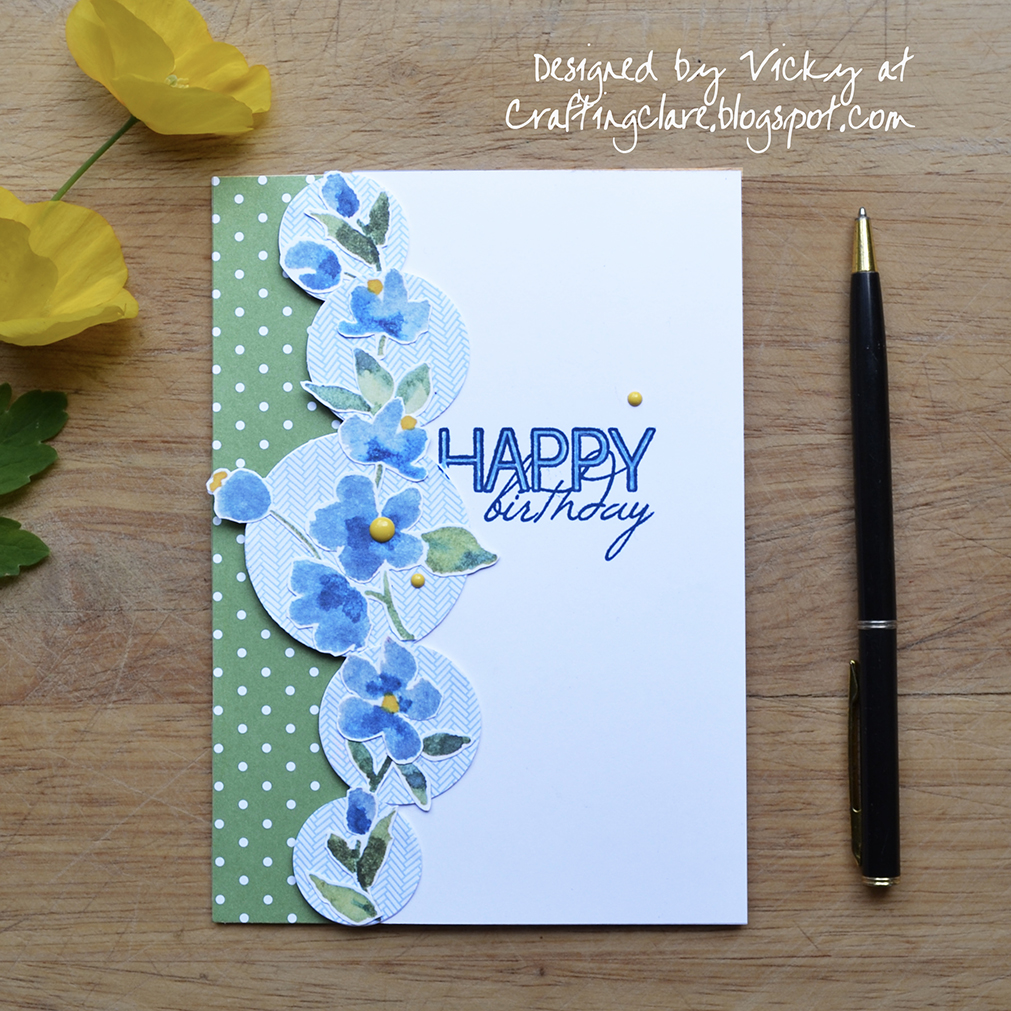
The set contains beautifully drawn roses and other flowers which feel beautifully romantic when used in clusters together. But when I was having a play the other day, I came up with a design using just one of the flower sprigs. I stamped the design from the bottom, filling in either side, and leaving a space for a birthday sentiment.
 

To make the flower sprig you stamp the stalk and leaf image, then you stamp the flowers, then finish with a detail stamp  - and everything is really easy to line up.
 

The sentiment is a favourite from Clearly Besotted which fit perfectly in the space. I used a waterbased marker to add yellow centres to the flowers and splattered some matching ink for some extra movement.

CHALLENGES
Beautiful Blossoms has a lovely blue floral mood board and I'm linking up there, and also at their birthday celebration post - congratulations on your first birthday ladies! Glenda's Topping at Seize the Birthday this month is Splatters so lots of fun to be had there too! The stamp set I used is Never Before Used Schtuff so I'm joining in at Darnells NBUS challenge. I'm also playing along with the Anything Goes option at Allsorts this week.
 

AND IN OTHER NEWS
My neighbour has been having a clear out and hesitantly asked me if I needed any dog towels. I think she was a little taken aback by the enthusiasm of my reply! But it has rained for the last day and a half and that's all it took for the countryside to flood again. One day I'll come in and try to take my wellies off, only to find that they are welded onto my legs!! The girls are not complaining of course...

 
... the fun Water World play park is back - YAY!!

Sending hugs,

Thursday, 1 February 2024

Paper roses

Hello, crafting friends!
 
Welcome back to the Tic Tac Toe challenge! We're back with all our usual inspiration but we're giving you two weeks to join in with each board this year :) Design Team O launched the first board two weeks ago, and now it's Team X's turn to inspire you to create! I got the privilege of making the board this time and I hope you enjoy my suggestions :)
 

There are valentine rows and columns for those that love the Season of Lurve! But I've tried to make everything versatile enough for other occasions too - as shown by the bright and cheery birthday card I've made:
 

I started with my Altenew Layered Rose die set, cutting the flower and leaf layers out of left over white card. I used three shades of red for the roses, sponging them roughly to get more variation, and two shades of green for the leaves. Once they were dry, I assembled them with glue (I have double sided adhesive sheets on order!!) and set them aside.
 

The snippet of beautiful mustard-coloured paper was found deep in the designer paper drawer! I trimmed it to fit the width of a card base and cut the top diagonally. The flowers and leaves were arranged on the diagonal and glued in place. I finished with a sentiment from The Greetery's PreText Sentiments set stamped in mustard, joined with a cursive 'birthday' from a retired SU set.

Okay, it's your turn now! Here's how to play: First, hop over to the Tic Tac Toe challenge blog and admire all the amazing inspiration the design team has come up with. Second, choose a row or column from the board and create a card using the suggestions. Third, use the Linky Tool at the bottom of the post to share your card with us - we can't wait to see what you make!

CHALLENGES
I'm linking this card up at Seize the Birthday where I'm going with the Anything Goes option; also Make My Monday, where Pamela has chosen 'Use your Patterned Paper' as her challenge; The colours were chosen from Colour Dare #584 - Sundance, Jade and Candy Apple.
 
AND IN OTHER NEWS
Such a lovely bright day today! Recently, I'd promised a friend a rug we've had stored away in the garage so I asked OH to help me get it out. It took half an hour of hard labour to locate the rug and heave it out, and afterwards, perspiring gently, we uttered those terrible words: "We really must have a clear out!" We stared at each other in horror until one of us came to our senses and said hurriedly: "When it gets a bit warmer!"

Sending hugs,

Tuesday, 15 August 2023

Envelope embellishments

Hello, crafting friends!
 
This morning, I was opening mail (just bills and promotional material I'm afraid!) when my eye was caught by the inside of one of the envelopes... and my craft switch was triggered! I immediately flew off to my designer paper drawer and rummaged around for some more snippets to go with the envelope.
 

Here's what I did with them: The green dotty piece was glued to a card base and the excess trimmed away. I cut the envelope into circles with punches and reached into the white snippets folder and cut matching circles to mount the flimsy paper onto. The flowery paper was a favourite back in the day and has been hoarded forever! I had cut some of the roses out of it for another project but today I was interested in the blue flowers.
 

After fussy cutting the flowers, I glued them on my envelope paper circles, ready to use as a border. I found a white piece of card that I trimmed to two thirds of my card base width and arranged the circles down the edge, adhering them down when I was happy with the design. This is when I realised I should have stamped the sentiment first!!
 

I masked the circle off where I wanted the sentiment to go but I'm afraid I did get a tiny bit of ink onto it. Someone once said to me "If you don't have any mistakes on your cards, how are people going to know they're handmade?" I didn't like to tell her that there wasn't any way on this earth that people wouldn't know, so I let it pass! I used a shiny blue pencil to colour the 'happy' part of the sentiment, popped the panel up on dimensional pads and finished the card with some yellow enamel dots.

CHALLENGES
I'm scampering off to the Snippets Playground with my homework - see you there! I'm also linking up at The Flower Challenge where the challenge is to include spots or stripes (or both) in our floral cards. I've got some dotty paper and the envelope paper has a chevron stripe pattern on it :)
 

AND IN OTHER NEWS
It was the resourceful Sarn from the Playground who inspired me to rifle through the recycling basket as I've been impressed with all the wonderful creations she has made with discarded packaging :) Of course, I have a fluffy pal here who is more than happy to help me look for likely items.
 

How about this Mum? Er, no thank you Eva! I cannot feel that your grotty tissue will enhance a card!!

Sending hugs,

Thursday, 20 July 2023

Delicate rose

Hello, crafting friends!
 
Today I'm joining my Tic Tac Toe Challenge team mates for a wonderful new board of inspiration devised by Felicita:

I immediately went for the right hand column CAS/Sentiment/Stencil - you know I can never resist a bit of stencil fun!
 

I chose two of my favourite stencils, both from Uniko, Pure Florals Rose and Nature's Treasure. I wanted to see if I could follow the line of the rose with the curve of the leaves and I'm pleased with the way it turned out. 
 

I started with the large leaf from Nature's Treasure, sponging pale green ink into it with a dauber. The stencil comes with the leaf mask as well, so I taped that over the image while stenciling the rose in peach ink. I used the smaller leaf at the top to balance out the colours and, after removing the leaf mask, added colour and detail with coloured pencils. Finally, I stamped the birthday sentiment from Altenew's Birthday Greetings and added some clear dots for that 'fresh as the morning' look!

Okay, so now it's your turn! Do hop over to the Tic Tac Toe challenge blog and check out the amazing inspiration from the rest of the design team. You'll find the Linky Tool at the bottom of the post and you can use it when you're ready to share your own creation with us. We can't wait to see what you make!

CHALLENGES
I'm joining in with The Flower Challenge where the theme this month is to use a CAS style to showcase your flowers; I'm also playing along with Happy Little Stampers Stencil challenge where anything using stencils goes; and the Stencil Fun Challenge where the optional theme is birthdays.


AND IN OTHER NEWS
My daughter wanted a bohemian style wedding so she shunned the more traditional roses and lilies for a handful of wild flowers! I was a bit dubious about this at first ("Nothing says 'I do' like a bunch of dead flowers," I said sarcastically) but she wanted to try, so I agreed to give it a practice run. Wild flowers and grasses had been specifically grown for this event so we were able to choose a selection. I then made a posy, cut the stems to length, wrapped them in water soaked kitchen roll and wrapped them tightly in clingfilm. This was then covered in jute twine and finished with a pretty bow.
 

Aren't they pretty? And just exactly what she had envisaged! We put the bouquet in the fridge overnight and carried it about in the heat of the next day and amazingly, they stayed fresh! So we were able to go ahead on the night before the wedding and pick flowers for the tables and to create the bouquet, which my daughter whipped out of the fridge just before walking up the aisle!!

Sending hugs,

Tuesday, 30 May 2023

Stenciled Blooms

Hello, crafting friends!
 
Isn't it wonderful to receive new stash in the post?! I was lucky enough to win a voucher from The Flower Challenge a few months ago and spent it at the wonderful Seven Hills Crafts (which is the exclusive stockist of The Greetery products in the UK - and you know just how much I love those fab Greetery products!) Tara and Rick, who run Seven Hills, work tirelessly to bring popular US brands into the inky little fingers of crafters and are well worth a browse if you are in the UK or Europe and don't want to pay crazy shipping costs.
 

This card was required at short notice and I rustled it up in no time with The Greetery's Always In Bloom stencil. I stenciled the flowers on the top half of a card panel then flipped it upside down and repeated the stenciling on the bottom half. Detail was added to the flowers and leaves with coloured pencils.
 

I stamped one of my favourite Clearly Besotted birthday sentiments in between the upper and lower stenciled flowers before trimming the sides of the panel away with a stitched rectangle die. Finally, I sponged a little ink on the edges of a card base before attaching the panel to it.

CHALLENGES
I used a stencil so I'm joining in at Allsorts where Lorraine's theme is Use a Stencil or Anything Goes; also Happy Little Stampers Stencil Challenge where Anything Goes; and Crazy is our Fame - Stencils are our Game where Anything Goes with optional theme of Flowers. I also enjoyed using Never Before Used Schtuff so I'm sharing at Darnell's NBUS Challenge too.
 
 
AND IN OTHER NEWS
Poor Eva is exhausted today. We went for a walk a bit further afield yesterday as I'm trying to build up her tolerance to the car as she'll be coming with us to my daughter's wedding. She was not happy I'm afraid. She perked up once we started on the walk... until on the way back, our way was blocked by a group of young heifers at a gate. Eva is afraid of cows but luckily I am a farmer's daughter and nipped through the gate and herded them away to the far side of the field! She was not impressed though.
 

Today we had one of Eva's pals round for the day but Eva had no energy to play. Look at this aggrieved little face! Guess who is feeling like a very bad dog mummy today :/

Sending hugs,

Thursday, 27 April 2023

Happy Honeysuckle

Hello, crafting friends!
 
Welcome to another Thursday of fabulous inspiration brought to you by the Tic Tac Toe Challenge! It's Elizabeth's turn to come up with the board for you and here it is:
 
 
I found myself drawn to the colour yellow in the middle of the board and decided to go diagonal from top left with Flowers/Yellow/Gems.
 

These striking flowers are created with a stencil from Uniko. I've used it once before HERE but was excited to use it as stylised honeysuckle this time! The stencil was positioned at different angles on a card panel, yellow ink sponged into it each time. I doodled stems from each flower head and added leaves using a MFT stencil. I added detail to the flowers and coloured in my leaves with coloured pencils.


The image was cut with a Spellbinders Hemstitch die and trimmed to size, and I sponged in a background using blue ink. One of Pinkfresh Studio's Perfect Sentiments was stamped in the corner and I finished with a sprinkling of gems before mounting the panel onto a yellow card base (a left over from an old Stampin' Up kit.)
 

Right - it's over to you! Which row or column or diagonal will you choose this week? Do hop over to the Tic Tac Toe challenge blog to check out the amazing inspiration my team mates have come up with. You'll find the Linky Tool at the bottom of the post and can use it to link up your own creation with us. We always look forward to seeing what you have made :)

CHALLENGES
I'm linking up with Addicted to Stamps and More where it's the Any Occasion challenge; I'm also joining in with Happy Little Stampers Stencil Challenge where Anything Goes; AAA Birthday has a Layer It Up challenge - I've added a layered panel so that the background shows through my frame, the colouring uses layers of colour and the sentiment is layered over the flowers.

AND IN OTHER NEWS
I have been spending lots of time sprucing up the garden ready for my daughter's 'hen' party - a get together for her girlfriends to celebrate her upcoming marriage. It's a tiny little space but I've been tidying things up and reviewing the borders because I'd like everything to be looking its best. The garden has so many memories of friends and family as so many of the plants were given as gifts. There's a honeysuckle, given by a friend as a moving in present over 20 years ago. A beautiful scented rambling rose was another gift that has kept on giving, as well as a rose from my family to celebrate my 50th birthday. There are foxgloves that my youngest son brought home from the garden centre in a backpack on his bike because he knew I loved them; hydrangeas that remind me of a place we used to holiday at; many geraniums because I can never resist them; and a peony that rose from the dead long after I had despaired of it! No pictures because it has poured with rain all day... Where is the spring?!

Sending hugs,

Friday, 3 March 2023

Spring in the country

Hello, crafting friends!
 
I've been having such a lovely time playing with the 3D embossing folders I recently acquired! Today's card started life as an experiment and I kept adjusting it and adding to it until finally I think it works!
 

I started by embossing a card base with the Daffodil Delight embossing folder by Altenew, letting the image hang off the edge. I wondered if I could watercolour it and so I coloured the flowers with water and inks, adding a wash of colour on the background and finally some splatters of ink. I let this dry. Of course the main problem was that I had used a standard card base and the image warped badly so I left it under a pile of heavy books and forgot about it :)
 

When I eventually came back to it, I was surprised at how well it had flattened. It looked all wrong though; the top of the card was all empty and not in a good 'white space' kind of way! I came up with the notion of scoring a pair of lines to separate the coloured area with the top of the card but it wasn't a great solution. That's when I suddenly thought of raiding the snippets drawer!
 

I gave the card a country look with a snippet of fabulous gingham paper and added a strip of coral card. I found a sentiment which fit the space perfectly and coloured it with a marker. The final touch was a bow, die cut from another snippet of coral card with an MFT die.
 

Here are the snippets I used.

CHALLENGES
I am linking this card up with Four Seasons where March sees the shift to spring! Happy Little Stampers Birthday is back with an Anything Birthday-themed Goes challenge so I'm playing along there; and This card is also my homework for the Snippets Playground where I hope there's some hot chocolate left because my hands are freezing!
 

AND IN OTHER NEWS
Isn't springtime wonderful? The flowers, the sunshine, the animals becoming frolicsome...
 

Here is a frolicsome dog for example. She is dripping wet because she has just frolicked in the river and now she is about to frolick in the earth. That face is saying "Promise me extra meaty chunks for tea, or I roll!"

Sending hugs,

Monday, 13 February 2023

Delighting in daffodils

Hello, crafting friends!
 
Where oh where does the time go?! I skip about thinking I'm all ahead of the game when all of a sudden, the things I should have done jump out at me and I realise that I'm not only NOT ahead of the game, but am dismally far behind it. So today's card was made with my fingers in my ears, saying "La la la, I can't hear you" to the chores!!
 

I've been dying to have a play with these 3D embossing folders that lots of you have been showcasing so I spent some of my Christmas money on several, including this one: Daffodil Delight by Altenew. I wondered if it would work to emboss just parts of the pattern, snip it out and colour it, and it turns out it works very well!
 
 
I coloured my fussy cut daffodils with alcohol markers and I love the dimension the embossing gives them. To assemble the card, I trimmed a snippet of Craft Consortium designer paper to size with a stitched rectangle die, attached it to a card base and layered my daffodils over the top. To finish, I stamped a sentiment from Uniko's Simply Said Blocks, snipped it out and gave it a ribbon tail on one side before adding it to the card front.
 

 I used just two snippets to create this card and the card base.

CHALLENGES
I followed Linda's fabulous sketch at Freshly Made Sketches so I'll link up there; This is my homework for The Snippets Playground where the challenge is to make a card with snippets; Over at the As You See It challenge Deborah has come up with a fill-in-the-blank for us: My favourite thing about spring is... I love watching the spring flowers come to life so I'm entering this card there too.


AND IN OTHER NEWS
The daffodils are making a supreme effort to come out along the path before we get to the fields behind our house.
 
 
Eva is very interested in them and, while I would love to think she is planning horticultural extravagances, I suspect the vulgar truth is that one of her pals has had a wee over them!!!

Sending hugs,

Sunday, 12 February 2023

Stenciling a garden

Hello, crafting friends!
 
I love stencils!
 

This card was made with the Flower Bouquet Builder stencil by MFT. I love how versatile this stencil is (look at THIS very different card made with it!)
 
 
This time, I sponged blue ink the bottom of a panel, fading upwards. Over the top I stenciled a leafy sprig several times, varying the position and height. These were topped with pretty flower tops in three sizes.
 

The panel was cut using a large arch die from The Greetery and topped with an ornate birthday sentiment from the Arched Sentiments stamp set and matching die. The arch was attached to a card front using dimensional pads.

CHALLENGES
I'm linking this card up with the Stencil Fun Challenge where Anything Stenciled Goes with Optional Hearts; also AAA Birthday where the team want to see birthday cards made using stencils; I was inspired by Joanne's colour challenge at CAS Colours & Sketches too.


AND IN OTHER NEWS
We've been having some wonderful walks lately. The weather has been dry and warmish and the dogs have wasted no time in taking the opportunity to have a swim!
 

There are no changing rooms or towels to hand but an enthusistic game of chase soon dries a pup off!!

Sending hugs,