Pages

Showing posts with label Letterpress Winter (SU). Show all posts

Tuesday, 6 February 2024

Snippety hellibores

Hello, crafting friends!
 
The other day, the postman came to my house with an exciting package full of stamps and dies. It was a bumper prize from The Snippets Playground that I was lucky enough to win in the draw when we were celebrating 12 years of the lovely Miss Di wielding the keys to The Playground. It was thrilling to examine each item and think about what I could do with it but, because the goodies are Christmas-themed, I have put them to the back of the NBUS box for an fun-filled moment when I'm ready for some festive action! Before I did so though, I spotted a little single hellibore in a Crafters Companion Christmas stamp set...
 

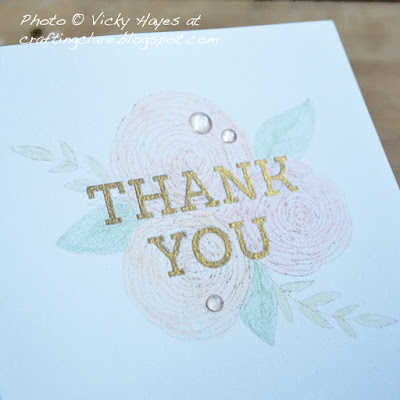
... and I thought I'd rustle up a card with not a fleck of glitter or tinsel to be seen! I stamped the flower in pale pink ink, multiple times on white card snippets, then coloured them with markers, fussy cut them and set them aside. I didn't know what hellibore leaves looked like so I looked them up and found they were similar to passion flower leaves. Bingo! Out came my Uniko Passiflora stamp set!
 

The leaves from the set were stamped onto a card base in two shades of green ink. The hellibore flower heads were arranged over the leaves. I glued them down once I was satisfied with the arrangement, trimming the overhang at the edges of the card base with paper snips.
 

The sentiment is a favourite from a long-retired SU set. I stamped it first in black ink using my stamping platform, then in the dark green ink to create a very dark shade of the green - don't know if you can see that on your screen. I find this is a good way to tie a sentiment into a coloured image.
 

Here are the snippets I used - the off cut strips were the perfect size for the hellibores! I only used one strip in the end, so look out for another hellibore card here soon!!

CHALLENGES
I'm nipping over to The Snippets Playground with my homework and will take advantage of the warmer weather to have a go on the swings. Head Prefect Sarn mentioned there might be hot chocolate in the tree house so I've got some squirty cream and sprinkles in my satchel! Come and join me!


I'm also joining in with the fun bingo grid at Allsorts, choosing the Distress Ink/Green/Flowers diagonal from top left.

AND IN OTHER NEWS
I'm afraid the golden girls found a dead squirrel out on our walk today so I've had to go for a lie down on a chaise longue with the smelling salts at hand. All my 'Give' training paid off and I managed to get the corpse off Lulu (with a poo bag serving as a makeshift glove) and I chucked it over the hedge. Off we went, with the girls on lead until we got round the corner. I thought I had dodged a bullet but as the path looped round, Lulu suddenly broke away and galloped towards the Scene of the Crime! She returned shortly afterwards with the wretched squirrel in her mouth... I know when I'm beaten so I just hurried away with Eva on lead and Lulu followed us and finally dropped her prize. Relating this story to my youngest son on the phone later, he laughed and said she'd probably convinced herself that she had tracked the squirrel for three days and had fearlessly attacked and overcome it all by herself! Bit like those fishermen who have always caught a massive fish but er... threw it back in the water of course!!

Sending hugs,


Friday, 24 February 2023

Rustic Garden

Hello, crafting friends!

The delicate little flowers on today's card are made with my favourite crafty item at the moment - the Botanicuts Wildflower Mix dies from The Greetery. They are quite fiddly but absolutely addictive!
 
 
I coloured my flowers with sponge daubers before glueing them together.
 

To showcase my flowers, I used a kraft card base and cut a matching panel using one of the Nordic Frame dies, also from The Greetery. I made a background by scribbling on the panel with a white watercolour crayon then glued the flowers on it in a curve. 
 

Finally, I stamped a sentiment from an old Stampin' Up set and popped up another sentiment from Uniko's Floral Vines over the top of it.

CHALLENGES
I've been wanting to join in with The Flower Challenge's Use Your Latest Stamps/Dies theme all month and think I will just get this card in before the deadline!


AND IN OTHER NEWS
I have become very, very fond of this little cutie!
 

He's quite a dignified chap who turns into a little babe when he falls asleep!

Sending hugs,

Friday, 14 January 2022

Barely there stamping

Hello, crafting friends!
 
Things are quite peaceful around here so I am making the most of it and getting the stamps out! I had a vision in my head of a large gold embossed sentiment with a feminine barely-there image behind it. Here's how it worked out:
 

I started with a bold sentiment from an old Stampin' Up set called Letterpress Winter, heat embossing it straight onto a thick card base with gold embossing powder.  The card base warped a bit so I sandwiched it between a sheet of copier paper and ran it through my Big Shot to flatten it.
 

The flowers, from Clearly Besotted's Just For You,were inked up with neutral ink, stamped off once and then stamped again over the top of my sentiment, resulting in a very pale outline. I chose pale shades of peach, pink and green to colour the image and finished with some clear drops.

CHALLENGES
I was very excited by Joanne's sketch at CAS Colours and Sketches this week (waves to my ex-teamies there!) and couldn't wait to give it a try; I'm also joining in at Watercooler Wednesday where Tristan is hosting an All Things Feminine challenge.
 

AND IN OTHER NEWS
Playing with these pale shades today made me think wistfully about the summer when these are the kind of colours I like to wear. My daughter, who nick-named me Crafting Clare whenever I got my crafty stash out, likes to tell me I look like a sugared almond in the summer!

Sending hugs,


Tuesday, 18 May 2021

A layering of stencils

Hello, crafting friends!

Welcome to another fabulous challenge at  CAS Colours and Sketches! Samantha, our lovely hostess, has chosen a gorgeous colour combination for us to try.


I have a lovely thistle stencil from Funky Fossil which I thought would suit these colours. 


I started by masking off the edges of a card base and blending pink ink out to a fade from the bottom left hand corner. The same ink was used through Funky Fossil's Fancy Trellis stencil over the top and then I placed the thistle over the top of that and inked the green and purple through it. 


The green and purple look much darker than in the colour palette doesn't it, but I did actually use Sea Foam and Highland Heather, so it must just have been intensity of the sponging. Finally, I stamped a bold sentiment from a retired Stampin' Up set and added some clear gems.

So now it's your turn! Do check out the inspiration from the team at the CAS Colours and Sketches challenge blog! You can link up your creation there too - but don't forget we are a clean and simple challenge and we like to see plenty of white space and the minimum of layers :) Have fun!

CHALLENGES
I'm joining in at the Die Cuts and/or Stencils challenge at Addicted to Stamps and More; I'm also linking up with the Anything Goes themes at Happy Little Stampers Stencil challenge and Stamplorations Stencil Challenge.


AND IN OTHER NEWS
The thistle gets a pretty bad rap but I think they are beautiful plants. According to Symbol Sage, the thistle symbolises resilience and, in Celtic regions, represents 'devotion, bravery, determination and strength.' Sounds pretty positive to me! The blog has all sorts of interesting things to learn about the thistle including some brilliant myths and stories, so do check it out :)

Sending hugs,

Tuesday, 4 May 2021

Simply thank you

Hello, crafting friends!

Welcome back to CAS Colours and Sketches where we have a brand new hostess (hello Samantha!) and a gorgeous colour combination for you to play with.


Reflecting the Pantone colours of the year, these are bang on trend, so I've used them to give some of my older stamp sets a fresh new twist!


To start my simple one layer card, I sponged yellow ink into Funky Fossil's Arched Window stencil, holding it upside down to make a tag shape at the top of a card base. Next came the sentiment, from the retired Letterpress Winter by Stampin' Up, positioned in my stamping platform and stamped in the darker grey.


I masked off the sentiment and used the lighter grey to stamp the flower and a leaf from Uniko's You Are Yes You above it. Coloured pencils were used to colour the petals and as a finishing touch, I added a shadow to one side of the tag to give it a bit more dimension, and a couple of clear dots.

Are you ready to join in with this week's challenge? As always, there is some wonderful inspiration over at the challenge blog where my team mates have pulled out all  the stops. You'll find the Linky Tool there too and will be able to link up your own creation. Don't forget to keep it clean and simple!

CHALLENGES
Normally, I look for a sketch or photo inspiration to get me started with a card but today I was inspired by the arched window stencil which made me think of a tag! I'm joining in with AAA cards' Up To One Third challenge and choosing not to go with the optional twist this time.


AND IN OTHER NEWS
The weekend just gone has been the May Day holiday weekend across the UK and we celebrated with a lovely long walk in the sunshine in a local woods famous for its bluebells. We were all - even Eva - quite tired by the end of it. 


Most of the weekend was warm and dry but on Monday strong winds and showers made our walks much brisker and my crafting more extensive! There has been some damage in the garden which has saddened me - watching everything come out has been so rewarding. But the plants have time to grow back so all is not lost.

Hope you've enjoyed your weekend too. Sending hugs,

Sunday, 18 April 2021

Leaves in different ways

Hello, crafting friends!

Everyone has favourite types of stamps don't they. Many of us can't resist flowers but I'm also attracted by bird stamps, dog stamps and, more obscurely, furniture stamps. Not to mention tree stamps and leaf stamps - which brings me to today's post where I've used a large leafy stamp in a couple of different ways.

CARD ONE


This is a very simple card made by stamping Large Background Tropical Paradise from Uniko in green ink, trimming it with a stitched rectangle die from Heffy Doodle and attaching it to a card base.


The sentiment is from Stampin' Up's Letterpress Winter (retired.) I stamped it in Versamark ink and heat embossed with gold embossing powder for a nice shiny look. It was cut out with a stitched label die from The Works and popped up on the background with dimensional pads.

CARD TWO


I stamped the same leafy stamp in green again. This time I used alcohol markers to colour the image, then cut nine circles out with a 1" circle punch. I arranged these on a card panel cut slightly smaller than my card base.


The sentiment is from Concord & 9th's Enjoy It All, stamped in dark green and heat embossed with clear embossing powder  - couldn't quite capture the shine in this photo, but it's lovely and glossy! The card panel was attached to the base with dimensional pads.


Here are the two cards together. They're very different aren't they, but both are quite masculine designs.

EDITED TO ADD AN AWARD
These cards got an Honourably Mention at the Twofer Challenge!

CHALLENGES
I made these cards for the Twofer Challenge where we are asked to make two cards, two different designs, for two different occasions using the same stamp/die/stencil; I'm linking both up with Tristan's Masculine challenge at Watercooler Wednesday too.
Card One uses two dies so I'm joining in with Happy Little Stampers Die challenge where Anything Goes.
Card Two was made using Cécile's beautiful sketch at Freshly Made Sketches so I'm playing along there.


AND IN OTHER NEWS
I can talk all I like about favourite types of stamps but I know what you're thinking... I just like stamps don't I! It would be much quicker to make a list of the kinds of stamps I DON'T like! And I suspect that goes for many of you too :) 

Sending hugs,

Monday, 30 December 2019

Sending thanks in the post

Hello crafting pals!

All the menfolk have gone away to do Manly Things. When asked if I'd be ok on my own, I just did Mutley laughter... I mean, whatever would I think of to do?!!! My craft stash is spread around the living room as we speak and I've made a very quick thank you card. Come and see:


I used Stampin' Up's Letterpress (retired) for that nice bold sentiment and the branch from MFT's Grateful which has proved to be a very useful purchase.


I've gone a bit off-piste with my colours but I kind of like them: dark brown for the sentiment, bright green for the branch and orange for the berries. The berries were punched out using the largest hole on my cropadile.


This is such a quick card - I might make some more of them in different colourways!

CHALLENGES
I noticed that CASology has a Branch cue word, and the challenge is ongoing until 6th January, so I shall link this card up there.


AND IN OTHER NEWS
I'm slowly clearing away the Christmas things and smiling as I remember the fun we had: a noisy family game of Sky-o, brought by my daughter, which was the best fun; when my husband said we'd reached 'dangerously low levels of cheese'; being thanked by my eldest son for 'making Christmas happen every year'; watching the film Paddington with my youngest son and laughing until we cried; Eva's enthusiasm at opening her presents (sadly only blurry photos!) - and a million more memories.


Hmm, might have been a little heavy handed with the brandy this year but our blazing pudding certainly got a huge round of applause!

Hope you're enjoying the Twilight Zone between Christmas and New Year as much as I am. Do let me know what you're up to in the comments below :)

Hugs,

Sunday, 8 December 2019

Designer paper? Make it yourself!

Hello crafting friends!

Like most crafters, I have a lovely big pile of designer paper that never really seems to go down. And it's not surprising really when it's so much fun making your own! Come and see:


The panel on this card started life as a simple piece of aqua card stock. I stamped it repeatedly with the dotty line in Uniko's Background Builders Classics, using Stampin' Up's Daffodil Yellow ink. Because it's a photopolymer stamp, it's easy to curve into a 'garland of beads'. I stamped over these with the fir branch from Winter Foliage, also by Uniko, using Stampin' Up's Granny Apple Green.


I wanted glitter and shine and different finishes, so I used gold Stickles on some of the beads, my gold Stampin' Dazzle pen on others and left the rest unembellished.


I felt the panel demanded a bold sentiment, so I pulled out Stampin' Up's Letterpress (retired), stamped it with Memento black ink, cut it out with my trimmer and popped it up on dimensionals.


CHALLENGES
I'm joining in with CAS(E) this Sketch where the sketches always get me going - and  it's so lovely to see my friend LeAnne guesting there this week :) The Colour Throwdown has a gorgeous Aqua, Green, Gold and White colour palette which really inspired me, so I shall link up there too. Finally, this is my second entry into the current Uniko challenge - Christmas with optional Tree.


AND IN OTHER NEWS
So, it's December. For many, this is the month for writing Christmas cards, planning family get-togethers, wrapping presents... but for Eva, it's the perfect month for jumping into the river and pretending to be a duck!


So how are you spending your December so far? And please note that I'm desperately hoping someone is going to send me a picture of themselves in a river dressed as a duck!

Hugs,